How to Make Scrapbook Embellishments From Paper Scraps and Stamps

The finished result: How to Make Scrapbook Embellishments From Paper Scraps and Stamps
  • Difficulty: Easy
  • About 45 minutes
  • 10 steps

You tapped Save

Save this project for later

We'll email you a link, no password.

How to Make Scrapbook Embellishments From Paper Scraps and Stamps

  • Your saved projects in one list
  • Your ticked steps on any device

Check your inbox for an email from us. Not there? Look in your spam folder.

Print

Steps written out by Crafting Step by Step from Ashley Fowler's video (opens YouTube) (6:07). Published .

Also in:Paper Crafts

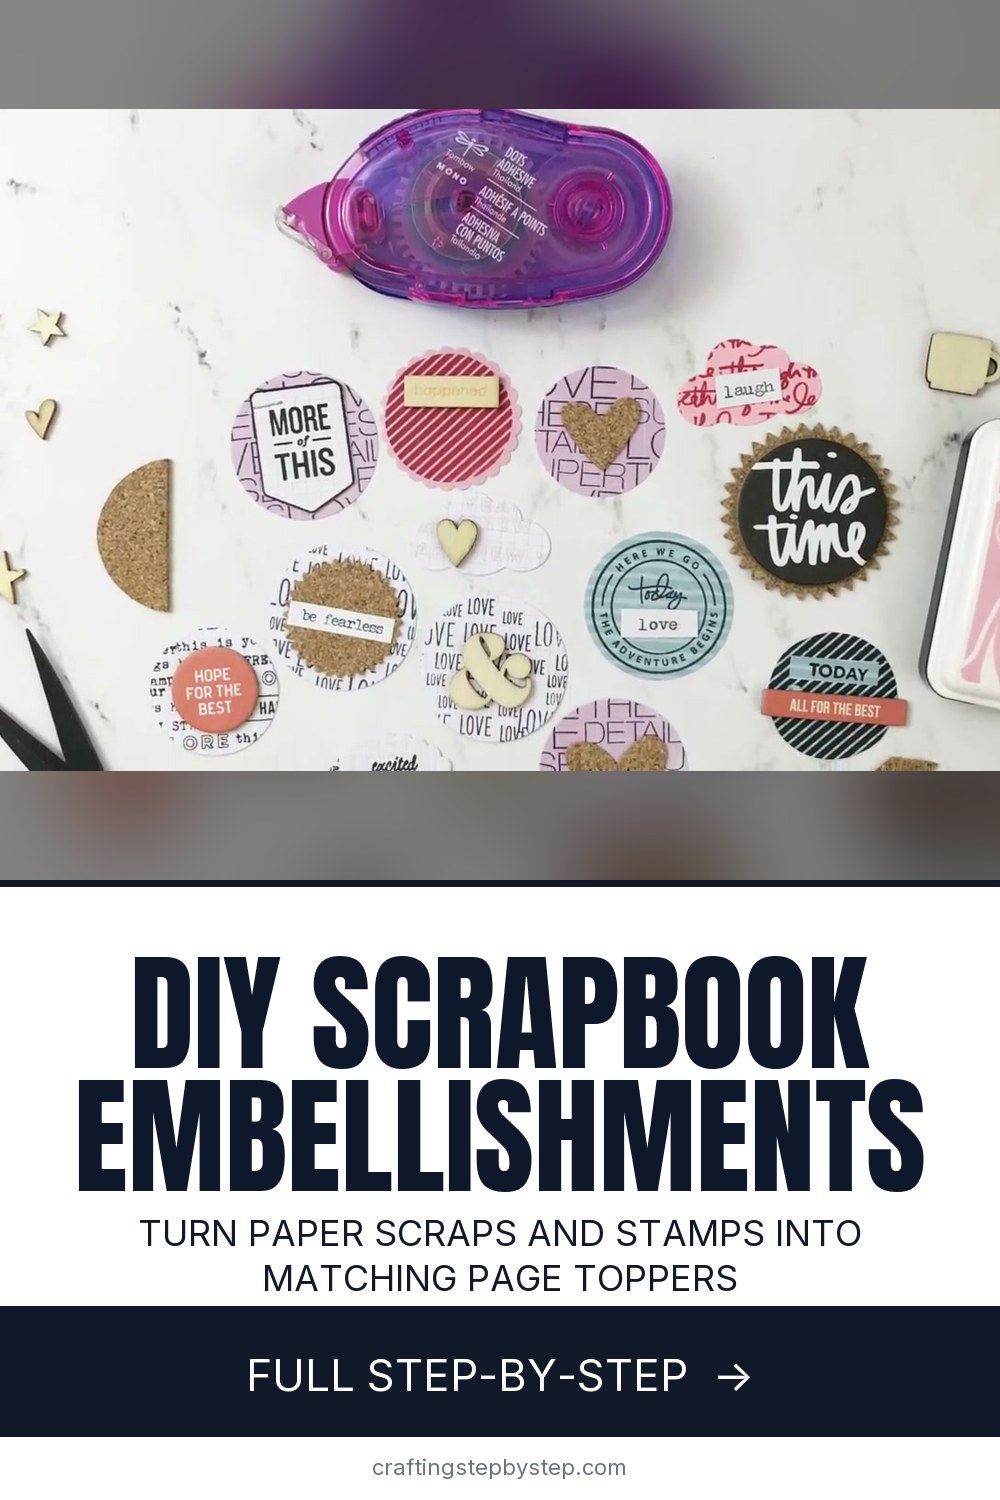
Store-bought embellishments add up fast, and half the time they do not match your page. Ashley Fowler makes her own from the scrap bin. She stamps words and sentiments onto paper scraps (even the back of product packaging), punches them into circles, clouds and scallops, then layers them with cork and wood veneer. The result is a stack of flat, matching pieces sized for scrapbook layouts, Project Life cards and planners.

How to make scrapbook embellishments: the short version

  • Pull paper scraps, clear stamps and two or three ink colors.
  • Stamp a word background or a single sentiment on each scrap.
  • Punch the stamped areas into circles and other shapes.
  • Layer a small shape on a bigger one, add cork, veneer or a typed word.
  • Stick everything together with dot adhesive or a tiny stapler.

What paper to use

Almost anything flat works. Ashley's favorite find was the back of a paper packaging sleeve with a printed grid. Matte paper takes ink best. Glossy paper smears. Try cardstock offcuts, patterned paper you did not love on a page, envelopes, receipts, book pages and kraft bags. Patterned paper is worth trying as a stamping base too, even though most people only think of white.

Choosing ink

A crisp black pigment ink like VersaFine gives sharp small text that reads well at embellishment size. Add one dark accent (Ashley uses navy) and one soft color (pink). Three colors keep the set matching. If a stamp prints patchy on patterned paper, swap to a bolder stamp or re-ink and press longer, rather than stamping twice on the same spot.

Punch sizes that work

A 1.25 inch and a 1.5 inch circle punch cover most needs. Layer the small circle on the large one for an instant two-tone piece. A scalloped punch gives a frame, and a cloud punch adds a softer shape. Punch upside down so you can see exactly what word lands in the middle.

Keep them flat

Ashley's style moved toward simpler embellishments because she uses them in Project Life pockets and planners every week. Bulky clusters will not fit in a page protector or close a planner. One layer of paper, one of cork or veneer and a word strip is plenty. Save the thick 3D pieces for album pages that lie open.

Where to use them

  • Corners of a photo on a scrapbook layout
  • Project Life and pocket page cards
  • Planner and junk journal pages
  • Gift tags, card fronts and envelope seals

Common problems

  • Ink smudges. Pigment ink dries slowly on coated paper. Give it a few minutes before you punch.
  • The punch jams. Thick or layered paper can stick. Punch single layers and rub wax paper through the punch now and then.
  • Pieces look random. Stick to one color palette across the batch.

More scrapbooking ideas

New to the hobby? Start with how to scrapbook. Use your pieces on a pocket page or in a junk journal, and frame them with washi tape.

Free printable

Print the steps and supply list for this project

One page you can take to the table. Free with a free account, no password.

Get the free printable

What you'll need

Free, for this project

Get this checklist by email

  • All 14 tools and materials, with tick boxes
  • A link to print all 10 steps on paper, to keep by you while you craft

No password. The whole tutorial stays free on this page.

Quick answer

Make your own scrapbook embellishments. Stamp paper scraps, punch circles and clouds, then layer with cork and wood veneer. Flat and planner friendly. An easy project: about 45 minutes. You need 14 things, including paper and cardstock scraps, clear word and sentiment stamps and black pigment ink pad. The 10 steps start with gather Paper Scraps, Stamps and Ink for Scrapbook Embellishments, stamp Words All Over a Scrap Paper Background and stamp a Sentiment on a Cardstock Scrap.

Step-by-step guide

10 steps, about 6 minutes. Tap a picture to jump to that step. Your progress saves automatically.

Tick each step off as you go.

  1. Step 1: Gather Paper Scraps, Stamps and Ink for Scrapbook Embellishments

    Watch this step · 0:14

    Pull a handful of paper scraps, a few clear stamp sets and two or three ink pads. Ashley starts with the back of a product packaging sleeve that has a printed grid. She liked how it looked when she used it as scratch paper. A matte finish takes ink well. Add an acrylic block for the stamps and set out your punches.

    Tip:

    Pick a small palette, like black, navy and pink, so the pieces match.

    Back to all steps

  2. Step 2: Stamp Words All Over a Scrap Paper Background

    Watch this step · 0:26

    Ink a small word stamp and press it onto the scrap again and again, turning it a little each time. Overlap the edges so the words build a busy, all-over texture. You are not making one neat sentiment here. This becomes background paper, and the punch will pick out a random patch of words later. Black pigment ink keeps tiny text crisp.

    Tip:

    Re-ink every two or three impressions so the print stays even.

    Back to all steps

  3. Step 3: Stamp a Sentiment on a Cardstock Scrap

    Watch this step · 1:52

    Now stamp single sentiments on other scraps. Ashley adds a round stamp to a blue striped cardstock offcut. Round stamps are handy because a circle punch fits right over them. Leave space between impressions so each one can be punched out on its own. Use a darker ink on light paper and a light ink on dark paper.

    Tip:

    Stamp a few spares. One always prints crooked or faint.

    Back to all steps

  4. Step 4: Stamp Round Sentiments on Patterned Paper Scraps

    Watch this step · 2:32

    Try stamping on patterned paper too. Ashley puts navy round sentiments on pink patterned scraps, which gives each piece color with no extra layer. If a stamp does not print well on a busy pattern, switch to a bolder design. She swaps to a word stamp and covers another scrap with "love these details" for a second background.

    Tip:

    Press straight down and lift straight up to avoid a doubled image.

    Back to all steps

  5. Step 5: Punch Circles From the Stamped Paper Scraps

    Watch this step · 3:12

    Flip the circle punch upside down and slide the stamped paper in so you can see where the circle lands. Center the round sentiments, or catch an interesting patch of the word background. Punch a mix of sizes. A 1.25 inch and a 1.5 inch punch let you stack one circle on another later. Keep the pieces in a little pile as you go.

    Tip:

    Let pigment ink dry a few minutes first, or it smears in the punch.

    Back to all steps

  6. Step 6: Punch Scalloped and Cloud Shapes for Embellishments

    Watch this step · 3:36

    Switch to shaped punches for variety. Ashley uses a scalloped circle punch for the red and pink pieces and her favorite cloud punch for a lighter stamped paper. A scallop makes a frame behind a plain circle. The cloud is a softer shape that breaks up a page full of rounds. Punch two or three of each.

    Tip:

    Save the punched-out holes. The leftover frames make fun backgrounds too.

    Back to all steps

  7. Step 7: Layer a Stamped Circle on a Scalloped Circle

    Watch this step · 4:22

    Start pairing pieces. Set a small stamped circle on top of a bigger scalloped circle and stick it down with dot adhesive. Ashley also puts a piece of cork behind a purple circle and stamps right on top of it. Two layers are enough. More than that gets bulky in a page protector or a planner.

    Tip:

    Offset the top circle slightly for a more casual look.

    Back to all steps

  8. Step 8: Add Wood Veneer Pieces to the Embellishments

    Watch this step · 4:30

    Dig into your wood veneer for small accents. Hearts, stars, ampersands and tiny mugs all work. Look for one that fits the word on the circle, or one that echoes a shape on your page. Ashley tries a few on the scalloped stamped piece before choosing. Stick each veneer down with a strong dot of adhesive.

    Tip:

    Veneer is thin, so it stays flat. Chunky wood pieces will not fit in pockets.

    Back to all steps

  9. Step 9: Attach a Typed Word Strip to a Paper Embellishment

    Watch this step · 4:46

    Type a few short words on cardstock with a typewriter, or print them small, and trim each into a thin strip. Ashley adds one to the "today" stamp and two more to other pieces. Stick them across the circle with adhesive, or fix them with a tiny stapler for a handmade look. The strip adds a personal note to a generic stamp.

    Tip:

    Words like "today", "love" and "be fearless" fit almost any page.

    Back to all steps

  10. Step 10: Top the Scrapbook Embellishments With Cork Hearts

    Watch this step · 5:40

    Finish a few pieces with cork. Ashley pre-cuts adhesive-backed cork into hearts, half circles and scallops, so she can peel and stick. Press a cork heart onto a stamped circle and the set is done. Lay everything out together and check that the colors and shapes look like one family. Store them flat in a bag.

    Tip:

    Cut a whole sheet of cork shapes at once so you always have some ready.

    Back to all steps

How to Fussy Cut Patterned Paper

Keep going

How to Fussy Cut Patterned Paper

10 steps · about 10 minutes

Keep going with scrapbooking

More on this topic, picked for this project.

You reached the last step

Save this project to come back to it

Your ticked steps, the free printable and your other saved makes, together in My Projects. Free, no password.

You tapped Save

Save this project for later

We'll email you a link, no password.

How to Make Scrapbook Embellishments From Paper Scraps and Stamps

  • Your saved projects in one list
  • Your ticked steps on any device

Check your inbox for an email from us. Not there? Look in your spam folder.

Free printable

Printable sheet and shopping list for this project

The bonus is hidden until you sign up.

Free with a free account, no password. Every step above stays open to everyone.

Products Used

The Checklist

How to Make Scrapbook Embellishments From Paper Scraps and Stamps

Tools
7
Materials
7
Steps
10
Video
6 min

Tools we recommend

As an Amazon Associate we earn from qualifying purchases. Links on this page may be affiliate links - clicking them and buying doesn't change your price, but helps support Crafting Step by Step.

Tags

The Crafter's Weekly

New scrapbooking tutorials, every Sunday

One short email with the week's best step-by-step guides. Free, no spam, unsubscribe anytime.

Did this work for you?

What's next

Related collections

Curated theme pages that include this tutorial.

Similar tutorials

Hand-picked next reads based on the one you just finished.

Liked this scrapbooking tutorial?

Pick the crafts you want to hear about. One email every Sunday with new step-by-step tutorials. No spam, easy to unsubscribe.

Get more like this in your inbox

Weekly digest. Pick the categories you want. Unsubscribe anytime.

Send me tutorials about

We only email about new tutorials. Easy unsubscribe anytime.