How to Paint a Moonlit Lake in Acrylics

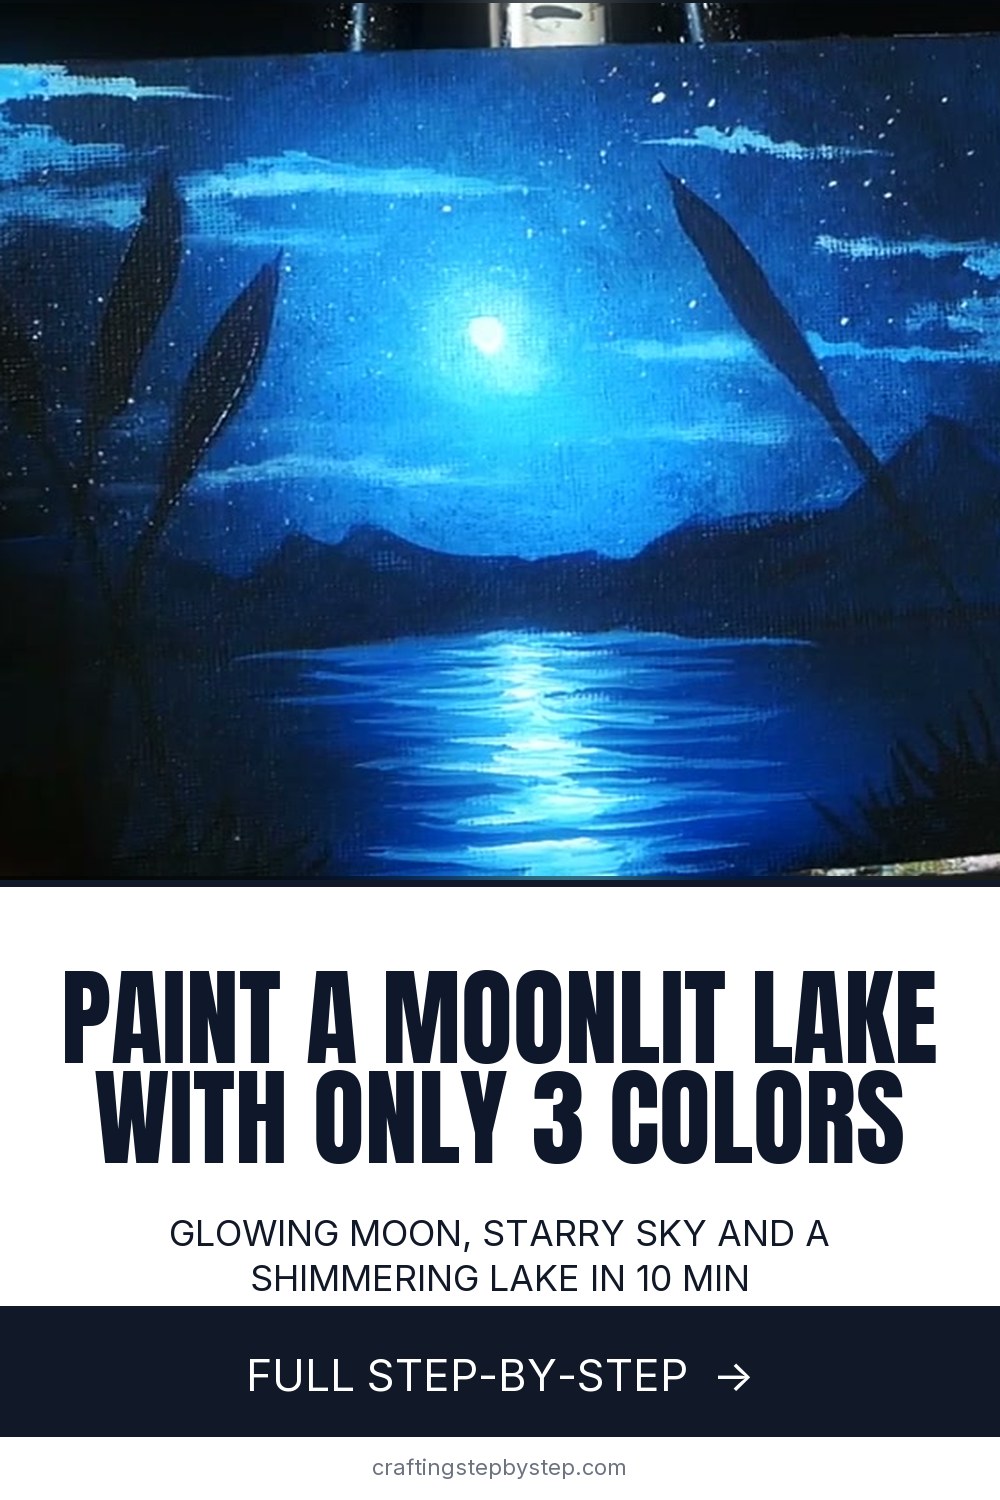
The finished result: How to Paint a Moonlit Lake in Acrylics
  • Difficulty: Easy
  • About 45 minutes, plus 15 minutes to dry or set
  • 10 steps

You tapped Save

Save this project for later

We'll email you a link, no password.

How to Paint a Moonlit Lake in Acrylics

  • Your saved projects in one list
  • Your ticked steps on any device

Check your inbox for an email from us. Not there? Look in your spam folder.

Print

Steps written out by Crafting Step by Step from Stay Creative Painting with Ryan O'Rourke's video (opens YouTube) (12:55). Published .

Also in:Crafts

A moonlit lake is one of the most satisfying night scenes you can paint in acrylics. Ryan O'Rourke of Stay Creative Painting finishes this one in about ten minutes with three colors: titanium white, primary blue and Mars black. You end up with a glowing sky full of stars, dark mountains, black bulrushes and a bright path of moonlight across the water.

How to paint a moonlit lake: the short version

  • Paint a light blue glow in the middle of the sky and blend it out to dark edges.
  • Tap and spatter stars while the sky is still wet.
  • Add dark mountains, then lay in the lake, light in the middle and dark at the sides.
  • Paint pure black bulrushes and grass up close.
  • Pull the moon's reflection across the water with short sideways strokes, then add clouds.

Why three colors are enough

Every color here is a mix of white, blue and black. That keeps the whole scene in one cool moonlit key, so nothing looks pasted on. The mountains and the dark water get black mixed into blue. Only the bulrushes and grass get black straight from the tube. Pure black is the darkest value in the painting, and putting it closest to you is what pushes the mountains and the moon far back.

Keep the sky wet

Ryan starts with a damp brush. The extra water slows drying, which buys you time to blend the glow, tap stars into it and fix the gradient. If the dark edges creep too far in, add more white and blue to the middle and blend out again. Acrylic is forgiving here. You can always push a patch lighter or darker.

Smooth, streaky or starry

You have three choices for a night sky. A soft touch with plenty of paint gives a smooth, empty sky. Visible strokes give a lively, Van Gogh feel. This painting goes for stars. Pick one look and carry it across the whole sky.

Make a star brush

The tapping brush is an old square brush with bristles that splay in every direction. Each stray bristle leaves its own dot, so you get hundreds of faraway stars in a few seconds. No old brush? Bend back the bristles on a cheap flat brush until it looks scruffy, and keep it for texture work.

Common problems

  • The moon looks dull. The sky was still wet. Plot the moon early, then go over it with pure white once the sky is dry.
  • Spatter dots are blobs. Add more water and pull the bristles back gently. Test on a paper towel.
  • The reflection looks like a stripe. Soften its edges with a light touch so it fades darker toward the sides.
  • The mountains vanish. Go over them with a darker blue and black mix.

Size and display

A small canvas around 8 by 10 inches suits a ten minute painting. A black canvas, or a black base coat, gives you a head start on the night. Paint three with different moons for a calm wall group, or set one on a tabletop easel as a gift.

More night and water paintings

For a sky-only version, try how to paint a full moon night sky, or go bigger with how to paint a galaxy. Brush up on blending acrylic paint, then practice painting water and painting clouds on their own.

Free printable

Print the steps and supply list for this project

One page you can take to the table. Free with a free account, no password.

Get the free printable

What you'll need

Free, for this project

Get this checklist by email

  • All 11 tools and materials, with tick boxes
  • A link to print all 10 steps on paper, to keep by you while you craft

No password. The whole tutorial stays free on this page.

Quick answer

Paint a moonlit lake in acrylics with only three colors. An easy project: about 45 minutes, plus 15 minutes to dry or set. Materials cost about $4 to $10. You need 11 things, including 8x10 black canvas, titanium white acrylic paint and primary blue acrylic paint. The 10 steps start with paint the Moonlit Sky Glow in the Center of the Canvas and blend Dark Blue Edges Into the Night Sky Glow.

Step-by-step guide

10 steps, about 13 minutes. Tap a picture to jump to that step. Your progress saves automatically.

Tick each step off as you go.

  1. Step 1: Paint the Moonlit Sky Glow in the Center of the Canvas

    Watch this step · 1:08

    Dampen a medium square brush. Mix about equal parts titanium white and primary blue and lay a patch in the middle of a black canvas, right where the moon will sit. Pick up more blue and work it around the outside of that patch, semi blending the two. Stay loose and rough for now. The water on the brush keeps the paint wet longer so you can drag it further.

    Tip:

    A light pencil or chalk sketch of the horizon and bulrushes helps you place things later.

    Back to all steps

  2. Step 2: Blend Dark Blue Edges Into the Night Sky Glow

    Watch this step · 2:56

    Mix equal parts Mars black and primary blue and brush it onto the left and right sides of the sky. That dark frame is a vignette. Blend it in toward the light so the sky moves from bright in the middle to dark at the edges in an even gradient. Keep the brightest spot centered. If the dark takes over, add more light mix back to the middle and blend out again.

    Tip:

    Cover the whole sky in wet paint before you start on the stars.

    Back to all steps

  3. Step 3: Tap Tiny Stars Into the Wet Night Sky With a Worn Brush

    Watch this step · 4:26

    Switch to an old square brush whose bristles splay out. Tap it lightly on the wet sky, starting in the bright center and working out in circles. Each loose bristle leaves a tiny speck, and the light flecks against the darker paint read as far off stars. Working from the middle outward stops you from dragging dark paint back into the glow.

    Tip:

    No worn brush? Bend back the bristles of a cheap flat brush until they fan out.

    Back to all steps

  4. Step 4: Spatter Bigger Stars and Plot the Moon in the Night Sky

    Watch this step · 5:23

    Load a small round brush with lots of water and a little titanium white. Hold it near the canvas and pull the bristles back with your thumb so the paint flicks onto the sky. These dots land bigger and closer than the tapped stars. Then dab a small white circle where the moon goes. The sky is still wet, so it will look soft. You will brighten it at the end.

    Tip:

    Test the spatter on a paper towel so you do not get big blobs.

    Back to all steps

  5. Step 5: Paint Dark Mountains Along the Lake Horizon

    Watch this step · 6:20

    Use the medium square brush to block in a low row of mountains across the horizon. Start with an even mix of primary blue, Mars black and titanium white. If they melt into the sky, go over them with a darker mix of black and blue. A little contrast keeps the mountains readable while the moonlight still seems to fall across the whole scene.

    Tip:

    Vary the peaks. A taller one off to the side looks more natural than an even row.

    Back to all steps

  6. Step 6: Block In the Lake Water Light in the Middle and Dark at the Sides

    Watch this step · 6:52

    Take the larger square brush and lay an equal mix of white and primary blue in the middle of the water, right below the moon. Put the black and blue mix on the left and right sides. Blend them together with a soft touch so the center stays bright and the edges go dark. This mirrors the glow in the sky and sets up the reflection.

    Tip:

    Keep your strokes horizontal so the water lies flat.

    Back to all steps

  7. Step 7: Paint Black Bulrush Silhouettes in the Foreground

    Watch this step · 8:04

    Use a small square brush and pure Mars black to paint a few bulrushes. Pull up thin stalks and give each one a long pointed seed head. Put a cluster on the left and a single tall one on the right so they frame the moon. They are close to you and far from the light, so they stay solid black. That contrast is what gives the painting its depth.

    Tip:

    Let the stalks cross the mountains and sky. Overlapping layers make the scene feel deep.

    Back to all steps

  8. Step 8: Pull the Moonlight Reflection Across the Lake

    Watch this step · 8:36

    Load the medium square brush with plenty of titanium white and a touch of blue. Paint short horizontal strokes on the water right under the moon, brightest in the middle. Then catch the ends of those strokes with a very soft touch and blend them into the dark water. Use the sharp corner of the brush for thin, crisp highlights where you want more sparkle.

    Tip:

    Lost the brightness? Add a few more white strokes once the layer underneath settles.

    Back to all steps

  9. Step 9: Add Dark Grass to the Bottom Corners of the Lake Scene

    Watch this step · 10:18

    With the small square brush and dark paint, flick short grass blades up from the bottom left and right corners. Now all four corners of the painting are dark. That frame pulls the eye to the bright moon and its reflection in the center, and stops it from wandering off the edges. Go back over the bulrushes too so they stay crisp and dark.

    Tip:

    Flick upward fast with light pressure for thin, tapered blades.

    Back to all steps

  10. Step 10: Brighten the Moon and Paint Soft Clouds in the Night Sky

    Watch this step · 11:42

    Once the sky is dry, dab pure white on the moon so it glows. Add a little more white to the middle of the reflection and soften it with your finger. Then take a small round brush and a white and blue mix and paint a few thin clouds with sideways strokes and a slight rounded motion. Make each cloud different, some more see-through than others.

    Tip:

    Keep clouds away from the moon itself so its glow stays clear.

    Back to all steps

How to Use a Wet Palette for Acrylics (Easy DIY Setup)

Keep going

How to Use a Wet Palette for Acrylics (Easy DIY Setup)

7 steps · about 10 minutes

Keep going with painting

More on this topic, picked for this moonlit lake in acrylics.

You reached the last step

Save this project to come back to it

Your ticked steps, the free printable and your other saved makes, together in My Projects. Free, no password.

You tapped Save

Save this project for later

We'll email you a link, no password.

How to Paint a Moonlit Lake in Acrylics

  • Your saved projects in one list
  • Your ticked steps on any device

Check your inbox for an email from us. Not there? Look in your spam folder.

Free printable

Printable sheet and shopping list for this project

The bonus is hidden until you sign up.

Free with a free account, no password. Every step above stays open to everyone.

Products Used

The Checklist

How to Paint a Moonlit Lake in Acrylics

Tools
7
Materials
4
Steps
10
Video
13 min

Tools we recommend

As an Amazon Associate we earn from qualifying purchases. Links on this page may be affiliate links - clicking them and buying doesn't change your price, but helps support Crafting Step by Step.

Tags

The Crafter's Weekly

New painting tutorials, every Sunday

One short email with the week's best step-by-step guides. Free, no spam, unsubscribe anytime.

Did this work for you?

What's next

Related collections

Curated theme pages that include this tutorial.

Similar tutorials

Hand-picked next reads based on the one you just finished.

Liked this painting tutorial?

Pick the crafts you want to hear about. One email every Sunday with new step-by-step tutorials. No spam, easy to unsubscribe.

Get more like this in your inbox

Weekly digest. Pick the categories you want. Unsubscribe anytime.

Send me tutorials about

We only email about new tutorials. Easy unsubscribe anytime.