How to Paint a Cardinal in Watercolor (Tips for Painting Red)

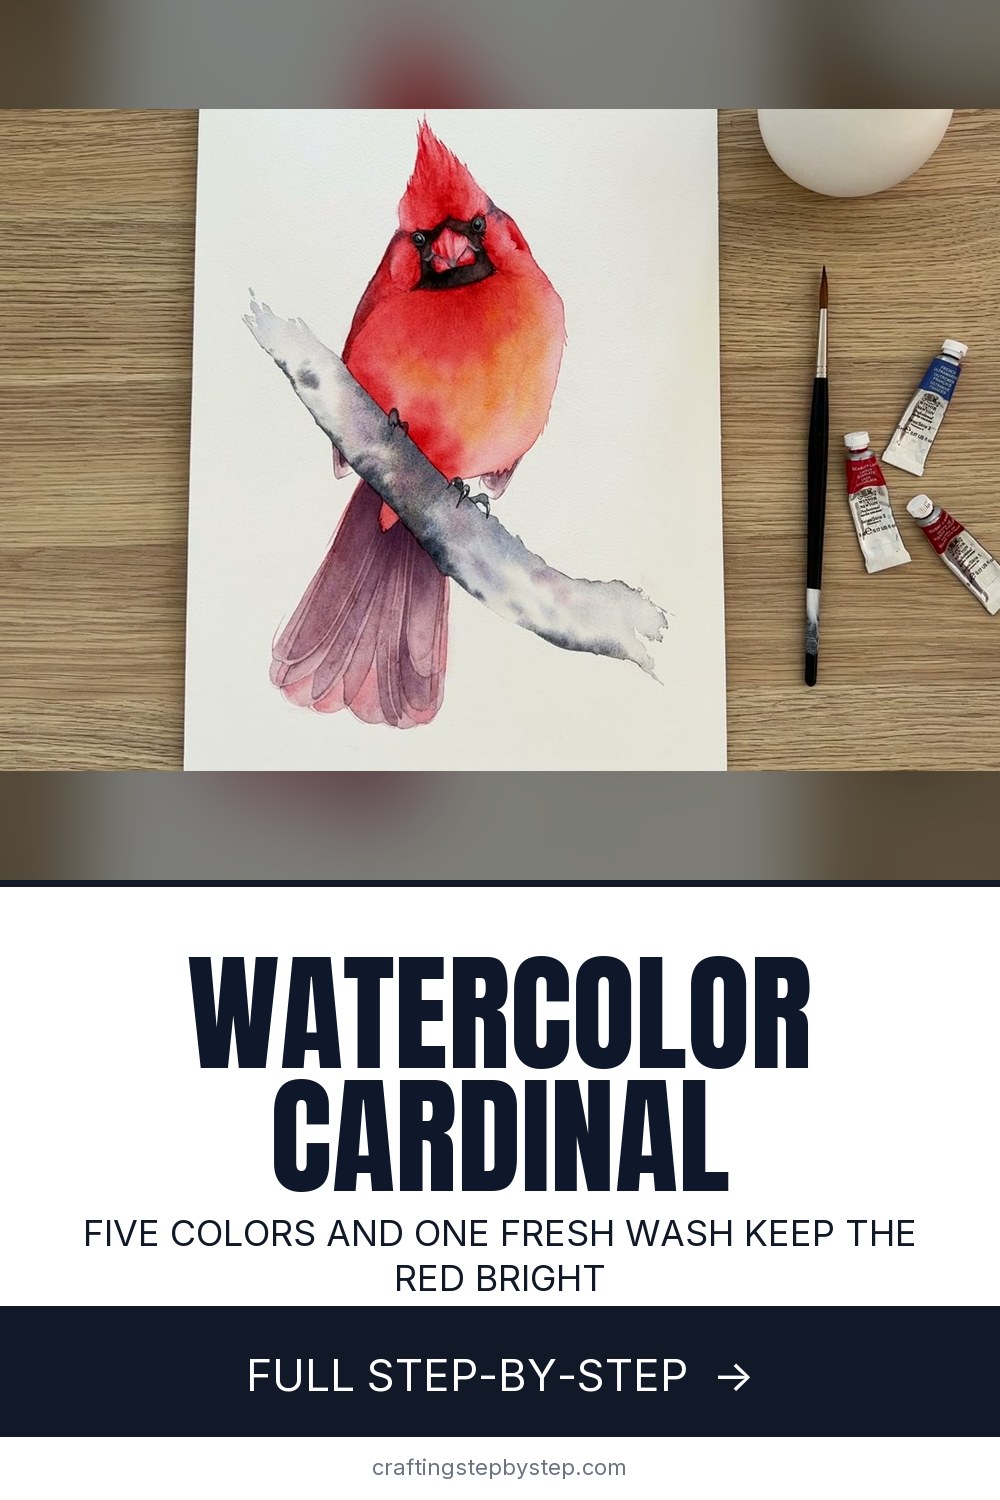
The finished result: How to Paint a Cardinal in Watercolor (Tips for Painting Red)
  • Difficulty: Medium
  • About 2 hours
  • 10 steps

You tapped Save

Save this project for later

We'll email you a link, no password.

How to Paint a Cardinal in Watercolor (Tips for Painting Red)

  • Your saved projects in one list
  • Your ticked steps on any device

Check your inbox for an email from us. Not there? Look in your spam folder.

Print

Steps written out by Crafting Step by Step from Louise De Masi's video (opens YouTube) (18:47). Published .

Red is a tricky color in watercolor. Louise De Masi admits it gives her trouble: even a staining red lifts off the paper when you rewet it to add layers. Her fix for this winter cardinal is to get almost everything into the first wash of each section, then stop. Head, body, tail, a few touches of detail, a black mask and a soft grey branch. It took her about two hours.

How to paint a cardinal: the short version

  • Mix an earthy violet from Scarlet Lake and French Ultramarine.
  • Paint the head wet, leaving the eyes white, and drop in stronger red.
  • Let it dry, then paint the body in one wash with a touch of Indian Yellow.
  • Paint the tail in violet on dry paper.
  • Add a little detail, the black mask, then the tail feathers.
  • Wash in a grey branch and a shadow under the tail.

The palette: five colors

Louise used Winsor & Newton Scarlet Lake as the main red, with French Ultramarine, Burnt Sienna, Indian Yellow and Lamp Black. Scarlet Lake is a warm red. Mixed with a warm blue like French Ultramarine it gives a muted, earthy violet for the wings and tail. A cool red such as Alizarin with the same blue makes a bright violet, which looks wrong on a bird. If your violet looks like a grape, warm up the red.

Why one wash works better with red

Most watercolor paintings build up in layers: paint light, let it dry, rewet, go darker. Red pigment does not always stay put when you rewet it. So paint each section on wet paper, vary the strength while it is still wet and drop darker pigment into the shadows. Then let it dry and leave it alone. Fresh first washes also stay brighter than overworked ones.

Working in sections

Break the bird into parts that each have a natural edge: head, body, tail, branch. Paint one, dry it fully (a hair dryer helps) and move to the next. Hard edges then land where a real bird has them, like where the wing meets the body. Paint straight over small details such as the toes or the black mask area. It is easier than painting around them, and the darker paint covers the red later.

Paper and brushes

Use a heavy cold press paper, 300 lb or a watercolor board, so it does not buckle under wet washes. Louise works with a medium round for the washes, a small round for details and a liner for the crest feathers. A stiff scrubbing brush lifts small highlights once the paint is dry.

Common problems

  • Blooms or water lines. Run a damp brush over the edge while the wash is still wet.
  • The red looks flat. Drop stronger pigment into the darker areas before the first wash dries.
  • The black looks like a hole. Start with watered-down black, dry it, then add darker black in places so some tone shows.

More painting

New to the medium? Start with how to paint with watercolors. For a pencil version of the same bird, see how to draw a cardinal. To round out a winter set, try birch trees and a poinsettia.

Free printable

Print the steps and supply list for this project

One page you can take to the table. Free with a free account, no password.

Get the free printable

What you'll need

Free, for this project

Get this checklist by email

  • All 14 tools and materials, with tick boxes
  • A link to print all 10 steps on paper, to keep by you while you craft

No password. The whole tutorial stays free on this page.

Quick answer

Paint a watercolor cardinal with five colors. Keep red from lifting, mix an earthy violet, then add the black mask, tail and branch. A medium project: about 2 hours. Materials cost about $3 to $8. You need 14 things, including Scarlet Lake watercolor, French Ultramarine watercolor and Indian Yellow watercolor. The 10 steps start with mix an Earthy Violet for the Cardinal's Wing and Tail and wash Scarlet Lake Into the Cardinal's Head Around the Eyes.

Step-by-step guide

10 steps, about 19 minutes. Tap a picture to jump to that step. Your progress saves automatically.

Tick each step off as you go.

  1. Step 1: Mix an Earthy Violet for the Cardinal's Wing and Tail

    Watch this step · 3:10

    Look at a cardinal photo and you will see a dull, pale violet on the wing and tail. Mix it from Scarlet Lake and French Ultramarine. Both are warm colors, so together they make an earthy violet rather than a bright purple. Mix a good puddle now. You will use it on the wing edge, the tail, the branch and the final shadow.

    Tip:

    Test the mix on scrap paper. It dries lighter than it looks wet.

    Back to all steps

  2. Step 2: Wash Scarlet Lake Into the Cardinal's Head Around the Eyes

    Watch this step · 4:45

    Wet the head area with clean water, including over the beak and the black mask, but leave the eyes dry. Touch a little violet along the wing edge and the side of the head. Then switch to Scarlet Lake with some water in it and paint carefully around the eyes. Paint straight over the beak; the black goes on top later.

    Tip:

    Dry eyes keep a clean white highlight without masking fluid.

    Back to all steps

  3. Step 3: Pull Red Strokes Up Into the Cardinal Crest

    Watch this step · 5:32

    While the head is still wet, pick up thicker Scarlet Lake with less water and drop it into the darker areas. Then take a liner brush loaded with pure pigment, almost straight from the tube, and flick long directional strokes up into the crest. They read as feathers. Add a little more violet on the side of the head, then let the head dry completely.

    Tip:

    Work quickly. Once the wash starts to dry, stop adding paint.

    Back to all steps

  4. Step 4: Paint the Cardinal Body in One Wet Wash

    Watch this step · 6:40

    Wet the body and paint it in with Scarlet Lake in one go. Louise treats this as her only chance, because going back later could lift the red and make a mess. Keep the right side lighter: dip the brush in water to thin the paint there. If a water line starts to form, run a damp brush over it before it sets.

    Tip:

    Paint over the toes. It gives a cleaner edge along the branch.

    Back to all steps

  5. Step 5: Drop Indian Yellow Into the Cardinal's Breast

    Watch this step · 7:05

    While the body is still wet, pick up a little Indian Yellow and touch it into the lighter side of the breast. It mixes with the red on the paper into a warm orange glow. Then add stronger red straight from the pigment into the darker areas near the wing. Let the colors mingle on their own instead of brushing them together.

    Tip:

    A little yellow goes a long way. Add it in small dabs.

    Back to all steps

  6. Step 6: Paint the Cardinal Tail With the Violet Mix

    Watch this step · 8:45

    Once the body is dry, paint the tail on dry paper with the violet mix thinned slightly with water. Paint the bottom of the small wing feathers too. Add a little Scarlet Lake to the top of the tail and into a few tail feathers while the violet is wet. The two colors bleed together softly where they meet.

    Tip:

    Dry paper gives the tail crisp outer edges.

    Back to all steps

  7. Step 7: Add Feather Detail to the Side of the Cardinal Head

    Watch this step · 10:00

    Now add a few details on dry paper. Use a small brush and Scarlet Lake to suggest feathers on the side of the face, then soften the edges with a damp brush. Paint the lower beak and add darker pigment to the center of the head. Brush very gently so you do not disturb the red underneath. Less is more here.

    Tip:

    Soften every hard edge right away with a clean damp brush.

    Back to all steps

  8. Step 8: Paint the Black Mask Around the Cardinal's Beak

    Watch this step · 12:15

    Paint the black feathers around the beak with watered-down Lamp Black on dry paper. Dry it with a hair dryer, rewet it with water and add darker black in places, leaving some of the lighter layer showing. That variation keeps the mask from looking like a flat hole. Add grey watercolor pencil to the beak and around the eyes.

    Tip:

    Never start black at full strength. Build it in two passes.

    Back to all steps

  9. Step 9: Draw the Tail Feathers Before Darkening Them

    Watch this step · 14:30

    With a pencil, draw lines on the dry tail to separate the feathers. Then wet each feather section with water and drop in the violet mix, darker at the top and fading out toward the bottom. Leave a thin lighter edge on each feather. Those pale edges are what make the tail read as layered feathers instead of one flat shape.

    Tip:

    Do one feather at a time so neighboring sections do not bleed.

    Back to all steps

  10. Step 10: Paint the Branch and Shadow Under the Cardinal Tail

    Watch this step · 16:20

    Wet the branch and paint it with a grey mixed from Burnt Sienna and French Ultramarine, leaving some white paper showing. Drop in violet and darker grey along the bottom edge to round it. Use more paint near the bird and less as you move away. Then rewet the tail and add a darker violet under the branch for a shadow.

    Tip:

    Curve the branch a little. It looks softer than a straight line.

    Back to all steps

How to Thin Oil Paint: Fat Over Lean Layering

Keep going

How to Thin Oil Paint: Fat Over Lean Layering

Keep going with painting

More on this topic, picked for this cardinal in watercolor.

You reached the last step

Save this project to come back to it

Your ticked steps, the free printable and your other saved makes, together in My Projects. Free, no password.

You tapped Save

Save this project for later

We'll email you a link, no password.

How to Paint a Cardinal in Watercolor (Tips for Painting Red)

  • Your saved projects in one list
  • Your ticked steps on any device

Check your inbox for an email from us. Not there? Look in your spam folder.

Free printable

Printable sheet and shopping list for this project

The bonus is hidden until you sign up.

Free with a free account, no password. Every step above stays open to everyone.

Products Used

The Checklist

How to Paint a Cardinal in Watercolor (Tips for Painting Red)

Tools
8
Materials
6
Steps
10
Video
19 min

Tools we recommend

As an Amazon Associate we earn from qualifying purchases. Links on this page may be affiliate links - clicking them and buying doesn't change your price, but helps support Crafting Step by Step.

Tags

The Crafter's Weekly

New painting tutorials, every Sunday

One short email with the week's best step-by-step guides. Free, no spam, unsubscribe anytime.

Did this work for you?

What's next

Related collections

Curated theme pages that include this tutorial.

Similar tutorials

Hand-picked next reads based on the one you just finished.

Liked this painting tutorial?

Pick the crafts you want to hear about. One email every Sunday with new step-by-step tutorials. No spam, easy to unsubscribe.

Get more like this in your inbox

Weekly digest. Pick the categories you want. Unsubscribe anytime.

Send me tutorials about

We only email about new tutorials. Easy unsubscribe anytime.