How to Needle Felt a Small Animal: Easy Sheep Bauble

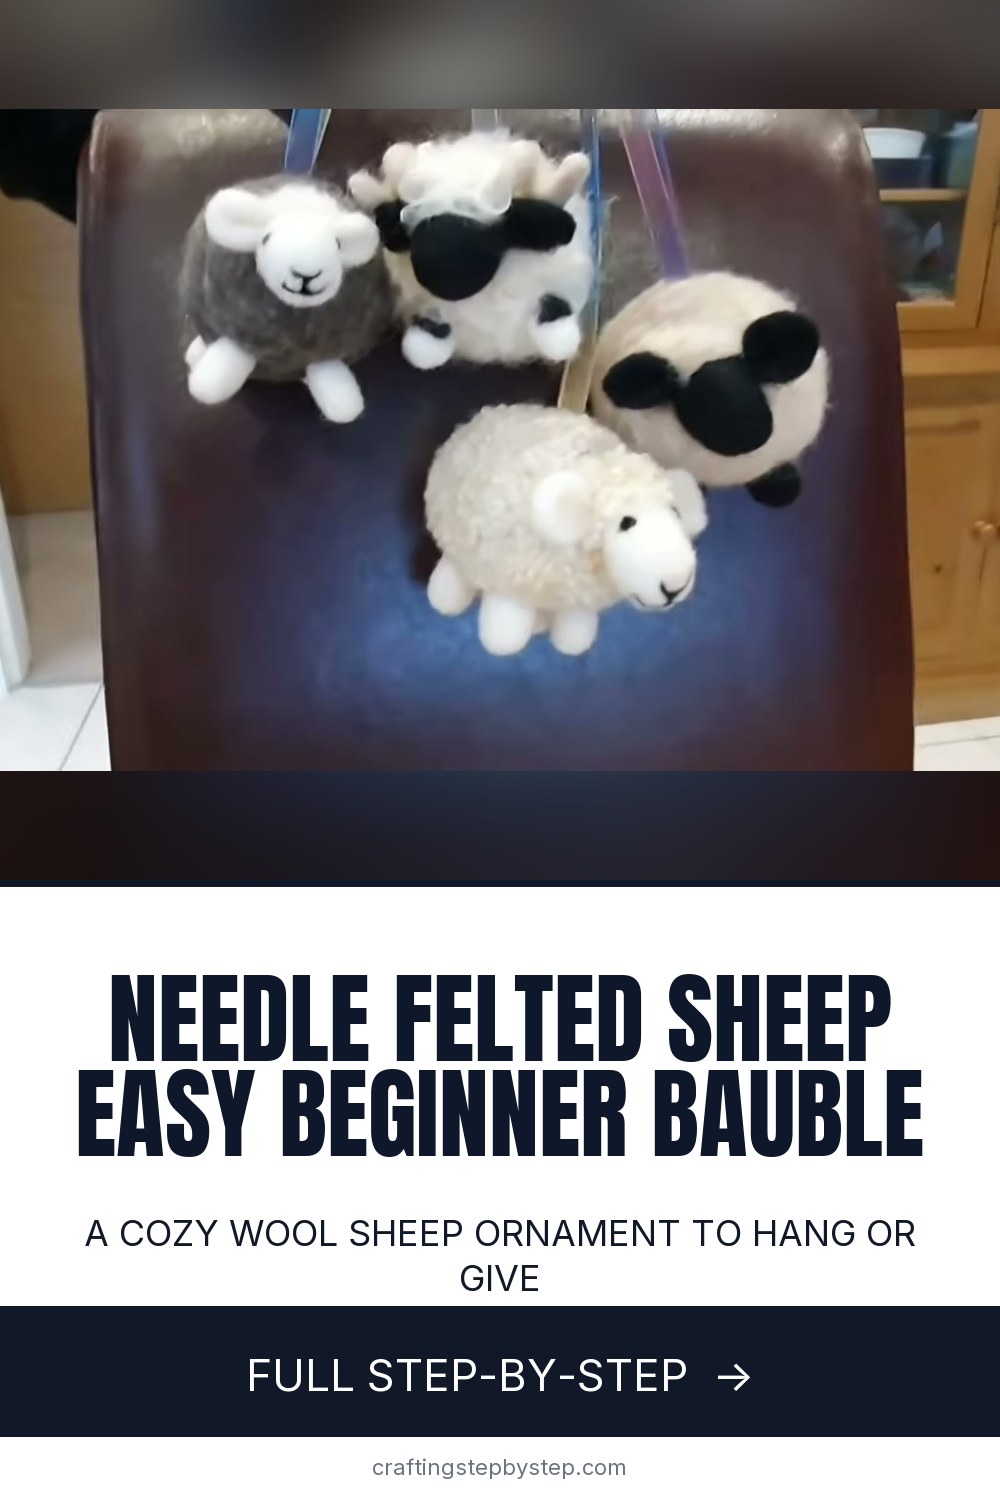
The finished result: How to Needle Felt a Small Animal: Easy Sheep Bauble
  • Difficulty: Easy
  • About 2 hours 30 minutes
  • 10 steps

You tapped Save

Save this project for later

We'll email you a link, no password.

How to Needle Felt a Small Animal: Easy Sheep Bauble

  • Your saved projects in one list
  • Your ticked steps on any device

Check your inbox for an email from us. Not there? Look in your spam folder.

Print

Steps written out by Crafting Step by Step from Felts By Philippa 's video (opens YouTube) (11:01). Published .

A small needle felted animal is the best first project once you can make a firm wool ball. This guide follows Philippa of Felts By Philippa as she makes a hanging sheep bauble: a round body, four little legs, a head with a stitched-on face, ears, a ribbon loop and a curly fleece coat. The same build works for almost any small animal. Change the colors and the ears and you have a pig, a cow or a bear.

The basic build for any small animal

Most beginner animals are a few simple shapes joined together. A ball for the body, tubes for legs, a cone or egg for the head, and flat pieces for ears. Make each shape on its own, then felt them together through the fluffy ends you leave on each part. Those loose fibers are what lock the pieces on. Felt a piece smooth all over and it has nothing to grab.

Which needles to use

NeedleUse it for
Triple needle holderFirming the body fast
36 gauge (coarse)Shaping, joining parts, moving wool
38 gauge (medium)General felting and legs
40 gauge (fine)Faces, eyes and the final coat

Philippa's rule: if you need to push wool to a new spot, use a thick needle. A fine needle will not move it.

Wool for a sheep

Any wool works for the hidden core, even scraps. Use a light color inside a white sheep so it does not show through. Carded wool felts faster than roving or tops. For the fleece coat, curly locks like Wensleydale or Blue Faced Leicester look the most like a real sheep. Fluffed up white carded wool also works.

Keep your fingers safe

Felting needles are very sharp and barbed. Stab straight in and straight out, and keep your fingers away from where the needle lands. Leather finger guards help, and so does working on a thick foam pad. Store needles out of reach of children. Little ones can choose the colors and watch, and an adult does the stabbing.

Fixes for common problems

  • Leg wobbles: felt more around the base where it meets the body.
  • Eyes uneven: push a needle straight through the head to line up the second eye, or add a few fibers to the smaller one.
  • Face sinking in: felt facial details gently. Heavy stabbing pulls them back into the head.
  • Stray black fibers: trim and blow them away as you go. They show on white wool.

Make it your own

Felt a black face and legs for a Valais Blacknose, grey wool for a Herdwick, or leave off the ribbon for a shelf sheep. A little pink inside the ears and on the nose adds a sweet touch. These make lovely Christmas tree ornaments and small gifts.

More to try

New to the needle? Start with how to needle felt for the basic ball. Then try felt acorns, or a no-needle version of a woolly animal from a yarn pom pom. For more ornaments see how to make Christmas ornaments, or make a crocheted animal with how to crochet amigurumi.

Free printable

Print the steps and supply list for this project

One page you can take to the table. Free with a free account, no password.

Get the free printable

What you'll need

Free, for this project

Get this checklist by email

  • All 13 tools and materials, with tick boxes
  • A link to print all 10 steps on paper, to keep by you while you craft

No password. The whole tutorial stays free on this page.

Quick answer

How to needle felt a small animal: a wool body, legs, head, face and ears, then a curly coat. An easy project: about 2 hours 30 minutes. Materials cost about $5 to $12. You need 13 things, including white carded wool, core wool and black wool roving. The 10 steps start with roll Core Wool Into a Firm Sheep Body Ball, roll White Wool Into Needle Felted Sheep Legs and needle Felt the Legs Onto the Sheep Body.

Step-by-step guide

10 steps, about 11 minutes. Tap a picture to jump to that step. Your progress saves automatically.

Tick each step off as you go.

  1. Step 1: Roll Core Wool Into a Firm Sheep Body Ball

    Watch this step · 0:40

    Take a handful of core wool and wrap it up tightly into a ball, holding it together with your fingers. Stab it all over with a triple needle tool, turning it as you go, until it holds a round shape. Squeeze it now and then to check. It should feel firm with a little give left, not rock hard. This ball is the body, the biggest piece of the sheep.

    Tip:

    Rough or scratchy scrap wool is fine here. Nobody sees the core.

    Back to all steps

  2. Step 2: Roll White Wool Into Needle Felted Sheep Legs

    Watch this step · 1:20

    Pull off a small piece of white carded wool and roll it into a tight tube. Hold one end and felt the other end round, since sheep legs have soft rounded feet. Leave the top end fluffy. Roll the leg back and forth on the mat as you felt, then roll it between your palms to smooth it. Make four legs the same size so the sheep stands even.

    Tip:

    Lay the four legs side by side to compare them before you attach any.

    Back to all steps

  3. Step 3: Needle Felt the Legs Onto the Sheep Body

    Watch this step · 2:05

    Hold a leg against the underside of the body and felt the fluffy end into it, working all around the base. Felt firmly. You want these legs on for good. Angle them out a little and hold each one in place while you felt, and it will stay there. If a leg ends up in the wrong spot, pull it off and try again. Needle felting forgives you.

    Tip:

    Attach two legs on opposite corners first, then fill in the other two.

    Back to all steps

  4. Step 4: Shape a Cone of Wool for the Sheep Head

    Watch this step · 2:40

    The head is bigger than a leg. Think of a cone with the tip cut off and rounded. Make it a bit wider at the top where the eyes go and narrower at the nose. Hold it up to the body to check the size. These sheep are cute, not realistic, so there is no wrong size. Felt the head fairly firm, since the face needs a solid base.

    Tip:

    Leave fluffy fibers at the back of the head. They help it attach later.

    Back to all steps

  5. Step 5: Needle Felt the Mouth and Nose on the Sheep Face

    Watch this step · 3:30

    Switch to a fine needle, around 40 gauge. Twist a thin wisp of black wool. Felt one end at a corner of the mouth, then the other corner, then work along the line. For the nose, felt the middle of a V first, then take each side up and cut off the extra. Felt gently. Too much stabbing pulls the face back into the head.

    Tip:

    Dark brown or dark grey wool works too if you want a softer face.

    Back to all steps

  6. Step 6: Add Tiny Black Wool Eyes to the Sheep Face

    Watch this step · 5:30

    Point your needle at the face to find where each eye should go. Take a very small amount of black wool and felt it in gently. Start smaller than you think, since big eyes look odd. To line up the second eye, push a needle straight through the head from the first one. If one eye ends up smaller, add a few fibers. A dab of pink on the nose finishes the face.

    Tip:

    Use a thick 36 gauge needle to nudge an eye that sits too high.

    Back to all steps

  7. Step 7: Felt One-Piece Ears Onto the Sheep Head

    Watch this step · 6:46

    Make both ears from one long strip. Lay a piece of wool on the mat, round off each end and fold the edges in with your needle. Felt both sides, lifting it off the mat now and then so it does not stick. Fold it gently in the middle and felt it across the back of the head. One piece is quicker than two separate ears and sits nice and even.

    Tip:

    Add a little pink wool inside the ears for color.

    Back to all steps

  8. Step 8: Needle Felt the Head Onto the Sheep Body

    Watch this step · 7:20

    Hold the head against the front of the body, using the fluffy fibers left on the back of the head. Felt all the way around the join, going deep. Push the needle well into the body so the head is held firmly. Check that the head points where you want it before you lock it on. A head that faces slightly to one side looks more lively.

    Tip:

    A coarse 36 gauge needle grabs more fibers and makes a stronger join.

    Back to all steps

  9. Step 9: Sew a Ribbon Hanging Loop Into the Sheep Bauble

    Watch this step · 7:40

    Fold over the ends of a length of ribbon so they are firm. Find the middle of the sheep's back and sew the ribbon on with strong thread, stitching through the wool several times. Take a few stitches right through the body and out the other side so the thread sits deep. Hold it up by the ribbon and check that it hangs fairly level.

    Tip:

    Do not worry if the join looks messy. The fleece coat covers it.

    Back to all steps

  10. Step 10: Felt a Curly Wool Coat Over the Sheep Bauble

    Watch this step · 8:35

    Lay curly wool locks over the body a few at a time and felt each one on with a fine needle, working around the ribbon. Cut and pick the curls you like best. It takes a while, and that is what makes it look like real fleece. Add a tiny lump of wool at the back for a tail. Go over the coat once more so every lock is held.

    Tip:

    No curly locks? Fluff up white carded wool and felt it on lightly.

    Back to all steps

How to Make Polymer Clay Beads (6 Easy Styles)

Keep going

How to Make Polymer Clay Beads (6 Easy Styles)

Keep going with other crafts

More on this topic, picked for this project.

You reached the last step

Save this project to come back to it

Your ticked steps, the free printable and your other saved makes, together in My Projects. Free, no password.

You tapped Save

Save this project for later

We'll email you a link, no password.

How to Needle Felt a Small Animal: Easy Sheep Bauble

  • Your saved projects in one list
  • Your ticked steps on any device

Check your inbox for an email from us. Not there? Look in your spam folder.

Free printable

Printable sheet and shopping list for this project

The bonus is hidden until you sign up.

Free with a free account, no password. Every step above stays open to everyone.

Products Used

The Checklist

How to Needle Felt a Small Animal: Easy Sheep Bauble

Tools
6
Materials
7
Steps
10
Video
11 min

Tools we recommend

As an Amazon Associate we earn from qualifying purchases. Links on this page may be affiliate links - clicking them and buying doesn't change your price, but helps support Crafting Step by Step.

Tags

The Crafter's Weekly

New other crafts tutorials, every Sunday

One short email with the week's best step-by-step guides. Free, no spam, unsubscribe anytime.

Did this work for you?

What's next

Related collections

Curated theme pages that include this tutorial.

Similar tutorials

Hand-picked next reads based on the one you just finished.

Liked this other crafts tutorial?

Pick the crafts you want to hear about. One email every Sunday with new step-by-step tutorials. No spam, easy to unsubscribe.

Get more like this in your inbox

Weekly digest. Pick the categories you want. Unsubscribe anytime.

Send me tutorials about

We only email about new tutorials. Easy unsubscribe anytime.