How to Make Polymer Clay Beads (6 Easy Styles)

The finished result: How to Make Polymer Clay Beads (6 Easy Styles)
  • Difficulty: Easy
  • About 1 hour, plus 45 minutes to dry or set
  • 10 steps

You tapped Save

Save this project for later

We'll email you a link, no password.

How to Make Polymer Clay Beads (6 Easy Styles)

  • Your saved projects in one list
  • Your ticked steps on any device

Check your inbox for an email from us. Not there? Look in your spam folder.

Print

Steps written out by Crafting Step by Step from Mont Marte Art's video (opens YouTube) (4:31). Published .

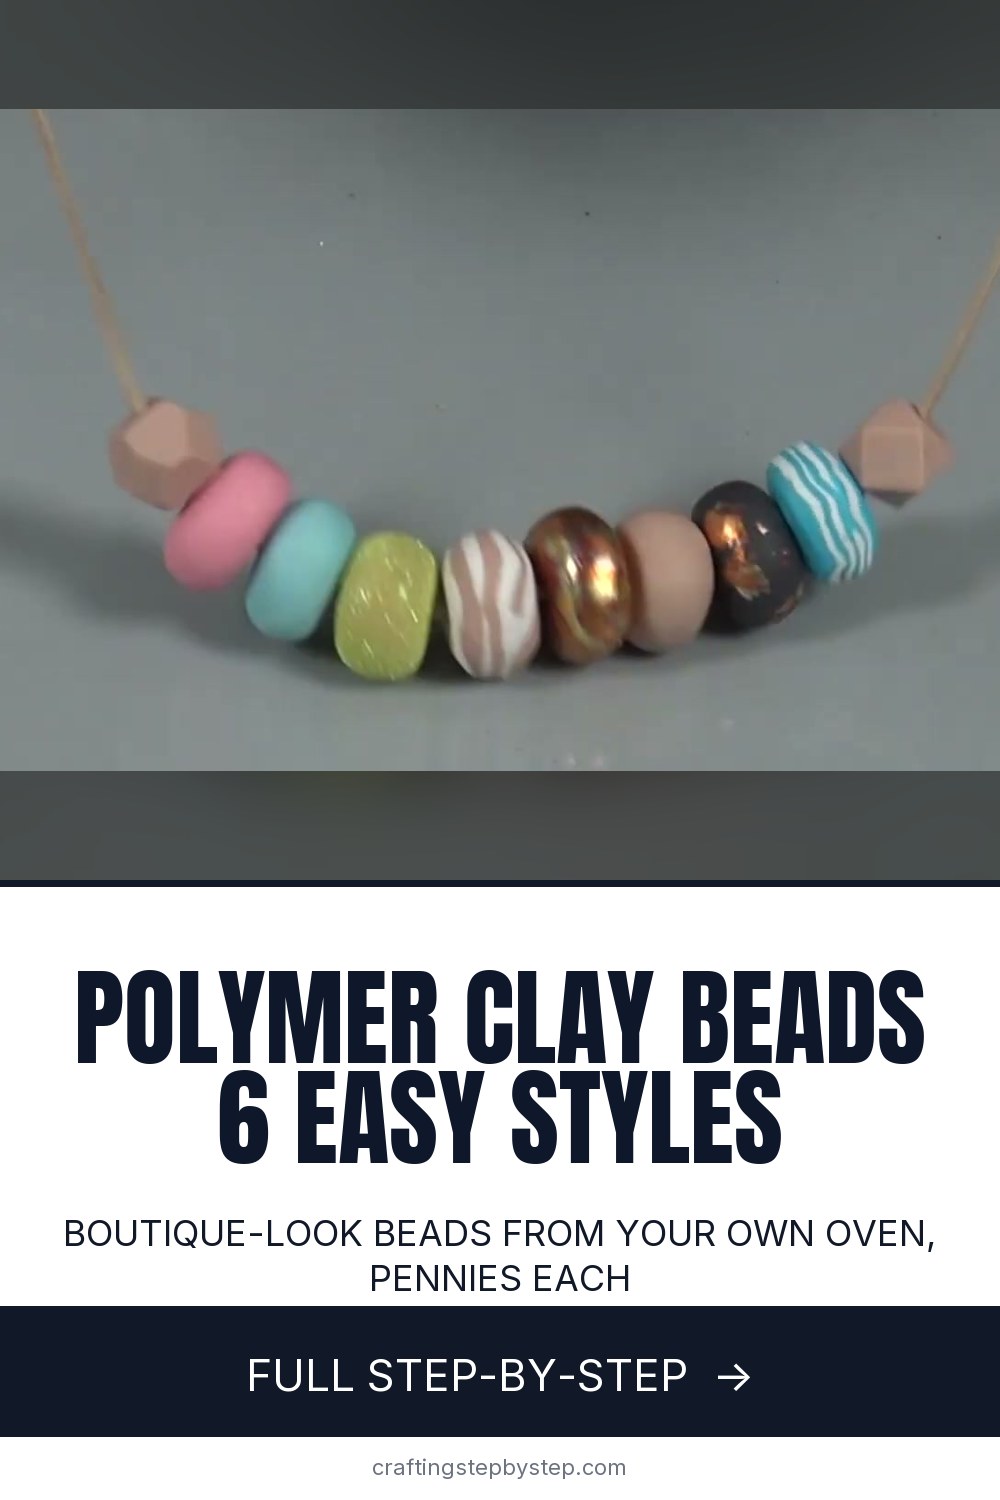
Homemade polymer clay beads look like they came from a boutique, and they cost pennies each. This guide follows the Mont Marte Art video, where the artist makes six different beads for one chunky necklace: plain, blended, striped, faceted, glittered and copper leafed. You only need a few blocks of clay, a knife, something pointy and a regular home oven.

What polymer clay is and which kind to buy

Polymer clay is a PVC based modeling clay that stays soft until you bake it. It does not dry out on the table, so you can take your time. Sculpey III and Fimo Soft are easy to knead and good for a first batch. Premo and Fimo Professional are firmer and hold sharp edges better, which helps with faceted beads.

Small blocks are fine. One 2 oz block makes about a dozen medium beads.

How to make polymer clay beads the same size

Uneven beads are the most common beginner complaint. Roll a log of clay to an even thickness, then cut it into equal pieces with a blade before you shape anything. Each piece turns into one bead, so they match. A ball about the size of a large marble gives the chunky rondelle shape from the video. Pea size works for bracelets.

Getting the hole right

Make the hole before baking, while the clay is soft. Push the needle in from one side until the tip shows, then finish from the other side. That stops the exit from tearing. Twist gently instead of stabbing. Check that your cord fits through the hole before the beads go in the oven.

Baking polymer clay safely

Always follow the temperature on your clay packet. Mont Marte clay bakes at 130 C (about 265 F) for 30 minutes. Most US brands say 275 F for 15 minutes per quarter inch of thickness. Home ovens often run hot, so an oven thermometer is worth having. Too hot scorches light colors. Too cool leaves beads weak and crumbly.

  • Bake on foil, card or a tray you keep for crafts only.
  • Open a window while it bakes.
  • Keep clay tools away from food tools.

Fixes for common problems

  • Cracks after baking: the clay was not kneaded enough or was underbaked.
  • Fingerprints: wipe the raw bead with a little baby oil or cornstarch on your fingertip.
  • Leaf flaking off: brush a coat of clear water based varnish over it once the size is dry.
  • Squashed hole: run the needle through again before baking.

Ideas for your beads

String them on suede for a necklace, on stretch cord for a bracelet, or hang a single bead on a key ring. This is a good afternoon project with grandkids. They shape and decorate the beads, and an adult handles the oven.

Keep going with polymer clay

Get more detail on oven times in how to bake polymer clay, and see how to soften polymer clay if your block is stiff. Ready for more? Try polymer clay earrings or put your beads to work in how to make a beaded bracelet.

Free printable

Print the steps and supply list for this project

One page you can take to the table. Free with a free account, no password.

Get the free printable

What you'll need

Free, for this project

Get this checklist by email

  • All 13 tools and materials, with tick boxes
  • A link to print all 10 steps on paper, to keep by you while you craft

No password. The whole tutorial stays free on this page.

Quick answer

How to make polymer clay beads: blend colors, shape round, striped and faceted beads, pierce, bake, then add glitter or copper leaf. An easy project: about 1 hour, plus 45 minutes to dry or set. Materials cost about $8 to $20. You need 13 things, including polymer clay, leafing size and fine glitter. The 10 steps start with cut and Knead Polymer Clay Into a Soft Ball and blend Two Polymer Clay Colors Into a New Shade.

Step-by-step guide

10 steps, about 5 minutes. Tap a picture to jump to that step. Your progress saves automatically.

Tick each step off as you go.

  1. Step 1: Cut and Knead Polymer Clay Into a Soft Ball

    Watch this step · 0:41

    Cut a square off a block of beige clay with scissors or a blade. Knead it between your fingers until it is warm and soft with no stiff bits left. That conditioning step keeps the bead from cracking in the oven. Roll the clay into a smooth ball between your palms, then press it down a little to flatten it into a rondelle. That is your first bead.

    Tip:

    Cold clay is stiff. Warm the block in your hands or a pocket for a few minutes first.

    Back to all steps

  2. Step 2: Blend Two Polymer Clay Colors Into a New Shade

    Watch this step · 0:59

    Mix your own colors from a starter pack. Press a blue block and a white block together and keep folding and kneading until the streaks disappear and you have an even sky blue. For pink, use a whole block of white with half a block of red. For a dark grey base that shows off copper leaf, mix white and black in equal amounts. Shape each one into a bead.

    Tip:

    Stop kneading early if you like the marbled look. Partly mixed clay makes great beads.

    Back to all steps

  3. Step 3: Layer Clay Slices for a Striped Polymer Clay Bead

    Watch this step · 1:32

    Cut a blue block and a white block into thin slices of the same thickness. Stack them, alternating colors, so you build a striped brick. Press the stack together gently so the layers bond. Pinch and roll the edges with light pressure to shape a barrel bead while keeping the stripes on the outside. The video repeats this with beige and white for a softer stripe.

    Tip:

    Light pressure keeps the stripes crisp. Heavy rolling smears them together.

    Back to all steps

  4. Step 4: Carve a Faceted Polymer Clay Bead From a Cube

    Watch this step · 2:01

    Form a block of clay into a neat cube. Mark the middle of each edge, then mark diagonals between those points. Use a palette knife to slice each corner off along the lines. Turn the cube over and do the same on the other side. Smooth each flat face with a fingertip until the shape looks balanced and even from every angle.

    Tip:

    Chill the clay for ten minutes before cutting. Firm clay gives cleaner facets.

    Back to all steps

  5. Step 5: Pierce a Hole Through Each Polymer Clay Bead

    Watch this step · 2:19

    Hold the bead lightly and push a pottery spike or needle tool through the center. Keep the hole as centered as you can so the bead hangs straight on the cord. Twist the tool as you go rather than forcing it. Use the end of a paintbrush handle to smooth out the opening on both sides. Repeat for every bead before anything goes in the oven.

    Tip:

    Push halfway from each side so the exit hole does not tear.

    Back to all steps

  6. Step 6: Bake the Polymer Clay Beads on a Foil Tray

    Watch this step · 2:39

    Preheat the oven to the temperature on your clay packet. Mont Marte clay bakes at 130 C (about 265 F) for 30 minutes. Stand the beads on an aluminium tray or a sheet of foil, with space between them so they do not touch. Bake for the full time, then let them cool on the tray. Polymer clay feels a little soft while warm and firms up as it cools.

    Tip:

    An oven thermometer tells you the real temperature. Many ovens run hotter than the dial.

    Back to all steps

  7. Step 7: Brush Leafing Size Onto the Baked Clay Beads

    Watch this step · 2:57

    Pour a little leafing size into a palette. Size is the glue that holds glitter and metal leaf. Brush it over any bead you want to decorate. Glitter and leaf only stick where the size goes. For a speckled look on the grey bead, dab on small patches and leave some of the base color bare. Let the size turn tacky before the next step.

    Tip:

    Slide the bead onto a skewer or tool so you can coat it without touching it.

    Back to all steps

  8. Step 8: Pour Glitter Over a Sized Polymer Clay Bead

    Watch this step · 3:16

    Hold the sized bead over a sheet of paper and pour glitter over it. The video uses the yellow from a six color shaker. The size is very sticky, so turn and position the bead with a brush handle instead of your fingers. Keep turning until the whole bead is coated. Tip the loose glitter off the paper back into the jar.

    Tip:

    Fine glitter gives a smooth sparkle. Chunky glitter shows the shape of each flake.

    Back to all steps

  9. Step 9: Wrap a Clay Bead in Copper Leaf

    Watch this step · 3:29

    Set a sized bead in the middle of a fresh sheet of copper leaf. Lift the leaf up and fold it gently around the bead until it is fully covered. Then sweep away the loose leaf with a clean, soft brush. The partly sized grey bead gets the same treatment, and the dark base shows through the gaps in the copper for a more rustic finish.

    Tip:

    Leaf is thin and tears easily. Work in a spot with no breeze or fan.

    Back to all steps

  10. Step 10: Thread the Polymer Clay Beads Onto a Cord

    Watch this step · 3:57

    Lay out your beads and decide on the order before you start. Thread them one at a time onto a length of faux suede cord, sliding each one down to meet the last. The video puts a faceted bead at each end to frame the round ones. Tie the cord ends with a sliding knot so the necklace fits over your head.

    Tip:

    Wrap a bit of tape around the cord tip if it frays and will not go through the holes.

    Back to all steps

How to Make a Bath Bomb (Beginner Recipe + Molding Tips)

Keep going

How to Make a Bath Bomb (Beginner Recipe + Molding Tips)

Keep going with other crafts

More on this topic, picked for this project.

You reached the last step

Save this project to come back to it

Your ticked steps, the free printable and your other saved makes, together in My Projects. Free, no password.

You tapped Save

Save this project for later

We'll email you a link, no password.

How to Make Polymer Clay Beads (6 Easy Styles)

  • Your saved projects in one list
  • Your ticked steps on any device

Check your inbox for an email from us. Not there? Look in your spam folder.

Free printable

Printable sheet and shopping list for this project

The bonus is hidden until you sign up.

Free with a free account, no password. Every step above stays open to everyone.

Products Used

The Checklist

How to Make Polymer Clay Beads (6 Easy Styles)

Tools
8
Materials
5
Steps
10
Video
5 min

Tools we recommend

As an Amazon Associate we earn from qualifying purchases. Links on this page may be affiliate links - clicking them and buying doesn't change your price, but helps support Crafting Step by Step.

Tags

The Crafter's Weekly

New other crafts tutorials, every Sunday

One short email with the week's best step-by-step guides. Free, no spam, unsubscribe anytime.

Did this work for you?

What's next

Related collections

Curated theme pages that include this tutorial.

Similar tutorials

Hand-picked next reads based on the one you just finished.

Liked this other crafts tutorial?

Pick the crafts you want to hear about. One email every Sunday with new step-by-step tutorials. No spam, easy to unsubscribe.

Get more like this in your inbox

Weekly digest. Pick the categories you want. Unsubscribe anytime.

Send me tutorials about

We only email about new tutorials. Easy unsubscribe anytime.