How to Make a Bath Bomb (Beginner Recipe + Molding Tips)

Also in:Crafts

By CraftingStepByStepPublished Updated

Based on a video by Creative Bath Lab.

Bath bombs look like chemistry, but they are really just baking soda, citric acid, and a tiny splash of wet stuff held together by your hands. Get the ratio right and the technique gets simple. Get the ratio wrong and you spend an afternoon sweeping pink powder off the counter.

This walkthrough is built from Dora's tutorial at Creative Bath Lab - one of the most-watched beginner bath bomb videos on YouTube. The base recipe is 1 cup baking soda, 1/2 cup citric acid, and 1/4 cup corn starch. That is the 2:1 ratio that makes the fizz, plus a starch buffer that gives you margin for error on the wet side. Total wet ingredients only add up to about 15 milliliters - that is the part beginners get wrong by quadrupling it and then wondering why their bombs are fizzing on the counter before they hit the mold.

Seven steps from gathering supplies to setting the finished bombs out to dry. Total active time is under twenty minutes; you wait 24 hours for them to cure before they are ready to give away or drop in your own bath. These make beautiful gifts - tucked into a jar with a ribbon they are a popular Mother's Day or hostess present, and you can scale the batch up once you have the technique down.

If you like making things to give away, the rest of the homemade gifts theme has more beginner-friendly DIY projects in the same gift-giving vein.

Step-by-Step Guide

1

Step 1: Gather Your Supplies

0:25
Step 1: Step 1: Gather Your Supplies

The core of any bath bomb is a 2:1 ratio of baking soda to citric acid - those two ingredients are what create the fizz when the bomb hits water. From there you can add a starch like corn starch to give the recipe a margin of error on the wet side, a skin-safe fragrance oil, an emulsifier (polysorbate 80) so the oil mixes into the bath water instead of pooling, and a surfactant for foam.

For color, you have two options: liquid colorant (gentle, won't trigger early fizz) or mica powder for shimmer. Tools-wise you need a mixing bowl, a fine-mesh sieve, a wire whisk, measuring cups and spoons, and stainless steel bath bomb molds. Two-piece hemispherical molds in the 2.5-inch size are the easiest to learn on.

Tip

Avoid plastic molds entirely. They flex when you press the halves together, and the bombs stick. Stainless steel molds are inexpensive and they release cleanly every time.

2

Step 2: Sieve and Whisk the Dry Ingredients

1:15
Step 2: Step 2: Sieve and Whisk the Dry Ingredients

Measure 1 cup baking soda, 1/2 cup citric acid, and 1/4 cup corn starch into a fine-mesh sieve held over your mixing bowl. Tap the sieve with one hand and push any clumps through with the back of a spoon. Clumps are what cause uneven fizz and lumpy bath bombs - sieving takes about a minute and is the difference between a smooth bomb and a pockmarked one.

Once everything is through the sieve, switch to a wire whisk and whisk the dry mix for about thirty seconds. The goal is to distribute the citric acid evenly throughout the baking soda so every part of the bomb fizzes at the same rate.

3

Step 3: Measure Out the Wet Ingredients

2:10
Step 3: Step 3: Measure Out the Wet Ingredients

In a small measuring cup, combine your wet ingredients. For this base recipe, 15 milliliters of liquid total is the sweet spot - much more than that and the bombs start fizzing in the mold or take days to dry. A good wet blend for one batch is 7.5 ml of fragrance oil, 5 ml of polysorbate 80 (emulsifier), and 2.5 ml of surfactant (coco glucoside or SLSA).

If you want to add color, stir liquid colorant or mica powder into the wet mix - not the dry. Mica mixed into the dry mix goes airborne the second you whisk it and lands all over your kitchen.

Tip

Always use skin-safe fragrance oils, not candle fragrance oils. Candle fragrances are formulated for hot wax and are not tested for skin contact - they can cause irritation in a bath.

4

Step 4: Add the Wet to the Dry Slowly

2:45
Step 4: Step 4: Add the Wet to the Dry Slowly

Drizzle the wet mixture over the dry powder a little at a time, whisking constantly. The whisking matters - if you dump the liquid in one spot, it triggers a localized fizz reaction and you lose some of the baking soda right there. Pouring slowly while whisking spreads the liquid evenly.

You will see streaks of color where the wet hits the dry. That is normal. Keep whisking until the streaks even out and the mixture looks like a uniform tinted powder.

Products used in this step

5

Step 5: Mix With Your Hands Until the Texture Is Right

3:35
Step 5: Step 5: Mix With Your Hands Until the Texture Is Right

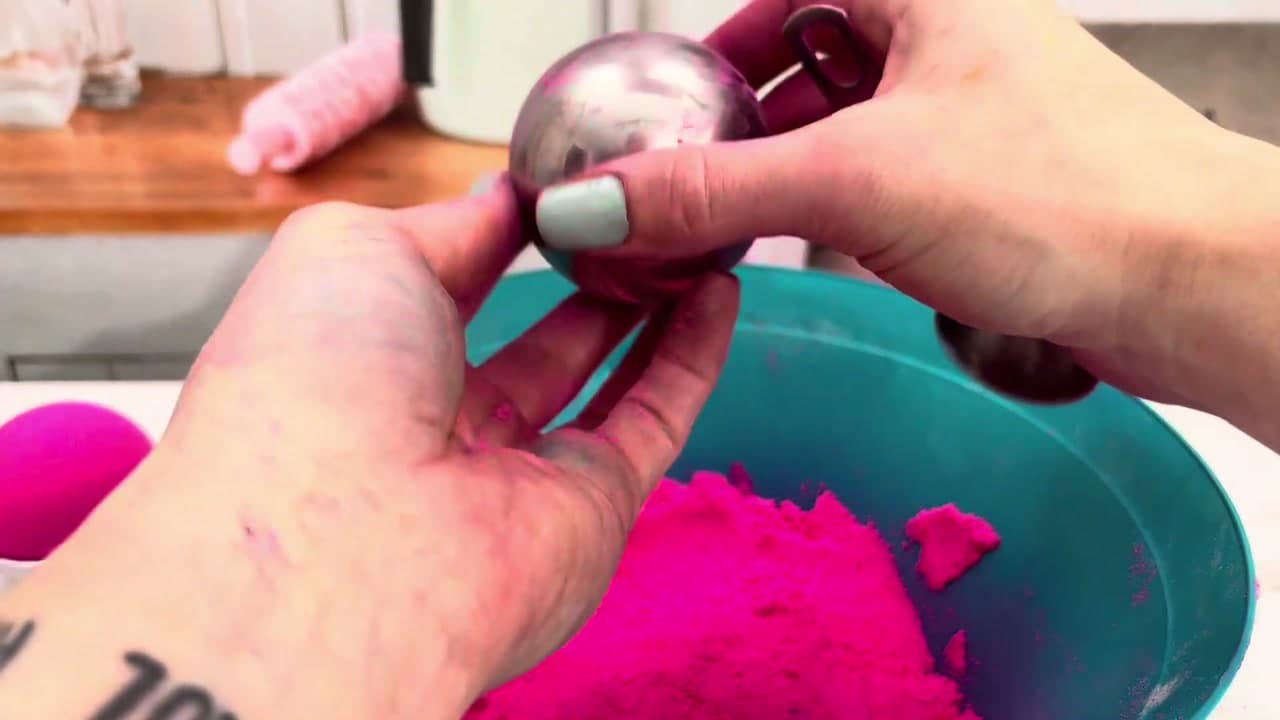
Put on a pair of nitrile or latex gloves (the mica stains hands for days) and get in there. Work the mixture together with your fingers, breaking up any remaining clumps and making sure every grain is touched by the wet mix. Two to three minutes of hand-mixing is enough.

Test the texture: grab a handful and squeeze. It should hold its shape like packed wet sand and then crumble apart easily when you poke it with a finger. Too dry and the bombs fall apart when you release the mold. Too wet and they start fizzing inside the mold before you can pack the second half.

Tip

If the mix feels too dry, do not spray it with water or witch hazel - it will look better for five minutes and then turn into useless sand. Add 5 ml of polysorbate 80 at a time instead. Thick liquids rewet the mix without triggering fizz.

Products used in this step

6

Step 6: Pack and Join the Mold Halves

5:45
Step 6: Step 6: Pack and Join the Mold Halves

Pick up one half of your stainless steel mold and overfill it - mound the mixture above the rim. Gently pack it down with your fingertips, then add a small amount of loose mix on top so it sits about a quarter-inch above the rim again. Repeat with the other half of the mold.

Press the two halves together with firm, even pressure until they touch all the way around. Do not twist - twisting shears the bomb at the seam and you get a crack later. Just squeeze straight down on both sides until you feel the metal click together.

7

Step 7: Release the Mold and Let It Dry

6:45
Step 7: Step 7: Release the Mold and Let It Dry

Hold the closed mold gently in your palm. Tap both sides with the back of a metal spoon - light, quick taps, not whacks. The vibrations break the seal between the bomb and the metal. Carefully lift the top half away. If it sticks, tap a few more times and try again. Never pry.

Set the bomb on a soft surface (a folded towel works) or rest it in a holder mold to keep its round shape. Let the bombs cure for 24 hours minimum, 48 hours if your kitchen is humid. After that they will be hard enough to wrap as gifts - tuck them in a small glass jar with a ribbon, or shrink-wrap them individually to keep them dry until use.

Tip

If a bomb cracks during release, gently smooth the crack with your finger while the mix is still soft, then shrink-wrap it. The wrap holds the shape while the bomb finishes drying. By the time you unwrap it 24 hours later, the crack is invisible.

Products Used

☐ The Checklist

How to Make a Bath Bomb (Beginner Recipe + Molding Tips)

Tools
8
Materials
7
Steps
7
Video
10 min

Your Guide

Creative Bath Lab

As an Amazon Associate we earn from qualifying purchases. Links on this page may be affiliate links - clicking them and buying doesn't change your price, but helps support ShowMeStepByStep.

Tags

What's next

Related collections

Curated theme pages that include this tutorial.

Weekly Digest

Liked this other crafts tutorial?

Pick the categories you want to hear about. Weekly digest of new step-by-step tutorials. No spam, easy unsubscribe.

Send me tutorials about

We only email about new tutorials. Easy unsubscribe anytime.