How to Make a Beaded Ring - Easy Peyote Stitch Ring

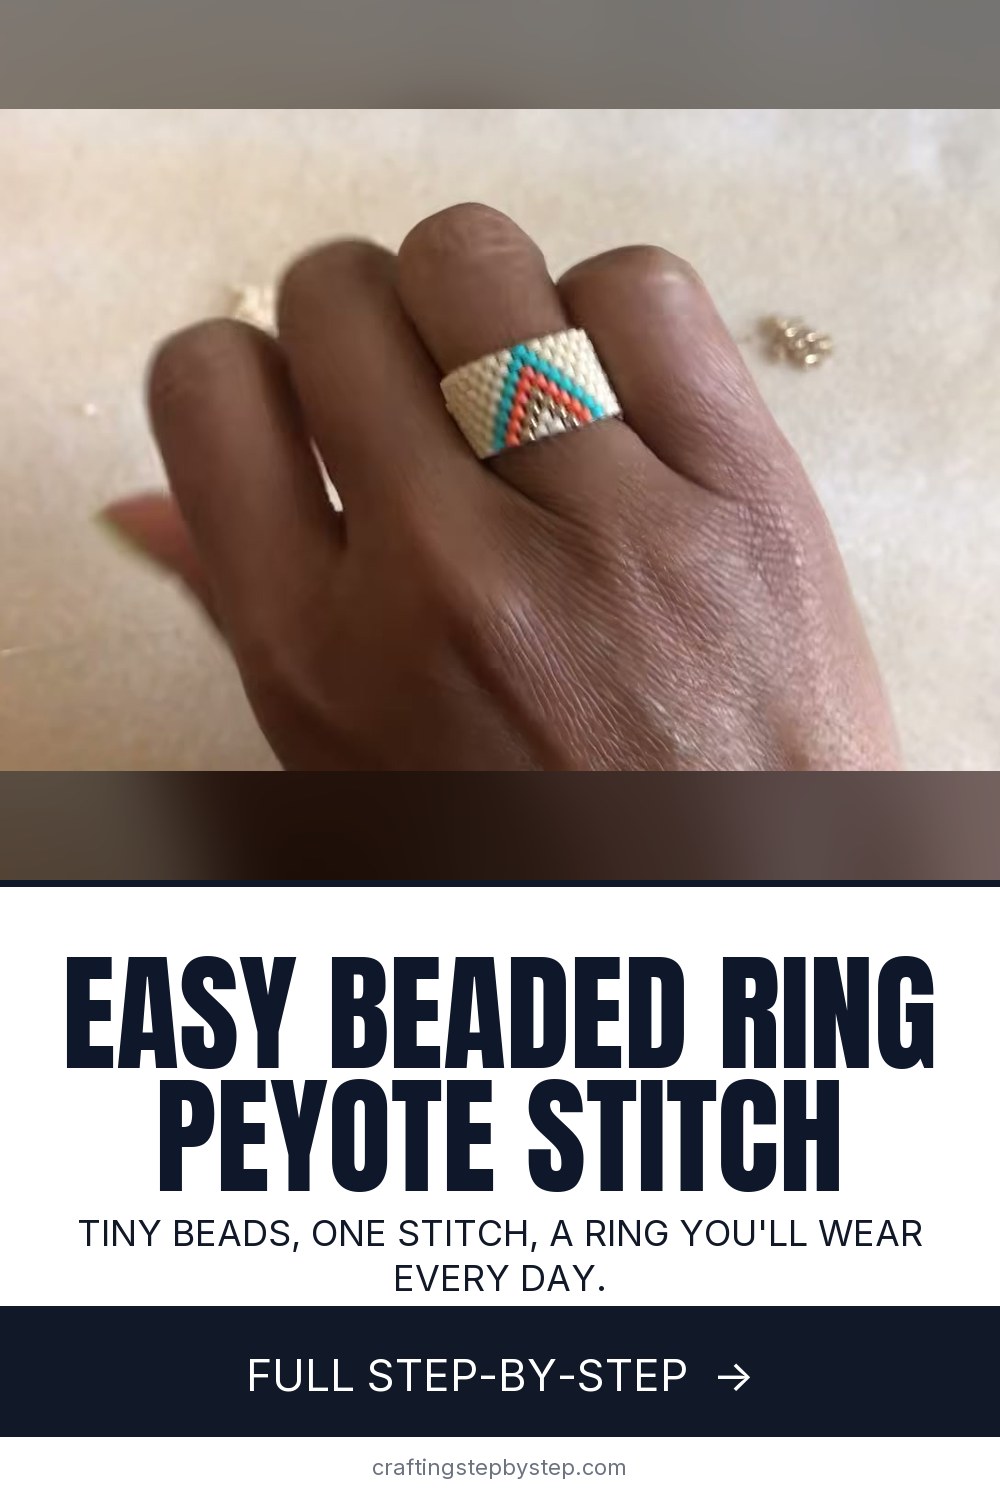
The finished result: How to Make a Beaded Ring - Easy Peyote Stitch Ring
  • Difficulty: Medium
  • About 1 hour 30 minutes
  • 9 steps

You tapped Save

Save this project for later

We'll email you a link, no password.

How to Make a Beaded Ring - Easy Peyote Stitch Ring

  • Your saved projects in one list
  • Your ticked steps on any device

Check your inbox for an email from us. Not there? Look in your spam folder.

Print

Steps written out by Crafting Step by Step from Snails and Fairy Dust - Beading Tutorials 's video (opens YouTube) (11:57). Published .

A beaded ring made in peyote stitch is a flat band of tiny seed beads that you zip into a circle. It is one of the best first projects in bead weaving because it is small, it comes together in an evening and you learn a stitch you will use for years. This tutorial is from Snails and Fairy Dust. She works an even count peyote band eight beads wide, adds a simple chevron in turquoise, coral and gold, then joins the ends so the seam disappears.

How to make a beaded ring: the short version

  • Add a stop bead and pick up eight beads.
  • Work the first peyote row by skipping every other bead.
  • Add four beads per row, each one between two up beads.
  • Work about 16 rows plain, then add a color design.
  • Keep going until the band wraps around your finger.
  • Zip the ends together, then weave in and clip the threads.

Beads and thread

Use cylinder beads such as Miyuki Delica size 11. They are shaped like tiny tubes and sit flat against each other, so peyote looks crisp and even. Round seed beads work too, but the band will look bumpier. For thread, she uses 6 lb Fireline. It is a braided line that does not stretch or fray, and a ring needs that strength because it gets pulled and rubbed all day. Use a size 12 beading needle so it fits through each bead more than once.

Getting the size right

Peyote rings close like a zipper, so the two ends have to fit together. Up beads on one end must meet down beads on the other. That means you always add rows in pairs. Wrap the band around the finger you plan to wear it on, check the fit, and add two more rows if it is tight. A wider band, or a knuckle that is bigger than the base of your finger, needs a slightly longer band so it slides on.

Designing your own pattern

Once the plain rows feel easy, play with color. She builds a diagonal triangle by starting one blue bead at the edge and following where each new colored bead lands, row by row. Graph paper helps if you want to plan ahead. Stagger the squares like bricks, since peyote rows offset by half a bead. Stripes, chevrons and initials all work on an eight bead band. Make a stack of three in matching colors and wear them together.

Common problems

  • Beads will not sit in line. Nudge them with a fingernail and keep the thread tension steady. Fireline holds them once they settle.
  • Lost track of the up beads. The up beads stick out a little higher. Always go through those, never the low ones.
  • Ring will not close. The ends do not mesh because there is an odd row. Add or remove one row.
  • Thread showing at the seam. Weave back through the join a second time and pull it snug.

More jewelry to make

Use the same beads for a beaded bracelet or a seasonal beaded snowflake. For findings, learn how to open a jump ring and how to use crimp beads.

Free printable

Print the steps and supply list for this project

One page you can take to the table. Free with a free account, no password.

Get the free printable

What you'll need

Free, for this project

Get this checklist by email

  • All 5 tools and materials, with tick boxes
  • A link to print all 9 steps on paper, to keep by you while you craft

No password. The whole tutorial stays free on this page.

Quick answer

Learn how to make a beaded ring with even count peyote stitch: an eight bead band, a simple chevron and a zipped seam. A medium project: about 1 hour 30 minutes. Materials cost about $3 to $6. You need 5 things, including 6 lb Fireline beading thread, size 12 beading needle and flush cutters or thread snips. The 9 steps start with add a Stop Bead and Pick Up Eight Beads for the Ring.

Step-by-step guide

9 steps, about 12 minutes. Tap a picture to jump to that step. Your progress saves automatically.

Tick each step off as you go.

  1. Step 1: Add a Stop Bead and Pick Up Eight Beads for the Ring

    Watch this step · 1:25

    Cut 4 to 5 feet of Fireline and thread your needle. Pick up one bead in a contrast color as a stop bead. Slide it down, leaving a 4 inch tail, and pass the needle back through it once so it holds. Then pick up eight beads in your main color and slide them down to the stop bead. These eight beads make your first two rows.

    Tip:

    Use a bead color you will not use in the ring for the stop bead. It comes off later.

    Back to all steps

  2. Step 2: Work the First Peyote Stitch on the Beaded Ring

    Watch this step · 1:44

    Wrap the thread around your finger to hold tension. Pick up one new bead. Skip the last bead you strung and pass the needle through the next one, which is bead two counting up from the stop bead. Pull it snug. The new bead and the bead it sits beside line up and start to form a little triangle.

    Tip:

    Count from the stop bead the first time. After that the pattern shows you where to go.

    Back to all steps

  3. Step 3: Finish the First Two Peyote Rows

    Watch this step · 3:18

    Keep going the same way. Pick up a bead, skip the next bead in the original row, and pass through the bead after it. Repeat until you reach the end. You will see a row of small stepped triangles. If a bead is not sitting where it should, wiggle it into place with your nail. That completes the first two rows.

    Tip:

    Hold the tiny strip flat between finger and thumb. It is easier to see the steps.

    Back to all steps

  4. Step 4: Add Four Beads Between the Up Beads Each Row

    Watch this step · 3:45

    Take off the stop bead. From now on every row is four beads. Turn and work back the other way. Pick up one bead and pass through the next bead that sticks up higher than the others, the up bead. Pick up a bead, go through the next up bead, and so on. Keep building until you have about 16 rows.

    Tip:

    Count rows along the edge in zigzags. Each point on the edge is two rows.

    Back to all steps

  5. Step 5: Start the Triangle Design on the Beaded Ring

    Watch this step · 5:00

    To start the chevron, use one colored bead as the first bead of a row. On the next row, when you reach that colored bead, add another one beside it. Keep stepping the color over by one bead each row. A second color follows one row behind. The colors build a small diagonal triangle across the band.

    Tip:

    Lay the colors out in order on your mat before you start the design.

    Back to all steps

  6. Step 6: Build the Diagonal Stripes of the Ring Design

    Watch this step · 6:25

    Continue the diagonal until the first color reaches the top edge of the band. She adds turquoise, coral and gold lines that follow each other, which makes a rainbow chevron. Follow where each bead naturally lands. Once the design is done, go back to your main color and keep weaving until the band almost wraps around your finger.

    Tip:

    Snap a phone photo of the design as you go so you can copy it on a matching ring.

    Back to all steps

  7. Step 7: Size the Beaded Ring and Line Up the Ends

    Watch this step · 8:48

    Wrap the band around your finger to check the length. The two ends must fit together like a zipper, with up beads on one end and down beads on the other. If it is too short, add two more rows so the teeth still mesh. She added two rows to hers. When the length is right, bring the ends together with the teeth interlocking.

    Tip:

    Always add rows in pairs. One extra row means the ends will not mesh.

    Back to all steps

  8. Step 8: Zip the Beaded Ring Seam Closed

    Watch this step · 9:08

    With the ends meshed, pass the needle through the up bead on the opposite end. Then go through the up bead on the near end, and back across again, zigzagging until you reach the last bead. Give the thread a good tug. The join pulls together and almost disappears. Weave back through the seam once more to secure it.

    Tip:

    Pull slowly. Fireline is strong, but a sudden yank can kink it.

    Back to all steps

  9. Step 9: Weave In and Clip the Beaded Ring Threads

    Watch this step · 11:20

    Weave the working thread back into the band. Find two neighbouring beads and loop around them two or three times to anchor the thread, then weave a little further and anchor again. A ring gets a lot of wear, so do it twice. Clip the end close. Thread the starting tail and finish it the same way.

    Tip:

    Use flush cutters. Scissors fray Fireline and leave a fuzzy end.

    Back to all steps

How to Make a Letter Bead Friendship Bracelet

Keep going

How to Make a Letter Bead Friendship Bracelet

Keep going with jewelry making

More on this topic, picked for this beaded ring.

You reached the last step

Save this project to come back to it

Your ticked steps, the free printable and your other saved makes, together in My Projects. Free, no password.

You tapped Save

Save this project for later

We'll email you a link, no password.

How to Make a Beaded Ring - Easy Peyote Stitch Ring

  • Your saved projects in one list
  • Your ticked steps on any device

Check your inbox for an email from us. Not there? Look in your spam folder.

Free printable

Printable sheet and shopping list for this project

The bonus is hidden until you sign up.

Free with a free account, no password. Every step above stays open to everyone.

Products Used

The Checklist

How to Make a Beaded Ring - Easy Peyote Stitch Ring

Tools
3
Materials
2
Steps
9
Video
12 min

Tools we recommend

As an Amazon Associate we earn from qualifying purchases. Links on this page may be affiliate links - clicking them and buying doesn't change your price, but helps support Crafting Step by Step.

Tags

The Crafter's Weekly

New jewelry making tutorials, every Sunday

One short email with the week's best step-by-step guides. Free, no spam, unsubscribe anytime.

Did this work for you?

What's next

Related collections

Curated theme pages that include this tutorial.

Similar tutorials

Hand-picked next reads based on the one you just finished.

Liked this jewelry making tutorial?

Pick the crafts you want to hear about. One email every Sunday with new step-by-step tutorials. No spam, easy to unsubscribe.

Get more like this in your inbox

Weekly digest. Pick the categories you want. Unsubscribe anytime.

Send me tutorials about

We only email about new tutorials. Easy unsubscribe anytime.