How to Draw With Stippling: Shade a Sphere With Dots

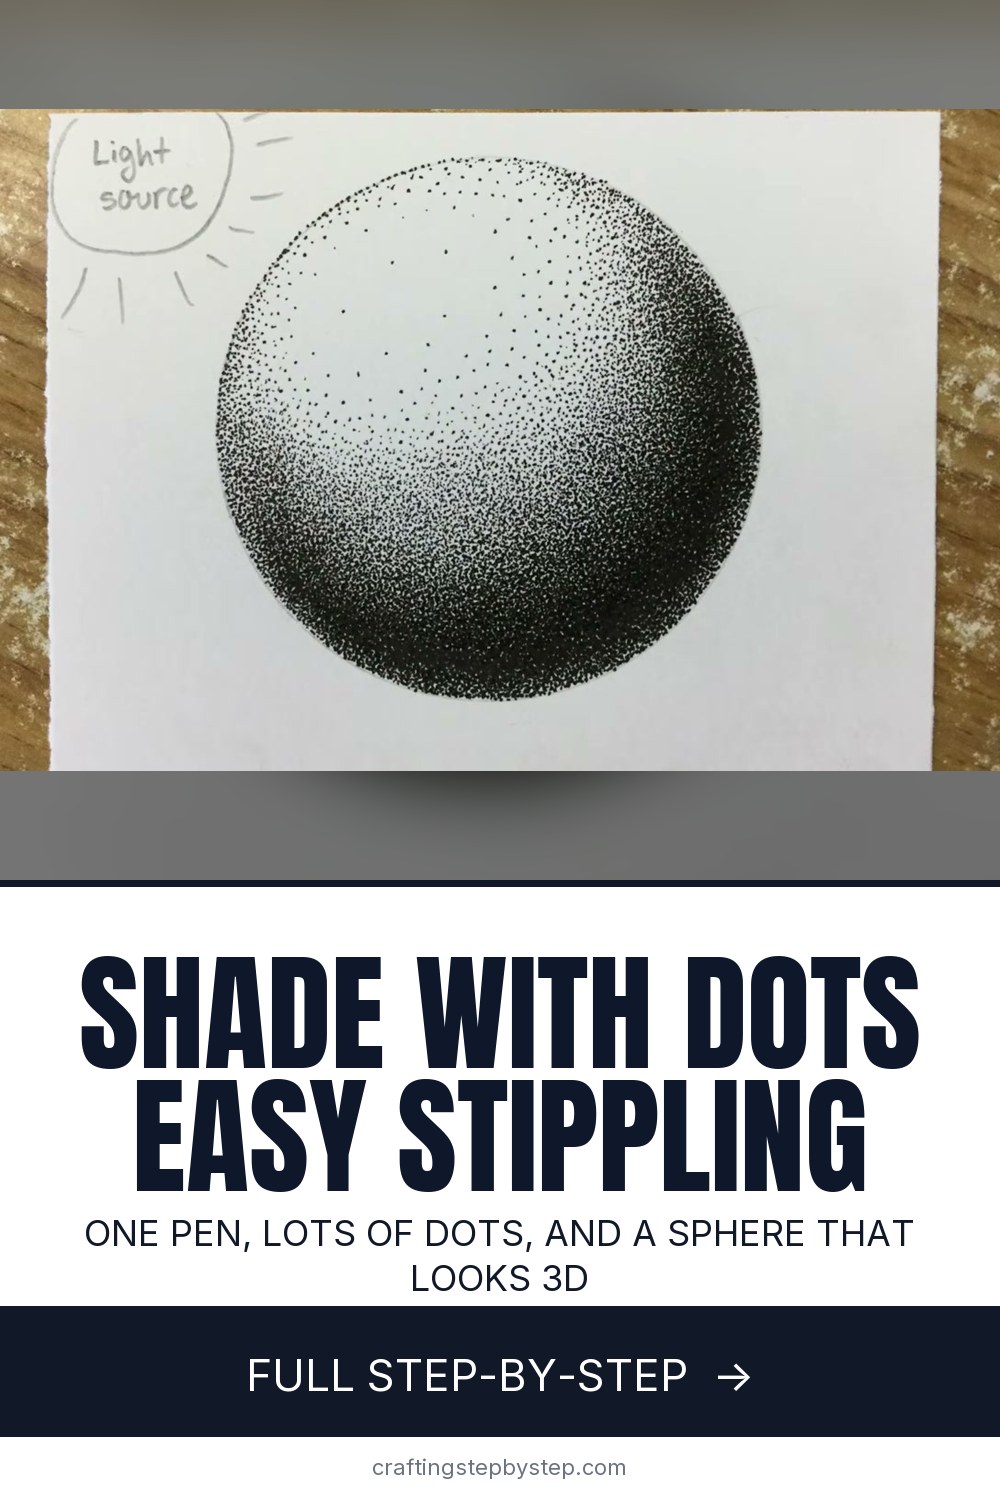
The finished result: How to Draw With Stippling: Shade a Sphere With Dots
  • Difficulty: Easy
  • About 1 hour 30 minutes
  • 9 steps

You tapped Save

Save this project for later

We'll email you a link, no password.

How to Draw With Stippling: Shade a Sphere With Dots

  • Your saved projects in one list
  • Your ticked steps on any device

Check your inbox for an email from us. Not there? Look in your spam folder.

Print

Steps written out by Crafting Step by Step from Ms. Cooper's Art Class' video (opens YouTube) (6:17). Published .

Stippling is drawing with dots. That is the whole trick. Put dots close together and an area reads as dark. Spread them out and it reads as light. This tutorial follows Ms. Cooper's Art Class on YouTube, where she warms up with a dotted value scale and then shades a round sphere with a fine black pen. It is slow, calm work, and the results look far more polished than the method suggests.

How to draw with stippling: the short version

  • Practice a value scale first, light dots on one end and packed dots on the other.
  • Draw a light pencil outline and mark where the light comes from.
  • Lay a thin, even base layer of dots over the whole shape.
  • Place the darkest dots opposite the light, then work outward into the lights.
  • Smooth the gradient with tiny, light taps of the pen.

What you need

A fine archival pen does most of the work. Ms. Cooper uses a Micron 05, which makes a clean, round dot. Smaller sizes like 01 and 005 make finer dots and smoother shading, but take longer. Pick smooth paper, such as Bristol or a heavy drawing paper. Rough paper drags the pen and the dots come out ragged. Keep a pencil and a kneaded eraser for the outline.

Dots, not dashes

Hold the pen straight up and down and tap it. Lift fully between dots. If the pen drags even a little, you get commas and tick marks instead of dots, and the shading looks hairy. Those marks can look interesting, but they are a different technique. Small circles are not stippling either. Real dots leave tiny gaps of white paper, and that is what makes the drawing look neat.

Why work from dark to light

You can always add dots. You cannot take them away. Building the darkest area first and easing outward keeps you from going too dark too fast in the middle tones. It also helps you avoid clumps. A clump in a light area is hard to hide. Hiding one means darkening everything around it.

How long does it take?

Longer than you think. The sphere in the video took Ms. Cooper a little under an hour and a half, with the footage sped up. Plan short sessions. Stippling is a good thing to do in front of a show or with music on, a few minutes at a time.

Where stippling shines

Dots suit soft, rounded subjects: fruit, stones, shells, feathers and faces. They also print well, which is why the look shows up in old book plates and botanical art.

Common problems

  • Patchy shading. Look for odd white gaps and drop single dots into the middle of each one.
  • Visible rows or a grid. Place dots by eye, in the spaces between other dots, never in lines.
  • Too dark too soon. Stop and squint. Lighten the rest of the drawing with more dots instead of fighting the dark spot.
  • Ink smudges. Rest your hand on a scrap of paper while you work.

Where to go next

Stippling pairs well with any shading lesson. Brush up on light and shadow in how to shade, then try dots on a real subject like a leaf or a nose. New to drawing? Start with the basics in how to draw.

Free printable

Print the steps and supply list for this project

One page you can take to the table. Free with a free account, no password.

Get the free printable

What you'll need

Free, for this project

Get this checklist by email

  • All 6 tools and materials, with tick boxes
  • A link to print all 9 steps on paper, to keep by you while you craft

No password. The whole tutorial stays free on this page.

Quick answer

Learn how to draw with stippling: build a dotted value scale, then shade a sphere from dark to light with a fine pen. An easy project: about 1 hour 30 minutes. You need 6 things, including smooth Bristol or drawing paper, Micron 05 pen and finer Micron pens. The 9 steps start with start a Stippling Value Scale With Light Dots, pack Dense Dots Into the Dark End of the Value Scale and know What Stippling Is Not.

Step-by-step guide

9 steps, about 6 minutes. Tap a picture to jump to that step. Your progress saves automatically.

Tick each step off as you go.

  1. Step 1: Start a Stippling Value Scale With Light Dots

    Watch this step · 0:30

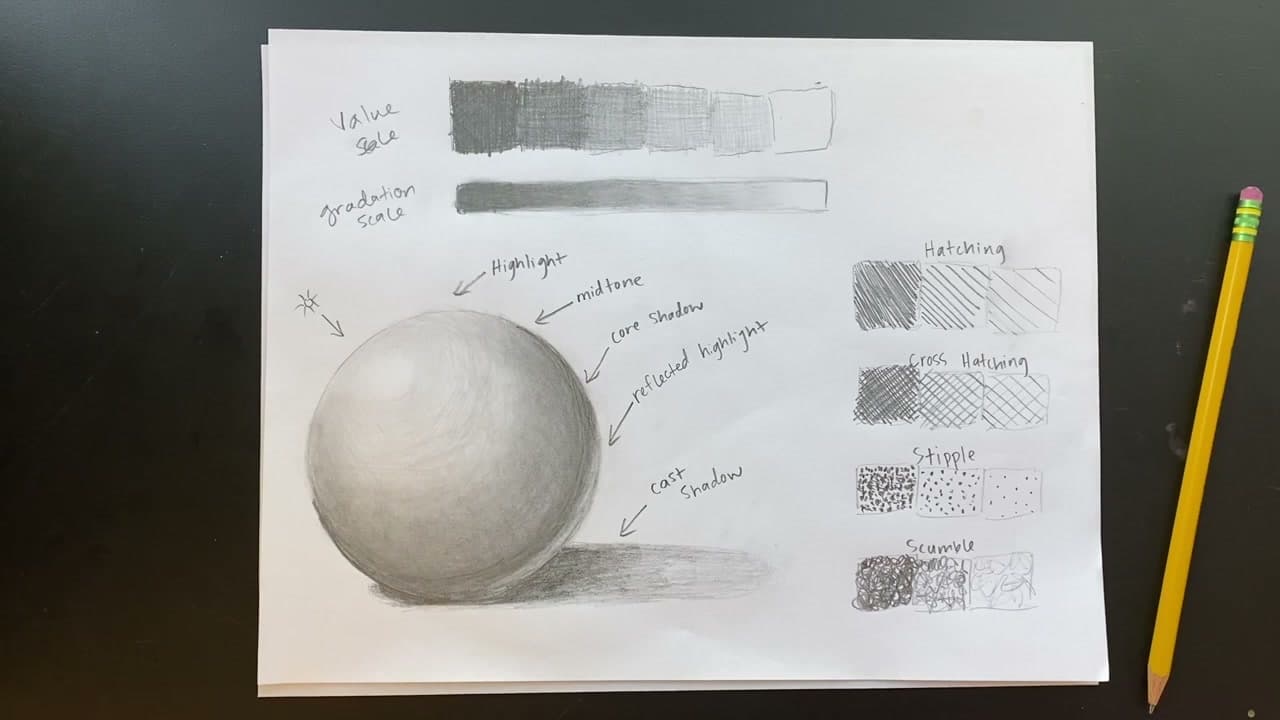
    Draw a long rectangle on your paper. This is a value scale, a strip that runs from light to dark. Tap a few dots into the left end, spaced well apart. Then add more as you move right, a little closer together each time. Keep the pen straight up and lift it fully between dots. You are training your hand to make a clean round dot every time.

    Tip:

    A Micron 05 makes a dot big enough to see while you learn.

    Back to all steps

  2. Step 2: Pack Dense Dots Into the Dark End of the Value Scale

    Watch this step · 0:45

    At the right end of the rectangle, pack your dots in tight. This is the darkest value, and you will see it looks almost solid black from a step back. Your pen moves fast here. Then work back toward the light end, placing each new dot in the middle of the gap between others. The goal is a smooth fade with no sudden jumps.

    Tip:

    Squint at the strip. Any band that jumps out needs a few more dots.

    Back to all steps

  3. Step 3: Know What Stippling Is Not

    Watch this step · 1:22

    Draw a couple of small boxes beside your scale and try the marks to avoid. Little hairs, dust flecks and tick marks happen when the pen drags. Tiny circles happen when you move the pen around. Both look interesting, but neither one is stippling. Seeing them next to real dots makes it easier to catch yourself when your hand gets tired and starts to slide.

    Tip:

    Slow down if your dots start growing tails.

    Back to all steps

  4. Step 4: Sketch a Circle and Light Source for a Stippled Sphere

    Watch this step · 1:35

    Lightly draw a circle in pencil. A drawing compass or a jar lid works well. In one corner, sketch a little sun and label it as the light source. Everything you shade will follow from that mark. Then start scattering a few dots inside the circle with your pen, spread wide apart, to start the base layer.

    Tip:

    Keep the pencil light so you can erase it once the ink is dry.

    Back to all steps

  5. Step 5: Lay a Light Base Layer of Dots Over the Sphere

    Watch this step · 1:52

    Keep adding dots until the whole circle has an even, light covering. This base layer shows you how dark the brightest part of the sphere will be. Spread the dots evenly. Avoid clusters now, because clumps in the light areas are the hardest thing to fix later. The circle should look like a soft grey disk, not yet round.

    Tip:

    Turn the paper as you go so your hand never smears the ink.

    Back to all steps

  6. Step 6: Place the Darkest Core Shadow Dots Opposite the Light

    Watch this step · 2:15

    Find the side of the sphere farthest from your light source. That is where the core shadow goes. Pack dots into a curved band along that side. It takes a while to build real darkness, so be patient. Make sure every mark is a dot and not a scribble. Real dots look neater and more even from a distance.

    Tip:

    Zoom in on your own work with a phone camera to check your dots.

    Back to all steps

  7. Step 7: Leave a Lighter Rim for Reflected Light on the Sphere

    Watch this step · 2:43

    Look at the bottom edge of your sphere. Keep the darkest band a little way in from the outline, not right on it. When a ball sits on a table, light bounces off the surface and back onto its underside. That thin rim is a touch lighter than the core shadow. Leaving it is what makes the sphere look round instead of flat.

    Tip:

    The reflected light is subtle. It should stay darker than the lit side.

    Back to all steps

  8. Step 8: Spread Stipple Dots From Dark Into Light

    Watch this step · 3:20

    Now blend. Start at the edge of the dark band and add dots that spread out as you move toward the light. Work in small sections and do it slowly, the same way you built the value scale. Going from dark into light keeps you from overdoing the middle tones. Even out both sides of the sphere so the gradient wraps around evenly.

    Tip:

    Stop often and look at it from across the room.

    Back to all steps

  9. Step 9: Even Out Clumps With Tiny Stipple Dots

    Watch this step · 4:40

    Look for white gaps and spots where dots crowd together. Instead of pressing for a full dot, barely tap the paper to make the smallest dot you can. Add enough of these and the shading turns smooth. This finishing pass takes the most time. When you are happy, let the ink dry and gently erase the pencil outline.

    Tip:

    A finer pen like a Micron 01 makes these tiny filler dots easier.

    Back to all steps

How to Draw a Christmas Ornament

Keep going

How to Draw a Christmas Ornament

10 steps · about 6 minutes

Keep going with drawing

More on this topic, picked for this project.

You reached the last step

Save this project to come back to it

Your ticked steps, the free printable and your other saved makes, together in My Projects. Free, no password.

You tapped Save

Save this project for later

We'll email you a link, no password.

How to Draw With Stippling: Shade a Sphere With Dots

  • Your saved projects in one list
  • Your ticked steps on any device

Check your inbox for an email from us. Not there? Look in your spam folder.

Free printable

Printable sheet and shopping list for this project

The bonus is hidden until you sign up.

Free with a free account, no password. Every step above stays open to everyone.

Products Used

The Checklist

How to Draw With Stippling: Shade a Sphere With Dots

Tools
5
Materials
1
Steps
9
Video
6 min

Tools we recommend

As an Amazon Associate we earn from qualifying purchases. Links on this page may be affiliate links - clicking them and buying doesn't change your price, but helps support Crafting Step by Step.

Tags

The Crafter's Weekly

New drawing tutorials, every Sunday

One short email with the week's best step-by-step guides. Free, no spam, unsubscribe anytime.

Did this work for you?

What's next

Related collections

Curated theme pages that include this tutorial.

Similar tutorials

Hand-picked next reads based on the one you just finished.

Liked this drawing tutorial?

Pick the crafts you want to hear about. One email every Sunday with new step-by-step tutorials. No spam, easy to unsubscribe.

Get more like this in your inbox

Weekly digest. Pick the categories you want. Unsubscribe anytime.

Send me tutorials about

We only email about new tutorials. Easy unsubscribe anytime.