How to Draw a Christmas Ornament

Save it for later. We'll email you a link, no password.

Find it again on your phone or computer, with your finished steps ticked.

You tapped Save

Save this project for later

We'll email you a link, no password.

How to Draw a Christmas Ornament

  • Your saved projects in one list
  • Your ticked steps on any device

Check your inbox for an email from us. Not there? Look in your spam folder.

  • 10 steps
  • 6:00 video
  • Difficulty: Easy
  • About 30 minutes
  • Drawing

Based on a video by DoodleDrawArt with Lisa

Opens their YouTube channel

Steps written out by Crafting Step by Step · Published · Updated

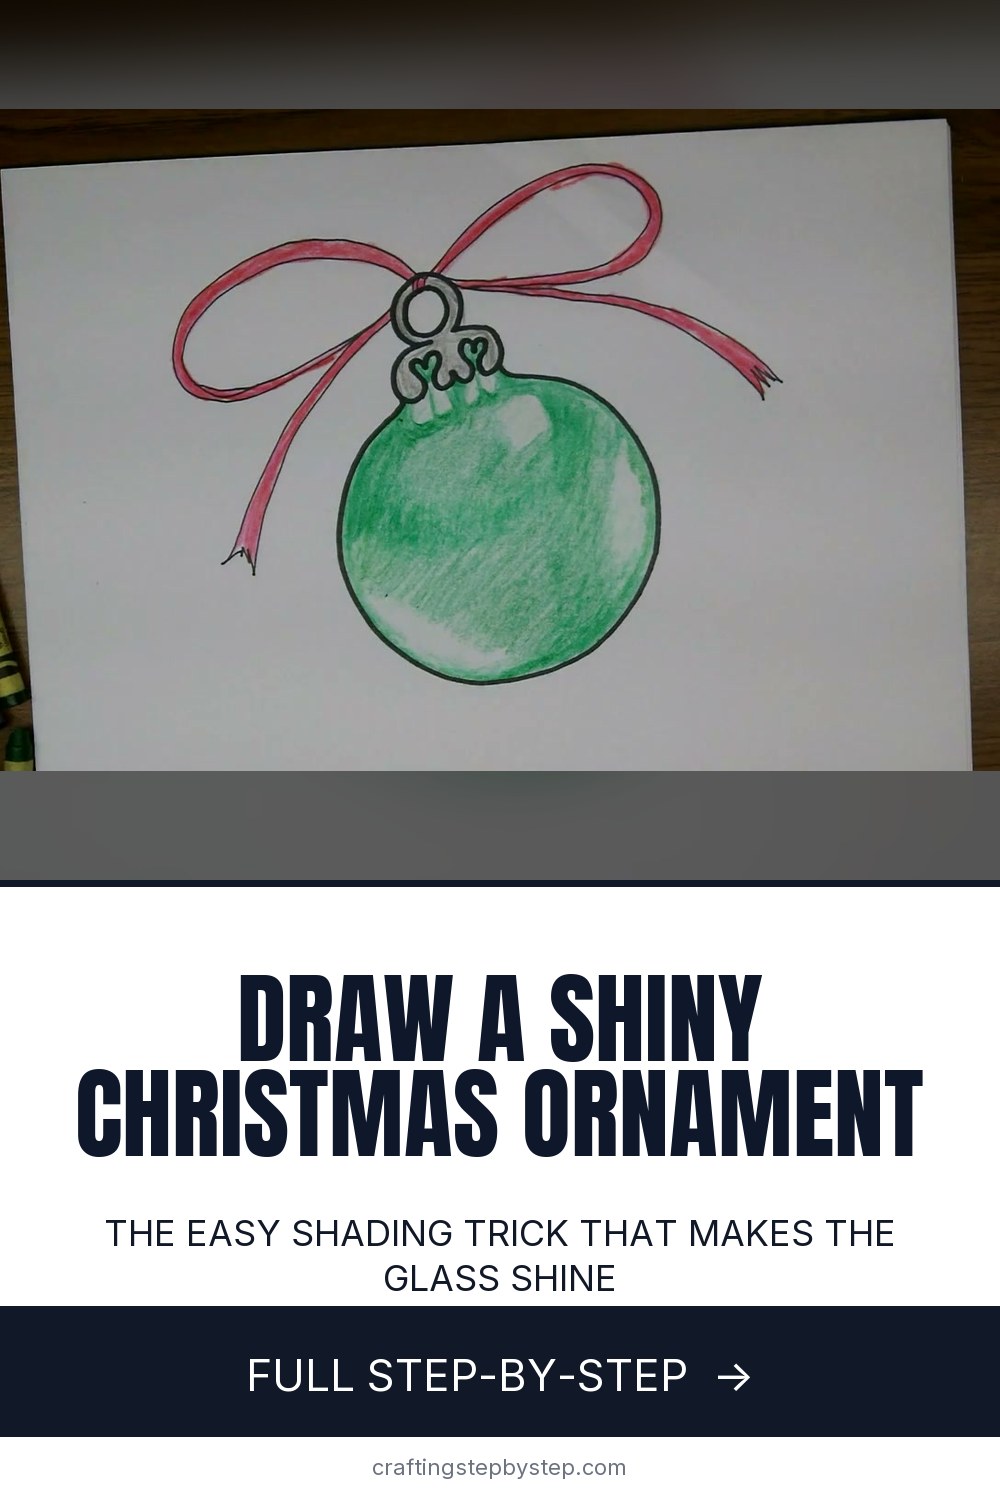
The finished result: How to Draw a Christmas Ornament

This Christmas ornament comes from Lisa at DoodleDrawArt with Lisa. She draws a round glass ball with a fancy clasp on top and a red ribbon bow, then colors it so the glass looks shiny. It is an easy lesson, and the shading trick at the end is worth learning. The whole drawing takes about six minutes.

You need a pencil, an eraser, a black marker and crayons or colored pencils.

Christmas ornament drawing: how to make glass look shiny

The ball is a plain circle until you shade it. Lisa's method works for any round, glossy object.

  • Pick a light source. Decide where the light hits. Lisa puts it at the top right.
  • Start pale. Lay down a soft, even layer of color over the whole ball.
  • Darken in curves. Build darker color near the edges in arcs that follow the round shape. Straight strokes make it look flat.
  • Save the shine. Leave a small patch of bare paper near the light. Cover it with a fingertip while you color around it.

Light only shows up next to dark, so the edge around the shine should be your darkest color. For more on this, see how to shade.

Ornament shapes to try

Once the ball feels easy, change the body and keep the same cap and bow.

  • Teardrop: a circle that stretches to a point at the bottom.
  • Finial: a long, skinny shape that tapers to a spike, like a vintage icicle.
  • Star: a five-point star with the loop on the top point.

Pattern bands for a fancier ornament

Draw two curved lines across the middle of the ball. Curve them like a smile so they wrap around the glass. Fill the band with stripes, dots, zigzags or tiny snowflakes. Shade the ball after the pattern, and let the shine cross right over the band.

Paper ornaments and gift tags

Draw the ornament on cardstock, color it and cut it out. Punch a hole through the loop and tie on a ribbon. Now it hangs on a real tree. A smaller one makes a sweet gift tag. Write the name on the back, or follow how to make Christmas gift tags. Grandchildren can draw a whole set in different colors for the tree.

Want an ornament you can keep for years? Try salt dough ornaments.

Ornament drawing ideas to try next

  • A row of three ornaments in red, gold and blue hanging from one ribbon.
  • A whole tree to hang them on: how to draw a Christmas tree.
  • An ornament with a monogram letter on the front.
  • A silver ball that reflects a tiny window shape in the shine.

Common problems

The circle is lumpy. Trace a cup or a jar lid. Lisa suggests it.

The ball looks flat. Your dark color is too even. Push it to the edges and leave the middle lighter.

The shine disappeared. Color is hard to take back off. Mark the shine first and keep coloring around it.
Free printable

Print the steps and supply list for this project

One page you can take to the table. Free with a free account, no password.

Get the free printable

What you'll need

Free, for this project

Get this checklist by email

  • All 7 tools and materials, with tick boxes
  • A link to print all 10 steps on paper, to keep by you while you craft

No password. The whole tutorial stays free on this page.

Quick answer

Draw a shiny Christmas ornament with a fancy clasp and red ribbon bow in 10 easy steps. An easy project: about 30 minutes. You need 7 things, including drawing paper or sketch pad, crayons or colored pencils and pencil. The 10 steps start with sketch the Round Christmas Ornament Ball in Pencil, draw the Christmas Ornament's Fancy Clasp With Heart Curls, sketch a Ribbon Bow Above the Christmas Ornament and outline the Christmas Ornament Ball in Black Marker.

Step-by-step guide

10 steps, about 6 minutes. Tap a picture to jump to that step. Your progress saves automatically.

Tick each step off as you go.

  1. Step 1: Sketch the Round Christmas Ornament Ball in Pencil

    Watch this step · 0:18

    Draw a big circle in the middle of your page with a pencil. Press lightly. These are guide lines, and you will erase them later. Make the circle as round as you can. If freehand circles give you trouble, trace a cup or a jar lid. Then draw a small rounded box on top of the circle for the ornament's cap, and a little circle above it for the hanging loop.

    Tip:

    Leave room above the ornament for the ribbon bow.

    Back to all steps

  2. Step 2: Draw the Christmas Ornament's Fancy Clasp With Heart Curls

    Watch this step · 1:06

    Now dress up the cap. Draw a circle for the loop at the top. Then add the metal clasp that holds the ornament on. Lisa makes it curve around and form a little heart shape in the middle, then loops down and makes another heart on each side. It looks fancy, but it is only a few curls. You can keep it simpler with a plain rectangle cap.

    Tip:

    Keep the clasp small. It should look like a jewel on top, not a second ball.

    Back to all steps

  3. Step 3: Sketch a Ribbon Bow Above the Christmas Ornament

    Watch this step · 1:44

    Draw the bow as a big sideways figure eight, with one loop on each side of the ornament loop. Then draw two ribbon tails coming down and out. Go back and double each line so the ribbon has thickness. It does not need to be the same width everywhere. Ribbon is fabric, so it twists and moves. Cut a little notch into the end of each tail.

    Tip:

    Uneven ribbon looks more natural than a stiff, perfect bow.

    Back to all steps

  4. Step 4: Outline the Christmas Ornament Ball in Black Marker

    Watch this step · 2:12

    Fix any spots you do not like, then grab a black permanent marker. Trace the ball carefully. Try to go around in one long, sweeping line instead of lots of short strokes. That keeps the circle smooth. Trace the loop and the heart-curl clasp the same way. Lisa uses a regular Sharpie here because the ornament is the star of the drawing.

    Tip:

    Turn your paper as you go. It is easier than twisting your wrist.

    Back to all steps

  5. Step 5: Outline the Ribbon Bow With a Fine Marker

    Watch this step · 2:22

    Switch to a finer marker for the ribbon bow. The bow sits behind the ornament, so a thinner line keeps it from fighting for attention. Trace both loops, the tails and the notched ends. Follow your doubled pencil lines so the ribbon keeps its width. Where the bow passes behind the loop, stop the line so the loop stays in front.

    Tip:

    No fine marker? Use the same one and press more lightly.

    Back to all steps

  6. Step 6: Erase the Pencil Lines From the Christmas Ornament

    Watch this step · 2:42

    Let the ink dry for a minute so it does not smear. Then erase all the pencil marks. Hold the paper flat with your other hand and rub gently. Check around the bow loops and the clasp. Little pencil lines like to hide there. A clean drawing makes the colors look brighter in the next steps.

    Tip:

    A kneadable eraser lifts graphite without scuffing the paper.

    Back to all steps

  7. Step 7: Color the Christmas Ornament Clasp Gray

    Watch this step · 2:52

    Color the clasp and the hanging loop gray. That reads as metal. If you have a silver or gold crayon or marker, use it here. Metallic colors catch the light and look great on a holiday card. Color lightly and stay inside your black lines. The little heart curls are small, so slow down.

    Tip:

    A sharp colored pencil is easier than a crayon in tiny spaces.

    Back to all steps

  8. Step 8: Color the Ribbon Bow Red

    Watch this step · 3:10

    Color the ribbon bow red. Lisa uses two reds, a brighter one and a deeper one, to give the fabric some texture. One red works fine too. Color along the length of the ribbon, not across it. Strokes that follow the ribbon make it look like it bends and flows.

    Tip:

    Put the darker red where the ribbon twists or tucks behind the ornament.

    Back to all steps

  9. Step 9: Color a Light Green Base Layer on the Glass Ornament

    Watch this step · 3:55

    Pick a color for the glass. Lisa chooses green. Color the whole ball very lightly with gentle pressure. This pale layer is the base. You are about to add darker color on top and leave some areas light for the reflection, so it matters that you start faint. Too much color now and there is no room left for a shine.

    Tip:

    Hold the crayon near the back end for a lighter touch.

    Back to all steps

  10. Step 10: Shade the Green Ornament and Leave a White Shine

    Watch this step · 4:40

    Now build the shine. Press harder near the edges and color in curved arcs that follow the round shape. Add a few circles under the clasp to show its reflection. Leave a patch at the top right almost white. Darken the color around that patch so it pops. Cover it with your fingertip if you need to. Add color a little at a time. You can always add more.

    Tip:

    Step back often. The glass effect is easier to judge from a few feet away.

    Back to all steps

How to Draw a Raven (Realistic Pencil Sketch)

Keep going

How to Draw a Raven (Realistic Pencil Sketch)

10 steps · about 15 minutes

You reached the last step

Save this project to come back to it

Your ticked steps, the free printable and your other saved makes, together in My Projects. Free, no password.

You tapped Save

Save this project for later

We'll email you a link, no password.

How to Draw a Christmas Ornament

  • Your saved projects in one list
  • Your ticked steps on any device

Check your inbox for an email from us. Not there? Look in your spam folder.

Free printable

Printable sheet for this project

The bonus is hidden until you sign up.

Free with a free account, no password. Every step above stays open to everyone.

Products Used

The Checklist

How to Draw a Christmas Ornament

Tools
4
Materials
3
Steps
10
Video
6 min

Tools we recommend

As an Amazon Associate we earn from qualifying purchases. Links on this page may be affiliate links - clicking them and buying doesn't change your price, but helps support Crafting Step by Step.

Tags

The Crafter's Weekly

New drawing tutorials, every Sunday

One short email with the week's best step-by-step guides. Free, no spam, unsubscribe anytime.

Did this work for you?

What's next

Related collections

Curated theme pages that include this tutorial.

Similar tutorials

Hand-picked next reads based on the one you just finished.

Liked this drawing tutorial?

Pick the crafts you want to hear about. One email every Sunday with new step-by-step tutorials. No spam, easy to unsubscribe.

Get more like this in your inbox

Weekly digest. Pick the categories you want. Unsubscribe anytime.

Send me tutorials about

We only email about new tutorials. Easy unsubscribe anytime.