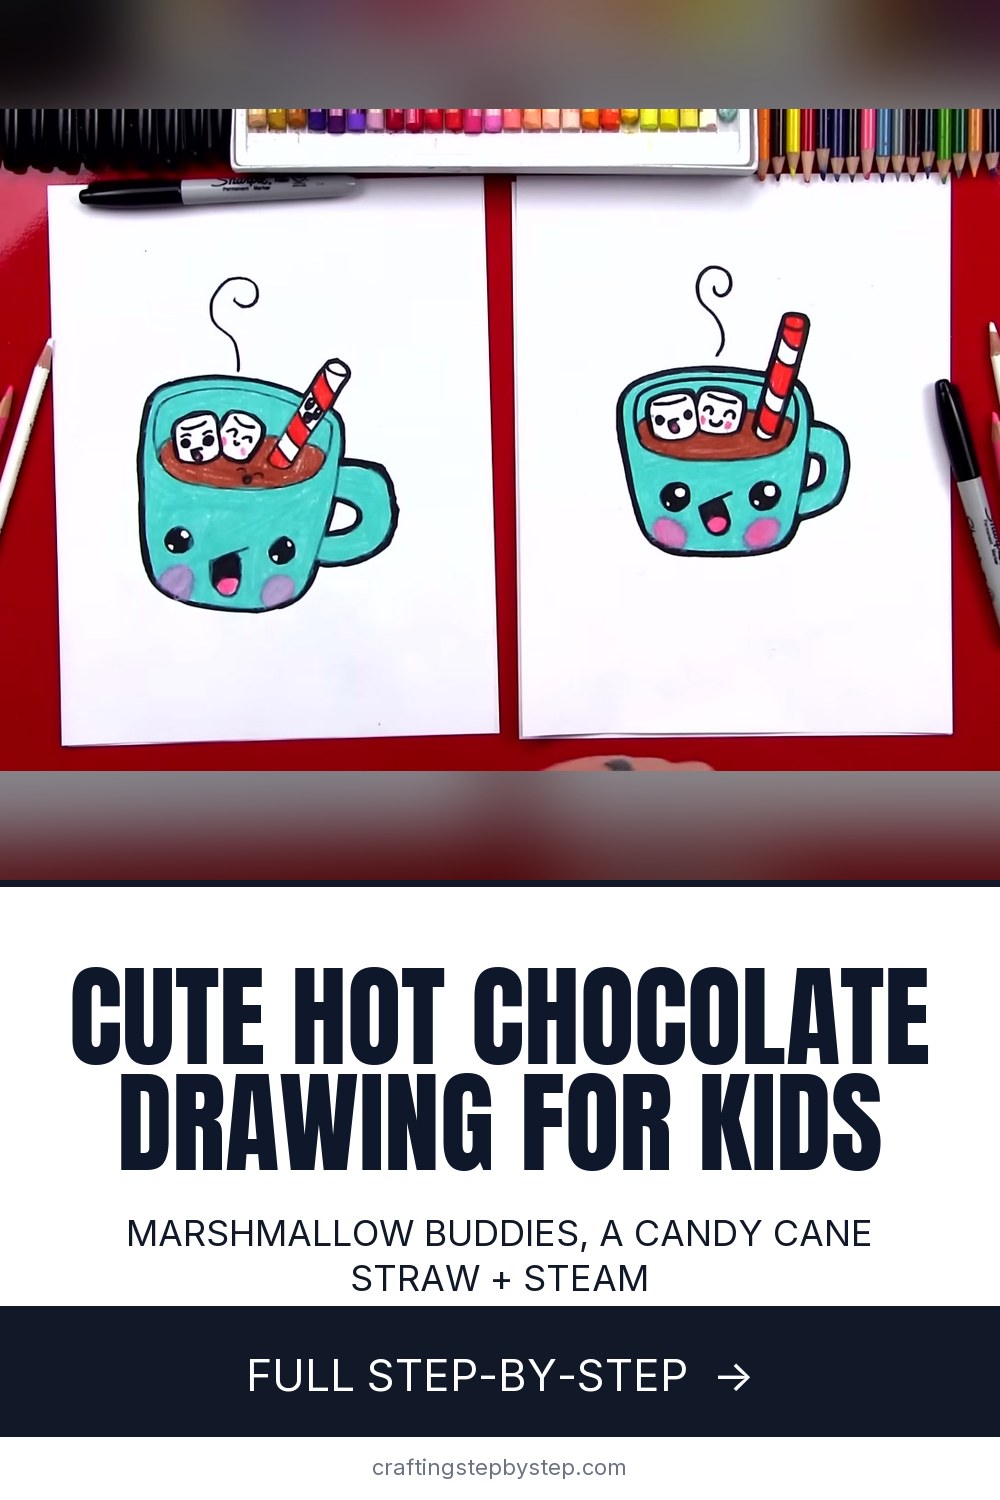
How to Draw Hot Chocolate

Save it for later. We'll email you a link, no password.

Find it again on your phone or computer, with your finished steps ticked.

You tapped Save

Save this project for later

We'll email you a link, no password.

How to Draw Hot Chocolate

  • Your saved projects in one list
  • Your ticked steps on any device

Check your inbox for an email from us. Not there? Look in your spam folder.

  • 10 steps
  • 7:53 video
  • Difficulty: Easy
  • About 15 minutes
  • Materials about $5 to $10
  • Drawing

Based on a video by Art for Kids Hub

Opens their YouTube channel

Steps written out by Crafting Step by Step · Published · Updated

The finished result: How to Draw Hot Chocolate

A cartoon mug of hot chocolate is a cozy winter drawing that kids love, because it gets a face. Two of them, in fact, plus two marshmallow buddies floating on top. This version comes from Art for Kids Hub, where a dad and his son draw side by side. You start with the hot chocolate, add the marshmallows and a striped straw, build the mug around them, then color it. Plan on about ten minutes.

You need a black marker, paper and something to color with.

Why this hot chocolate drawing starts inside the mug

Most people draw the cup first and then try to squeeze things into it. This lesson works the other way. You draw the drink, the marshmallows and the straw first. Then the mug rim and sides go around them, and any line that would cross a marshmallow stops and picks up on the other side. That trick is called overlapping. It makes the marshmallows look like they sit in front, and it saves you from erasing.

Markers, paper and coloring supplies

A fine point black permanent marker gives the bold cartoon outline you see in the video. Printer paper is fine for practice. For a piece you want to keep, a heavier drawing pad stops markers from bleeding through. The video colors with colored pencils, and the creators point out that crayons, markers or oil pastels work too. Washable markers are the fastest pick for little kids.

Draw big. Put the first curve in the middle of the page and make it about as wide as your hand. A mug that fills the sheet is much easier to color.

Hot chocolate drawing ideas to try next

The video mug is teal with a red and white straw, but you can pick any colors. Here are a few ways to change it up:

  • Swap the straw for a peppermint stick and add a candy cane hooked on the handle. Our candy cane drawing shows the stripes.
  • Pile whipped cream on top instead of marshmallows and add sprinkles.
  • Give the straw or the drink its own face, the way the son does in the video.
  • Draw a sweater pattern on the mug, like stripes, snowflakes or a reindeer.
  • Set a cookie friend next to it. A gingerbread man drawing pairs well.

Holiday ways to use your hot chocolate drawing

Fold a piece of cardstock in half and draw a small mug on the front for a winter card. Cut a mini one out, punch a hole and tie it to a present; our Christmas gift tags guide has more ideas. A finished drawing also looks great taped to a classroom window next to a snowman drawing. And when the art is done, a real mug of homemade hot chocolate makes a good reward.

Common hot chocolate drawing problems

  • The mug looks flat. Make sure the rim curve sits above the hot chocolate line. That gap shows the drink is lower than the top of the cup.
  • The marshmallows look like flat squares. Add the small curve on top of each one. That one line makes them look 3D.
  • The handle is too thin. Draw the big backward C first, then a smaller one inside it, and leave a fat gap between them.
  • The eyes look blank. Leave two tiny white circles in each eye when you color it in.

New to drawing? Start with how to draw for the basics.

Free printable

Print the steps and supply list for this project

One page you can take to the table. Free with a free account, no password.

Get the free printable

What you'll need

Free, for this project

Get this checklist by email

  • All 4 tools and materials, with tick boxes
  • A link to print all 10 steps on paper, to keep by you while you craft

No password. The whole tutorial stays free on this page.

Quick answer

Draw a cute mug of hot chocolate in 10 easy steps: marshmallows with funny faces, a candy cane straw, a smiling mug and steam. An easy project: about 15 minutes. Materials cost about $5 to $10. You need 4 things, including colored pencils or washable markers, black fine point permanent marker and pencil and eraser. The 10 steps start with draw a Smile Curve for the Top of the Hot Chocolate and draw Two Overlapping Marshmallows in the Hot Chocolate.

Step-by-step guide

10 steps, about 8 minutes. Tap a picture to jump to that step. Your progress saves automatically.

Tick each step off as you go.

  1. Step 1: Draw a Smile Curve for the Top of the Hot Chocolate

    Watch this step · 0:33

    Find the middle of your paper. Draw a wide curve that dips down and comes back up, like a big smile. This is the front edge of the hot chocolate inside the mug. Make it about as wide as your hand. Everything else in the drawing, from the marshmallows to the cup, gets built around this one line.

    Tip:

    Keep the curve in the center of the page. You need room below it for the mug and above it for the steam.

    Back to all steps

  2. Step 2: Draw Two Overlapping Marshmallows in the Hot Chocolate

    Watch this step · 1:24

    Right above the curve, draw a line that goes up, over and down. Connect the bottom with a small curve. That is your first marshmallow. Now draw a second one beside it, tucked behind the first. Start its line where it touches the first marshmallow so it overlaps. Add a little curve on top of each one so they look 3D.

    Tip:

    Round the corners a bit. Soft corners make them read as marshmallows instead of ice cubes.

    Back to all steps

  3. Step 3: Give the Hot Chocolate Marshmallows Funny Faces

    Watch this step · 2:25

    On the front marshmallow, draw two small eyes set far apart and a big U for an open mouth. Color the top of the mouth and leave the bottom white. On the back marshmallow, draw two upside-down U shapes for closed, happy eyes and a small smile. Every face can be different. Silly is the goal here.

    Tip:

    Keep the faces low on each marshmallow so there is room for the 3D curve on top.

    Back to all steps

  4. Step 4: Draw a Striped Candy Cane Straw in the Hot Chocolate

    Watch this step · 3:20

    Beside the marshmallows, draw a long line that comes down into the hot chocolate. Draw a second line right next to it going the same direction. Close the bottom with a small half circle and the top with a squished oval. Then add curved stripes down the straw. With red stripes, it looks like a candy cane.

    Tip:

    Tilt the straw a little. A slanted straw looks more natural than one standing straight up.

    Back to all steps

  5. Step 5: Close the Hot Chocolate Surface Behind the Marshmallows

    Watch this step · 4:04

    Go back to your first curve. Imagine it going behind the marshmallows and the straw. Draw the same curve coming out on the far side, then bring it around and connect it to where you started. Now the hot chocolate is a flat oval with the marshmallows and the straw floating in it.

    Tip:

    Stop the line wherever it hits a marshmallow or the straw, then start again on the other side.

    Back to all steps

  6. Step 6: Draw the Mug Rim, Sides and Bottom Around the Hot Chocolate

    Watch this step · 4:56

    Draw another curve above the hot chocolate oval for the rim of the cup. Let it go behind the straw. Then pull a line down from each side of the rim, curving in a little toward the bottom. Connect the two sides with a curve at the base. The gap between the rim and the drink shows the hot chocolate sits lower than the top.

    Tip:

    Make the mug tall enough to fit a face. About twice as tall as the marshmallows works well.

    Back to all steps

  7. Step 7: Draw a Big Backward C Handle on the Hot Chocolate Mug

    Watch this step · 5:22

    The mug needs a handle. Start near the top of the right side and draw a big backward C shape that curves out and comes back into the cup lower down. Then draw a smaller backward C inside it. The space between the two lines is the thickness of the handle, so keep a nice wide gap.

    Tip:

    A chunky handle looks more cartoon and is easier to color than a thin one.

    Back to all steps

  8. Step 8: Draw a Cute Cartoon Face on the Hot Chocolate Mug

    Watch this step · 6:26

    Draw two circles on the front of the mug for eyes. Inside each, draw a small circle at the top right and a smaller one at the bottom left. Color the big circles in and leave the small ones white so the eyes look shiny. Then draw a short line between the eyes and a big U for an open mouth with a little tongue.

    Tip:

    Keep the face low on the mug, below the hot chocolate line, so it does not crowd the marshmallows.

    Back to all steps

  9. Step 9: Add a Steam Swirl Above the Hot Chocolate Mug

    Watch this step · 6:40

    Above the mug, draw a small swirl that curls up, loops around and comes back down. That wisp of steam tells everyone the hot chocolate is warm. One swirl is enough for a cartoon look. If you want more, add a second smaller one beside it. That finishes the line drawing.

    Tip:

    Leave a little space between the steam and the rim so it looks like it is floating up.

    Back to all steps

  10. Step 10: Color the Hot Chocolate Mug, Marshmallows and Straw

    Watch this step · 7:10

    Pick your colors. In the video, both mugs are teal with brown hot chocolate, white marshmallows, a red and white straw and pink cheeks. Use colored pencils, markers, crayons or oil pastels. Color the drink brown first, then fill in the mug around the face. Leave the marshmallows and the eye highlights white.

    Tip:

    Two small pink circles under the eyes make the face look extra cute.

    Back to all steps

How to Draw a Candle

Keep going

How to Draw a Candle

You reached the last step

Save this project to come back to it

Your ticked steps, the free printable and your other saved makes, together in My Projects. Free, no password.

You tapped Save

Save this project for later

We'll email you a link, no password.

How to Draw Hot Chocolate

  • Your saved projects in one list
  • Your ticked steps on any device

Check your inbox for an email from us. Not there? Look in your spam folder.

Free printable

Printable sheet for this project

The bonus is hidden until you sign up.

Free with a free account, no password. Every step above stays open to everyone.

Products Used

The Checklist

How to Draw Hot Chocolate

Tools
2
Materials
2
Steps
10
Video
8 min

Tools we recommend

As an Amazon Associate we earn from qualifying purchases. Links on this page may be affiliate links - clicking them and buying doesn't change your price, but helps support Crafting Step by Step.

Tags

The Crafter's Weekly

New drawing tutorials, every Sunday

One short email with the week's best step-by-step guides. Free, no spam, unsubscribe anytime.

Test your knowledge

Did the lesson stick? Start with this one.

5 questions covering what you just read. No signup, no score saved, and you can stop after this one.

Question 1 of 5

What do you draw before the mug itself?

Quick reference

Key takeaways from How to Draw Hot Chocolate

5 questions, answers, and one-line explanations. Tap to expand.

  1. 1.What do you draw before the mug itself?

    Answer: The drink and marshmallows

    The mug is built around what sits inside it.

  2. 2.What is it called when a line stops at a marshmallow and picks up past it?

    Answer: Overlapping

    Overlapping puts the marshmallow in front and saves you from erasing.

  3. 3.How big should the first curve be?

    Answer: About the width of your hand

    A hand-wide curve gives a mug big enough to color easily.

  4. 4.What shape makes the mug handle?

    Answer: A big backward C

    A backward C with a smaller one inside makes a handle with thickness.

  5. 5.What does the swirl above the mug tell people?

    Answer: The drink is warm

    A single steam swirl shows the hot chocolate is hot.

Did this work for you?

What's next

Related collections

Curated theme pages that include this tutorial.

Similar tutorials

Hand-picked next reads based on the one you just finished.

Liked this drawing tutorial?

Pick the crafts you want to hear about. One email every Sunday with new step-by-step tutorials. No spam, easy to unsubscribe.

Get more like this in your inbox

Weekly digest. Pick the categories you want. Unsubscribe anytime.

Send me tutorials about

We only email about new tutorials. Easy unsubscribe anytime.