How to Draw a Polar Bear

Save it for later. We'll email you a link, no password.

Find it again on your phone or computer, with your finished steps ticked.

You tapped Save

Save this project for later

We'll email you a link, no password.

How to Draw a Polar Bear

  • Your saved projects in one list
  • Your ticked steps on any device

Check your inbox for an email from us. Not there? Look in your spam folder.

  • 10 steps
  • 14:28 video
  • Difficulty: Easy
  • About 35 minutes
  • Drawing

Based on a video by Art for Kids Hub

Opens their YouTube channel

Steps written out by Crafting Step by Step · Published · Updated

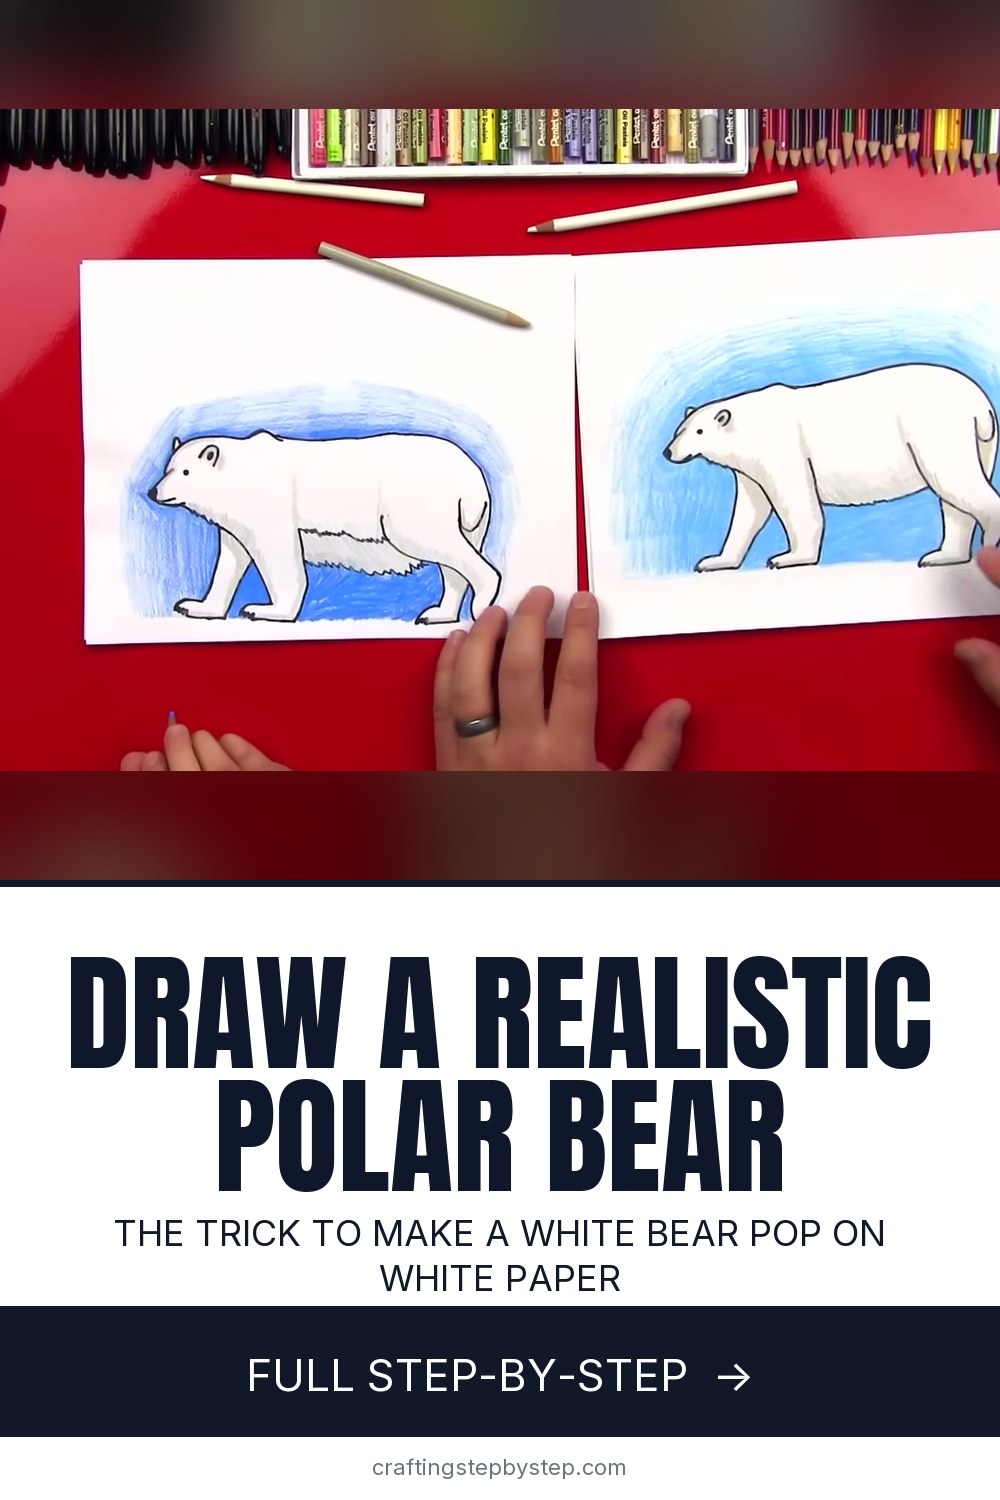
The finished result: How to Draw a Polar Bear

This polar bear drawing comes from Rob at Art for Kids Hub, who draws it side by side with his son. It is one of the channel's realistic lessons, so the bear is drawn from the side, mid-step, with a long snout, a heavy body and fur along the belly. You outline it in black marker, then use three colored pencils to make a white bear stand out on white paper.

Plan on about 15 minutes. Older kids and adult beginners will enjoy it too.

How to draw a white animal on white paper

This is the clever part of the lesson. You never color the bear white. You color the space around it. A light blue background, dark near the bear and fading out toward the edges, makes the paper inside the outline read as white fur. Leave a strip of white under the paws and it turns into ice.

The bear itself only gets a light gray, in short back-and-forth strokes, on the side of each leg, under the belly, behind the ears and on the snout. Those shadows do all the work of making it look round. If you want to go deeper on light and shadow, the how to shade guide covers the basics.

Side-view polar bear proportions

Polar bears look different from brown bears. The head is small and long, the neck is long, and the back rises into a hump at the shoulders before sloping to the rump. Keep the ears tiny and round.

A long body is the most common surprise. Rob's son drew his back line so far that they called it a hot dog bear. The fix is thick back legs. A wide thigh fills the space and the bear looks heavy instead of stretched. Line every paw up on one ground line and keep all four feet about the same length.

Supplies for a realistic polar bear drawing

A black fine point marker gives a clean outline. A sturdy drawing pad holds up to colored pencil layers better than printer paper. For color you need three pencils: a light blue, a white and a very light warm gray. Soft-core pencils blend more smoothly, but a basic school set works if it has a pale gray. Sketch in pencil first if you are nervous about the marker.

Polar bear drawings for winter cards and classrooms

A walking polar bear on blue ice makes a good winter card or a January classroom project. Draw it on folded cardstock, add falling snow dots in the blue sky, and write a note inside. Pair it with a penguin drawing for an arctic-and-antarctic bulletin board, though in real life the two never meet.

Polar bear drawing ideas to try next

  • A mother polar bear with a small cub walking behind her.
  • A night scene with a dark blue sky and green northern lights.
  • Another cold-weather animal, like a wolf or a moose.

Common polar bear drawing problems

  • The bear disappears. Press harder with the blue right next to the outline.
  • It looks like a dog. Make the snout longer and the ears smaller, and add the shoulder hump.
  • The shading looks dirty. Use the lightest gray you have and keep it to the shadow sides.

Free printable

Print the steps and supply list for this project

One page you can take to the table. Free with a free account, no password.

Get the free printable

What you'll need

Free, for this project

Get this checklist by email

  • All 4 tools and materials, with tick boxes
  • A link to print all 10 steps on paper, to keep by you while you craft

No password. The whole tutorial stays free on this page.

Quick answer

Draw a realistic polar bear in 10 easy steps. An easy project: about 35 minutes. You need 4 things, including black fine point permanent marker and pencil and eraser. The 10 steps start with draw the Polar Bear's Eye, Forehead and Long Snout, add the Polar Bear's Small Ears and Long Neck, draw the Polar Bear's Two Front Legs and Clawed Paws, draw the Polar Bear's Shoulder Hump and Long Back and curve the Polar Bear's Rump and Add a Little Tail.

Step-by-step guide

10 steps, about 14 minutes. Tap a picture to jump to that step. Your progress saves automatically.

Tick each step off as you go.

  1. Step 1: Draw the Polar Bear's Eye, Forehead and Long Snout

    Watch this step · 2:46

    Put a small dot for the eye on the left side of your paper, about halfway down. Keep it tiny, because this is a realistic bear. From the eye, draw a slanted line down to the end of the nose for the forehead. Curve around the tip for a small nose and color it in, then add a short mouth line and a little jaw underneath. Leave room to the right. The body is long.

    Tip:

    Leave a tiny white spot in the black nose. It reads as a shine.

    Back to all steps

  2. Step 2: Add the Polar Bear's Small Ears and Long Neck

    Watch this step · 3:18

    Draw a wavy line over the top of the head that runs back into the neck and toward the shoulders. Add two small upside-down U shapes for ears, one in front of the other, and a little curve inside the near ear. Under the jaw, draw a curved neck line coming down, then a few zigzags so the chest fur looks thicker. Polar bears have long necks, so let this line run a bit.

    Tip:

    Keep the ears small and round. Big ears make it look like a cartoon bear.

    Back to all steps

  3. Step 3: Draw the Polar Bear's Two Front Legs and Clawed Paws

    Watch this step · 4:22

    The bear is walking, so one front leg sits ahead of the other. Bring a line down from the chest for the near leg and curve it out into a paw. Add a small zigzag for claws, a line back for the bottom of the paw, then go up for the back of the leg. Draw the second front leg behind it the same way. Its paw stops in line with the first, on the same ground.

    Tip:

    Don't make the paws too long. Shorter paws keep the legs from looking huge.

    Back to all steps

  4. Step 4: Draw the Polar Bear's Shoulder Hump and Long Back

    Watch this step · 5:46

    Add a small bump above the front legs for the shoulder. Polar bears carry a hump there. From the shoulder, draw one long line across the paper for the back. Keep it fairly flat, then let it curve down at the far end where the rump starts. Watch the length. A back that runs too far gives you a stretched bear, though thick back legs can fix that later.

    Tip:

    Stop the back about three heads past the shoulder.

    Back to all steps

  5. Step 5: Curve the Polar Bear's Rump and Add a Little Tail

    Watch this step · 6:40

    At the end of the back line, hook around and down for the bear's bottom. Leave a small gap or overlap so the tail can sit on top. Draw a small U shape on the rump for the tail. Polar bear tails are short and stubby, so keep it tiny. It should sit near the top of the curve, not low down by the legs.

    Tip:

    A small tail helps the bear look heavy and real.

    Back to all steps

  6. Step 6: Draw the Polar Bear's Lifted Back Leg

    Watch this step · 7:50

    This leg is mid-step. Start a line under the rump and bring it down and forward, crossing toward the front so the leg looks picked up. Curl it down into a paw, add a zigzag for claws and curl back for the bottom of the foot. Then come in for a wide thigh, starting low and curving up into the body in an S shape. A thick thigh makes a long bear look sturdy.

    Tip:

    Bring the paw down to the same ground line as the front paws.

    Back to all steps

  7. Step 7: Add Zigzag Fur Along the Polar Bear's Belly

    Watch this step · 8:45

    Connect the front leg to the back leg with a zigzag line along the belly. This looks like long, shaggy fur hanging down. Then draw a second zigzag a little lower so the fur looks thicker. It is fine if the lines start in slightly different places. Later, the gray shading will tuck right up to this line and make it look like a shadow.

    Tip:

    Short, quick zigzags look more like fur than slow, even ones.

    Back to all steps

  8. Step 8: Draw the Polar Bear's Far Back Leg

    Watch this step · 9:28

    Imagine the near back leg passes in front of a second one. Draw that far leg peeking out behind, ending at the same ground line as every other paw. Make its foot about the same length as the others, add a zigzag for claws and curl up and over for the top of the paw. Finish with a line back up into the body. Your outline is done.

    Tip:

    Check all four paws. They should line up and be about the same size.

    Back to all steps

  9. Step 9: Color a Blue Background Around the White Polar Bear

    Watch this step · 10:30

    Grab a light blue colored pencil. Color around the bear, pressing harder close to the outline and fading out as you move away. You don't need to fill the page. Stop the blue at the ground line and leave the area under the paws white, so the bear stands on ice. Fill the space under the belly and between the legs with blue too. Watch the bear pop off the page.

    Tip:

    Color in one direction for a smooth sky.

    Back to all steps

  10. Step 10: Shade the Polar Bear With a Light Gray Colored Pencil

    Watch this step · 12:40

    Use a very light warm gray. Start at the snout, darker near the nose, and blend up toward the forehead. Shade behind the ears and down the front of the neck in short back-and-forth strokes for fur. Work down each leg on the side away from the light, under every paw, and up along the belly fur. Add a thick shadow under the back leg and under the tail. Leave the tops white.

    Tip:

    If you only have a darker gray, press very lightly.

    Back to all steps

How to Draw a Christmas Stocking

Keep going

How to Draw a Christmas Stocking

You reached the last step

Save this project to come back to it

Your ticked steps, the free printable and your other saved makes, together in My Projects. Free, no password.

You tapped Save

Save this project for later

We'll email you a link, no password.

How to Draw a Polar Bear

  • Your saved projects in one list
  • Your ticked steps on any device

Check your inbox for an email from us. Not there? Look in your spam folder.

Free printable

Printable sheet for this project

The bonus is hidden until you sign up.

Free with a free account, no password. Every step above stays open to everyone.

Products Used

The Checklist

How to Draw a Polar Bear

Tools
2
Materials
2
Steps
10
Video
14 min

Tools we recommend

As an Amazon Associate we earn from qualifying purchases. Links on this page may be affiliate links - clicking them and buying doesn't change your price, but helps support Crafting Step by Step.

Tags

The Crafter's Weekly

New drawing tutorials, every Sunday

One short email with the week's best step-by-step guides. Free, no spam, unsubscribe anytime.

Test your knowledge

Did the lesson stick? Start with this one.

5 questions covering what you just read. No signup, no score saved, and you can stop after this one.

Question 1 of 5

How do you show a white bear on white paper?

Quick reference

Key takeaways from How to Draw a Polar Bear

5 questions, answers, and one-line explanations. Tap to expand.

  1. 1.How do you show a white bear on white paper?

    Answer: Color the background blue

    A blue background fading out from the bear makes the white shape stand out.

  2. 2.What body feature sits above a polar bear's front legs?

    Answer: A shoulder hump

    Polar bears carry a hump at the shoulders, which makes the drawing look real.

  3. 3.Compared with a brown bear, a polar bear's head and neck are

    Answer: Longer and narrower

    A long neck and narrow head are what set a polar bear apart.

  4. 4.What does the zigzag along the belly show?

    Answer: Long shaggy fur

    A ragged lower line reads as fur hanging below the body.

  5. 5.What should all four paws line up with?

    Answer: The same ground line

    Paws on one ground line keep the bear standing on the ice, not floating.

Did this work for you?

What's next

Related collections

Curated theme pages that include this tutorial.

Similar tutorials

Hand-picked next reads based on the one you just finished.

Liked this drawing tutorial?

Pick the crafts you want to hear about. One email every Sunday with new step-by-step tutorials. No spam, easy to unsubscribe.

Get more like this in your inbox

Weekly digest. Pick the categories you want. Unsubscribe anytime.

Send me tutorials about

We only email about new tutorials. Easy unsubscribe anytime.