How to Draw a Haunted House

Save it for later. We'll email you a link, no password.

Find it again on your phone or computer, with your finished steps ticked.

You tapped Save

Save this project for later

We'll email you a link, no password.

How to Draw a Haunted House

  • Your saved projects in one list
  • Your ticked steps on any device

Check your inbox for an email from us. Not there? Look in your spam folder.

  • 10 steps
  • 13:50 video
  • Difficulty: Easy
  • About 40 minutes
  • Drawing

Based on a video by Art for Kids Hub

Opens their YouTube channel

Steps written out by Crafting Step by Step · Published · Updated

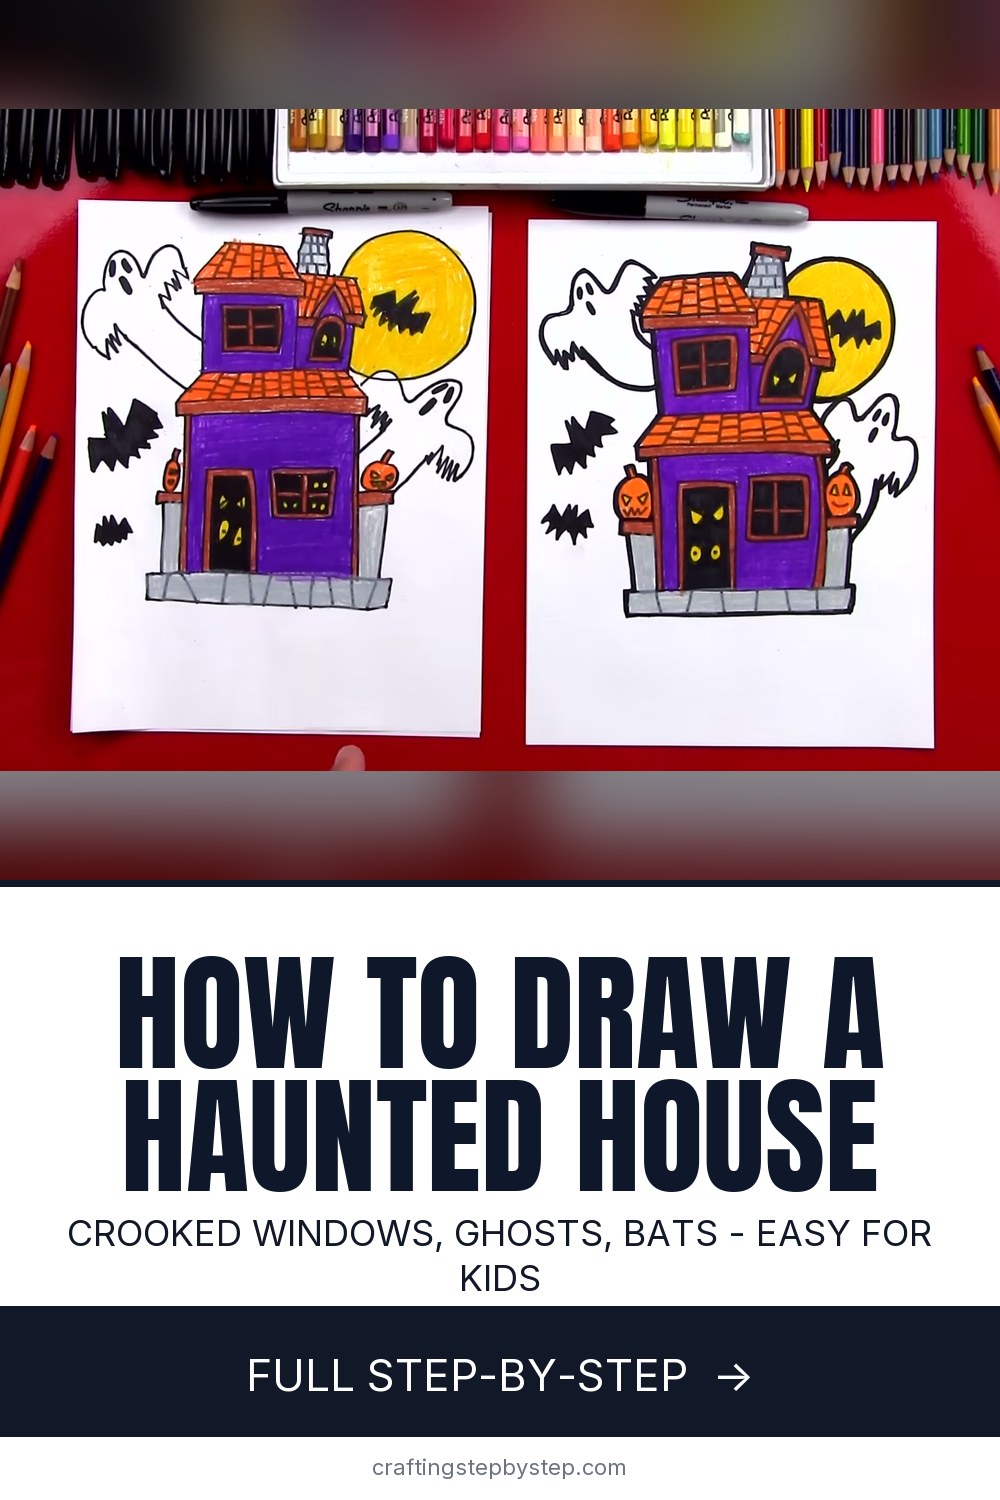
The finished result: How to Draw a Haunted House

A haunted house is a regular house that has had a very bad century. The walls lean, the shingles slide off, the windows are crooked and something is staring out of the door. That is good news for you. Wobbly lines are the whole look, so this is one drawing where a shaky hand helps.

Rob from Art for Kids Hub draws this one next to his son, one step at a time, in black marker. They build the house from boxes and triangles, add shingles, bricks and a stone porch, then fill the yard with ghosts, bats and a big full moon. Plan on about 30 minutes for the line drawing and another 15 to color it.

What you need

A black marker and a sheet of paper. A fine-point Sharpie gives a bold outline that survives coloring. For color, Rob and his son use colored pencils in gray, dark purple, orange, yellow and brown. Crayons, oil pastels or washable markers work too. Letter size paper is fine. Turn it portrait so the house has room to grow up.

Why crooked lines work here

On a normal house drawing you fight to keep walls straight. Here you let them drift. A roof that sags or a wall that bows makes the house look old and run down. If you want the tidy version, our guide to how to draw a house keeps every line square.

The one place to take care is the shingles. Change the direction of the little lines from column to column. When every shingle matches, the roof looks brand new. When they wander, it looks like they are falling off.

Make your haunted house your own

Around step 7 Rob stops and invites you to finish the house your own way. Some ideas:

  • Put jack-o-lanterns on the porch posts. Our pumpkin drawing guide shows the round ribbed shape.
  • Draw scary eyes peeking out of the windows and door.
  • Add a sheet ghost drifting out of a wall. See how to draw a ghost for a cute version.
  • Fill the sky with bats. How to draw a bat takes the wings further than the quick M shape here.
  • Draw the ground, a few gravestones and a dead tree.

Coloring tips

Dark purple walls with orange roofs is the classic combo, and it pops against a yellow moon. Keep the porch and chimney gray. Color the windows and door black first, then add yellow eyes with a pencil pressed hard. Leave the ghosts white. Color the bats solid black with the marker.

Using your drawing for Halloween

This makes a great classroom activity because kids can follow the house and then invent their own spooky extras. Fold a finished drawing into a Halloween card, use it as a party coloring page, or tape it in a window with the moon facing out.

Common problems

  • The house runs off the page. Start the base box in the lower half of the paper. The roofs, tower and moon need the top half.
  • The windows look flat. Draw a second box around each one for a frame.
  • The colors smear the marker. Let the ink dry for a minute before you color.
  • The ghosts disappear. White on white paper fades. Trace their outlines twice so they stand out once the sky around them is busy.

Free printable

Print the steps and supply list for this project

One page you can take to the table. Free with a free account, no password.

Get the free printable

What you'll need

Free, for this project

Get this checklist by email

  • All 4 tools and materials, with tick boxes
  • A link to print all 10 steps on paper, to keep by you while you craft

No password. The whole tutorial stays free on this page.

Quick answer

Draw a spooky cartoon haunted house in 10 easy steps: crooked windows, a side tower, shingles, ghosts, bats and a full moon. An easy project: about 40 minutes. You need 4 things, including drawing paper, black fine point permanent marker and colored pencils. The 10 steps start with draw the Haunted House Base Box, Roof Ledge and Porch, add the Haunted House Roof Slopes and Second Story and draw the Haunted House Side Tower and Crooked Chimney.

Step-by-step guide

10 steps, about 14 minutes. Tap a picture to jump to that step. Your progress saves automatically.

Tick each step off as you go.

  1. Step 1: Draw the Haunted House Base Box, Roof Ledge and Porch

    Watch this step · 1:40

    Start low on the page. Draw a big L shape, then an upside-down L to close it into a box. That is the base of your haunted house. Add two short lines sticking out past the top corners and join them with a long thin rectangle for the roof ledge. Do the same along the bottom, wider this time, for the porch. Wobbly lines are fine. This house is supposed to look old.

    Tip:

    Make the porch stick out farther than the roof so the pumpkin posts have room later.

    Back to all steps

  2. Step 2: Add the Haunted House Roof Slopes and Second Story

    Watch this step · 2:38

    From each end of the roof ledge, draw a diagonal line up and in, then connect them across the top. Stand the second story on that roof. Draw a line up on the left side and another a little right of the middle, then close the top with a line. Turn that line into a ledge rectangle and add two more slanted roof lines with a flat top, the same way you did below.

    Tip:

    Going too fast? Pause the video. The second story is where most drawings drift off center.

    Back to all steps

  3. Step 3: Draw the Haunted House Side Tower and Crooked Chimney

    Watch this step · 3:58

    On the right side of the second story, draw an A shape that goes up and back down. Connect it to the wall, run a small line out to the side and bring it down to the first roof. Add a box with another A shape on top for the tower roof, then a diagonal line up to the same height. For the chimney, draw two crooked lines and cap them with a line and a small rectangle.

    Tip:

    Let the chimney lean a little. A ruler-straight one makes the house look brand new.

    Back to all steps

  4. Step 4: Draw the Haunted House Door and Crooked Windows

    Watch this step · 6:00

    Draw a tall rectangle on the ground floor for the door and a second rectangle inside it. For each square window, draw an L, then an upside-down L, then a bigger box around it for the frame. Divide the panes with two lines down the middle and two across. In the side tower, draw an upside-down U, close the bottom, add a long sill underneath and trace a second U around the outside.

    Tip:

    A small door on a big house looks creepier. Keep it narrow.

    Back to all steps

  5. Step 5: Add Porch Pedestals and Stone Lines to the Haunted House

    Watch this step · 6:44

    Draw a line down each side of the house for the corner boards. On both ends of the porch, draw a rectangle that sticks out from the wall, then run two lines from it down to the porch floor. These pedestals are where the pumpkins will sit. Fill the porch with short crooked lines going up and down so it looks like it is built from old stones.

    Tip:

    Space the stone lines unevenly. Matching gaps look like a brick sidewalk, not old stone.

    Back to all steps

  6. Step 6: Draw Messy Roof Shingles and Chimney Bricks on the Haunted House

    Watch this step · 8:20

    Draw a line down the middle of the roof, then a few more on each side, slanting outward as you go. Now fill each column with short crosswise lines, and change their angle from column to column. Two lines here, three tilted ones there. The mix makes the shingles look loose and ready to slide off. Repeat on the upper and tower roofs, then add brick lines to the chimney.

    Tip:

    This is the slowest step. Put on some music and take your time.

    Back to all steps

  7. Step 7: Add Pumpkins and Spooky Eyes to the Haunted House Windows

    Watch this step · 9:50

    Draw a pumpkin on top of each porch pedestal. Give one a scary face and make the other small. Now give the house something living inside. Draw angry eyes with two diagonal lines and a curved bottom, or scared eyes with two circles and a dot in each. Put them in the door and windows, then color the door and window glass solid black around the eyes.

    Tip:

    Leave the eyes white when you fill in the black. You will color them yellow at the end.

    Back to all steps

  8. Step 8: Draw a Full Moon and Ghosts Behind the Haunted House

    Watch this step · 11:40

    Draw a big circle behind the house for the full moon. Stop the line where it hits the roof so the moon sits behind it. For a ghost, draw an upside-down U for the head, then arms reaching out on both sides. Close the bottom of each arm with a spooky zigzag line and trail the body back into the house wall. Add two long oval eyes and a long open mouth.

    Tip:

    Draw one ghost on each side of the house so the picture feels balanced.

    Back to all steps

  9. Step 9: Draw Bats Flying Around the Haunted House

    Watch this step · 12:40

    Draw a small M shape for the bat's head and ears. Add an A shape on each side for the wing tops, then connect the wing tips across the bottom with a zigzag line. Color the whole bat black. Scatter a few more around the sky, with one flying across the moon. Mix big and small bats so some look closer than others.

    Tip:

    A bat drawn over the moon reads best. The black shape stands out against the yellow.

    Back to all steps

  10. Step 10: Color the Haunted House Purple With Orange Roofs

    Watch this step · 12:58

    Swap to colored pencils. Color the walls dark purple and the roofs orange. Use gray for the chimney, porch and pedestals, brown for the window and door frames, and orange for the pumpkins. Color the moon yellow and press hard with yellow on the eyes so they glow against the black. Leave the ghosts white. Pause the video at the end to match the finished colors.

    Tip:

    Crayons, oil pastels or markers all work if you do not have colored pencils.

    Back to all steps

How to Draw a Polar Bear

Keep going

How to Draw a Polar Bear

You reached the last step

Save this project to come back to it

Your ticked steps, the free printable and your other saved makes, together in My Projects. Free, no password.

You tapped Save

Save this project for later

We'll email you a link, no password.

How to Draw a Haunted House

  • Your saved projects in one list
  • Your ticked steps on any device

Check your inbox for an email from us. Not there? Look in your spam folder.

Free printable

Printable sheet for this project

The bonus is hidden until you sign up.

Free with a free account, no password. Every step above stays open to everyone.

Products Used

The Checklist

How to Draw a Haunted House

Tools
3
Materials
1
Steps
10
Video
14 min

Tools we recommend

As an Amazon Associate we earn from qualifying purchases. Links on this page may be affiliate links - clicking them and buying doesn't change your price, but helps support Crafting Step by Step.

Tags

The Crafter's Weekly

New drawing tutorials, every Sunday

One short email with the week's best step-by-step guides. Free, no spam, unsubscribe anytime.

Test your knowledge

Did the lesson stick? Start with this one.

5 questions covering what you just read. No signup, no score saved, and you can stop after this one.

Question 1 of 5

Why do shaky, crooked lines help this drawing?

Quick reference

Key takeaways from How to Draw a Haunted House

5 questions, answers, and one-line explanations. Tap to expand.

  1. 1.Why do shaky, crooked lines help this drawing?

    Answer: They make the house look old

    Leaning walls and sagging roofs are exactly what reads as run down.

  2. 2.Which way should the paper face for a haunted house?

    Answer: Portrait, so the house can grow tall

    Portrait leaves room for the second story, tower and moon.

  3. 3.How should you space the lines on the stone porch?

    Answer: Unevenly, like worn old stone

    Matching gaps look like a new brick sidewalk, not worn stone.

  4. 4.What keeps the roof shingles from looking too neat?

    Answer: Changing the line angle per column

    Shifting the angle from column to column makes the shingles look loose.

  5. 5.Where does a black bat stand out best in the scene?

    Answer: Over the bright yellow moon

    A dark shape reads clearest against the lightest part of the picture.

Did this work for you?

What's next

Related collections

Curated theme pages that include this tutorial.

Similar tutorials

Hand-picked next reads based on the one you just finished.

Liked this drawing tutorial?

Pick the crafts you want to hear about. One email every Sunday with new step-by-step tutorials. No spam, easy to unsubscribe.

Get more like this in your inbox

Weekly digest. Pick the categories you want. Unsubscribe anytime.

Send me tutorials about

We only email about new tutorials. Easy unsubscribe anytime.