How to Draw a Spider Web

Save it for later. We'll email you a link, no password.

Find it again on your phone or computer, with your finished steps ticked.

You tapped Save

Save this project for later

We'll email you a link, no password.

How to Draw a Spider Web

  • Your saved projects in one list
  • Your ticked steps on any device

Check your inbox for an email from us. Not there? Look in your spam folder.

  • 9 steps
  • 5:57 video
  • Difficulty: Easy
  • About 15 minutes
  • Materials about $4 to $8
  • Drawing

Based on a video by Art Projects for Kids

Opens their YouTube channel

Steps written out by Crafting Step by Step · Published · Updated

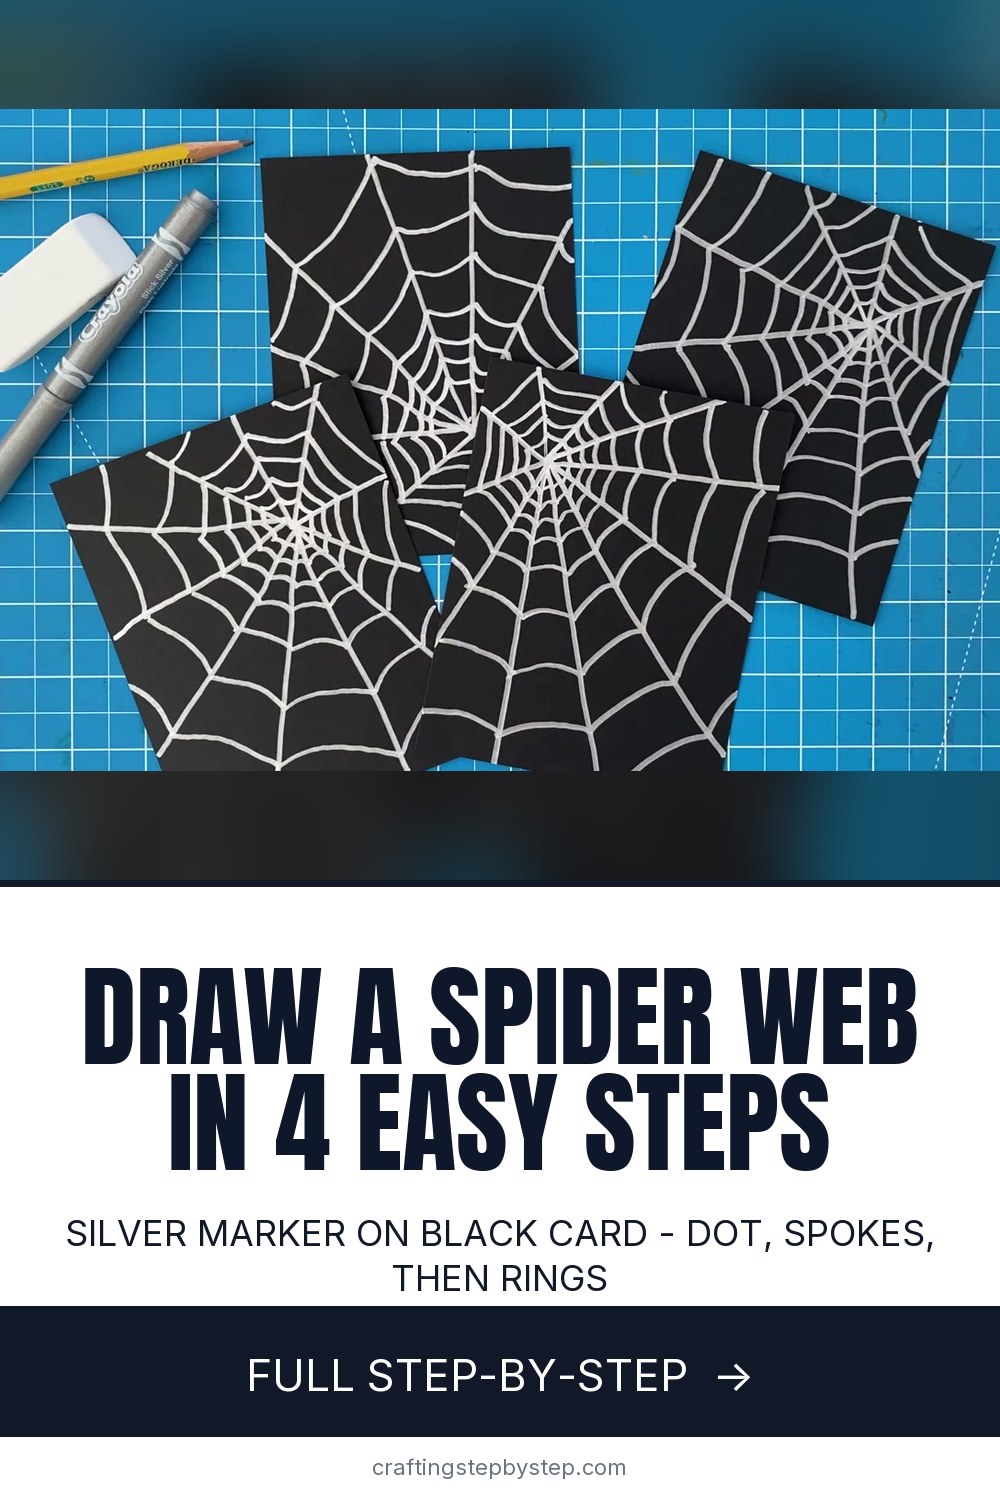
The finished result: How to Draw a Spider Web

A spider web looks fussy until you see how it is built. It is two kinds of line. Straight spokes go out from a center point, and curved rings hop from spoke to spoke. Art teacher Kathy Barbro of Art Projects for Kids shows the whole method in under six minutes, drawing silver webs on small black cards. Her one real secret is spacing. Keep the first rings tight around the center, then let the gaps grow as you move out.

This is an easy drawing for kids and beginners. One web takes about five minutes. Most kids want to make three or four once they get the hang of it.

Supplies for a silver spider web drawing

Kathy cuts black cardstock into 4.25 x 5.5 inch cards. That is a letter sheet cut in quarters, so one sheet gives you four webs. A small card fills up fast, which keeps young kids from giving up halfway.

For the lines, she uses metallic markers. Crayola metallic markers are water based and a safe pick for younger students. Sharpie metallic markers give a brighter, more even line, but they are permanent, so older kids and some supervision are best. You do not need expensive white paint pens. Silver on black reads like dew on real silk.

Why ring spacing makes the web look real

Real orb webs are dense in the middle and open at the edges. If every ring is the same distance apart, the drawing looks like a target. Draw four or so rings close to the center, all about evenly spaced. Then widen each gap a little as you go out. Curve each ring segment gently toward the center as it crosses between spokes. That sag is what makes the web look like it is hanging.

Wobbly spokes are fine. A slightly crooked line looks more natural than a ruled one. Real spiders do not use rulers either, and nobody will notice a bent spoke once the rings are on.

Ideas for your finished spider webs

Move the center dot and you get a new web every time. Corner webs look like they are stretched across a window frame. A web centered on the card looks like it hangs in open air. The big gaps in the outer rings are the best spot for a spider. Our guide on how to draw a spider shows you how to add one in a few simple shapes.

For Halloween, glue a few cards onto orange construction paper for party invitations or classroom window art. Draw a web in the corner of a bigger scene, like a pumpkin drawing or a cartoon ghost. If you would rather make one you can hang, try the yarn version: how to crochet a spider web.

Spider web drawing troubleshooting

  • The web looks like a bullseye. Your rings are evenly spaced all the way out. Leave bigger gaps on the outer rings.
  • The rings look stiff. Draw each segment as a shallow curve that dips toward the center, not a straight bridge.
  • The marker line is patchy. Shake metallic markers well and press the tip on scrap paper until the ink flows.
  • A ring runs off the card. That is fine. Guess where it would go and keep the curve going to the edge.

Free printable

Print the steps and supply list for this project

One page you can take to the table. Free with a free account, no password.

Get the free printable

What you'll need

Free, for this project

Get this checklist by email

  • All 3 tools and materials, with tick boxes
  • A link to print all 9 steps on paper, to keep by you while you craft

No password. The whole tutorial stays free on this page.

Quick answer

Draw a spider web in 5 minutes. Start with a center dot and straight spokes, then add curved rings that spread out. Easy for kids. An easy project: about 15 minutes. Materials cost about $4 to $8. You need 3 things, including black cardstock, silver metallic marker and paper trimmer or scissors. The 9 steps start with cut Black Cardstock and Pick a Metallic Marker for the Spider Web and mark the Spider Web Center Dot and Draw the First Spokes.

Step-by-step guide

9 steps, about 6 minutes. Tap a picture to jump to that step. Your progress saves automatically.

Tick each step off as you go.

  1. Step 1: Cut Black Cardstock and Pick a Metallic Marker for the Spider Web

    Watch this step · 0:50

    Cut black cardstock down to small cards about 4.25 by 5.5 inches. One letter sheet makes four. Grab a metallic marker. Crayola metallic markers are water based and good for younger kids. Sharpie metallic markers make a brighter line but are permanent, so they need a bit more supervision. Silver on black gives you that glowing web look without paint pens.

    Tip:

    Test the marker on a scrap of black card first. Metallic ink can take a few strokes to start flowing.

    Back to all steps

  2. Step 2: Mark the Spider Web Center Dot and Draw the First Spokes

    Watch this step · 1:24

    Decide where the center of your spider web goes and make a small dot. Kathy starts hers near the top right corner. From that dot, draw a straight line out to the edge of the card. Hold the card steady with your other hand. Work slowly and keep the line as straight as you can, then add the next spoke beside it.

    Tip:

    A center near a corner is easier for beginners. You get fewer, longer spokes and a web that looks stretched across a window.

    Back to all steps

  3. Step 3: Finish the Straight Spider Web Spokes to Every Edge

    Watch this step · 1:33

    Keep drawing spokes from the center dot until they reach every edge of the card. Aim for two or three lines going to each side. They do not need to be evenly spaced. If a line wobbles, leave it. A slightly crooked spoke makes the spider web look more real, not less.

    Tip:

    Count your spokes before moving on. Between eight and twelve gives the rings enough places to connect.

    Back to all steps

  4. Step 4: Draw Small Curved Rings Close to the Spider Web Center

    Watch this step · 1:48

    Start the rings. Go around the center dot, hopping from one spoke to the next. Make each little segment curve slightly inward toward the center instead of drawing it straight. Draw about four rings this way, all close to the center and all about the same distance apart. This tight middle is what makes a web look like a web.

    Tip:

    Turn the card as you go so your hand stays comfortable and you do not smudge fresh ink.

    Back to all steps

  5. Step 5: Add Wider Spider Web Rings Spaced Further Apart

    Watch this step · 2:11

    Now draw the rest of the rings, leaving a little more space between each one as you move out. Keep the same inward curve on every segment. Near the edges, the rings run off the card. Make your best guess at where each one would go and carry the curve to the edge.

    Tip:

    Growing gaps are the whole trick. If your web starts to look like a target, open up the next ring.

    Back to all steps

  6. Step 6: Check the Finished Silver Spider Web Drawing

    Watch this step · 2:24

    Step back and look at your web. The center should be dense and bright, with rings opening wider toward the edges. The big outer gaps are the best place to add a spider later, so leave them open. If a ring looks too far from its neighbor, add one more in between. Let the metallic ink dry for a minute before you handle the card.

    Tip:

    Sharpie metallic ink stays tacky for a moment. Set the card aside while you start the next one.

    Back to all steps

  7. Step 7: Draw a Spider Web From the Bottom Right Corner

    Watch this step · 2:55

    Try a new card with the center dot in the bottom right corner. The steps are the same. Draw straight spokes out to the edges, two or three to each side. Then start the small rings around the center, keeping them close together and curving each segment inward. A new corner changes how the whole web sits on the card.

    Tip:

    Make a set of four webs with the center in a different corner each time. They look great displayed together.

    Back to all steps

  8. Step 8: Draw a Spider Web From the Bottom Left Corner

    Watch this step · 4:10

    On the third card, put the center in the bottom left corner. Add your spokes, then the tight inner rings. Finish with the larger rings that sit further apart, letting them run off the top and side of the card. By now the formula should feel automatic: spokes, tight rings, then wide rings.

    Tip:

    Hold the card down near the side you are not drawing on, so your hand does not rub the ink.

    Back to all steps

  9. Step 9: Draw a Spider Web From the Top Left Corner

    Watch this step · 5:10

    For one more, start the web in the top left corner. Draw the straight spokes out from the dot, add the small rings close together, and finish with the wider rings further apart. Carry the last rings off the right edge and bottom of the card. Line up all four webs and you have a full set.

    Tip:

    Glue a set of spider web cards onto orange paper for a quick Halloween card or classroom display.

    Back to all steps

How to Draw a Turkey

Keep going

How to Draw a Turkey

You reached the last step

Save this project to come back to it

Your ticked steps, the free printable and your other saved makes, together in My Projects. Free, no password.

You tapped Save

Save this project for later

We'll email you a link, no password.

How to Draw a Spider Web

  • Your saved projects in one list
  • Your ticked steps on any device

Check your inbox for an email from us. Not there? Look in your spam folder.

Free printable

Printable sheet for this project

The bonus is hidden until you sign up.

Free with a free account, no password. Every step above stays open to everyone.

Products Used

The Checklist

How to Draw a Spider Web

Tools
1
Materials
2
Steps
9
Video
6 min

Tools we recommend

As an Amazon Associate we earn from qualifying purchases. Links on this page may be affiliate links - clicking them and buying doesn't change your price, but helps support Crafting Step by Step.

Tags

The Crafter's Weekly

New drawing tutorials, every Sunday

One short email with the week's best step-by-step guides. Free, no spam, unsubscribe anytime.

Test your knowledge

Did the lesson stick? Start with this one.

5 questions covering what you just read. No signup, no score saved, and you can stop after this one.

Question 1 of 5

What are the two kinds of line in a spider web?

Quick reference

Key takeaways from How to Draw a Spider Web

5 questions, answers, and one-line explanations. Tap to expand.

  1. 1.What are the two kinds of line in a spider web?

    Answer: Straight spokes and curved rings

    Spokes run out from the center and rings hop between them.

  2. 2.How should each ring segment curve between two spokes?

    Answer: Slightly inward toward the center

    A gentle inward sag is what makes the silk look like it is hanging.

  3. 3.Your web is starting to look like a target. What should you change?

    Answer: Widen the gap before the next ring

    Rings that grow farther apart as they move out look like real silk.

  4. 4.Why start the web center near a corner of the card?

    Answer: Fewer, longer spokes are easier

    A corner center gives beginners fewer spokes and a stretched-out look.

  5. 5.Why do silver lines on black card work so well here?

    Answer: Silver on black looks like dewy silk

    The bright line on a dark ground mimics light catching real web silk.

Did this work for you?

What's next

Related collections

Curated theme pages that include this tutorial.

Similar tutorials

Hand-picked next reads based on the one you just finished.

Liked this drawing tutorial?

Pick the crafts you want to hear about. One email every Sunday with new step-by-step tutorials. No spam, easy to unsubscribe.

Get more like this in your inbox

Weekly digest. Pick the categories you want. Unsubscribe anytime.

Send me tutorials about

We only email about new tutorials. Easy unsubscribe anytime.