How to Draw a Ghost - Scary Shaded Ghost in 8 Steps

Save it for later. We'll email you a link, no password.

Find it again on your phone or computer, with your finished steps ticked.

You tapped Save

Save this project for later

We'll email you a link, no password.

How to Draw a Ghost - Scary Shaded Ghost in 8 Steps

  • Your saved projects in one list
  • Your ticked steps on any device

Check your inbox for an email from us. Not there? Look in your spam folder.

  • 8 steps
  • 12:09 video
  • Difficulty: Medium
  • About 50 minutes
  • Materials about $15 to $30
  • Drawing

Based on a video by Art Hub Plus

Opens their YouTube channel

Steps written out by Crafting Step by Step · Published · Updated

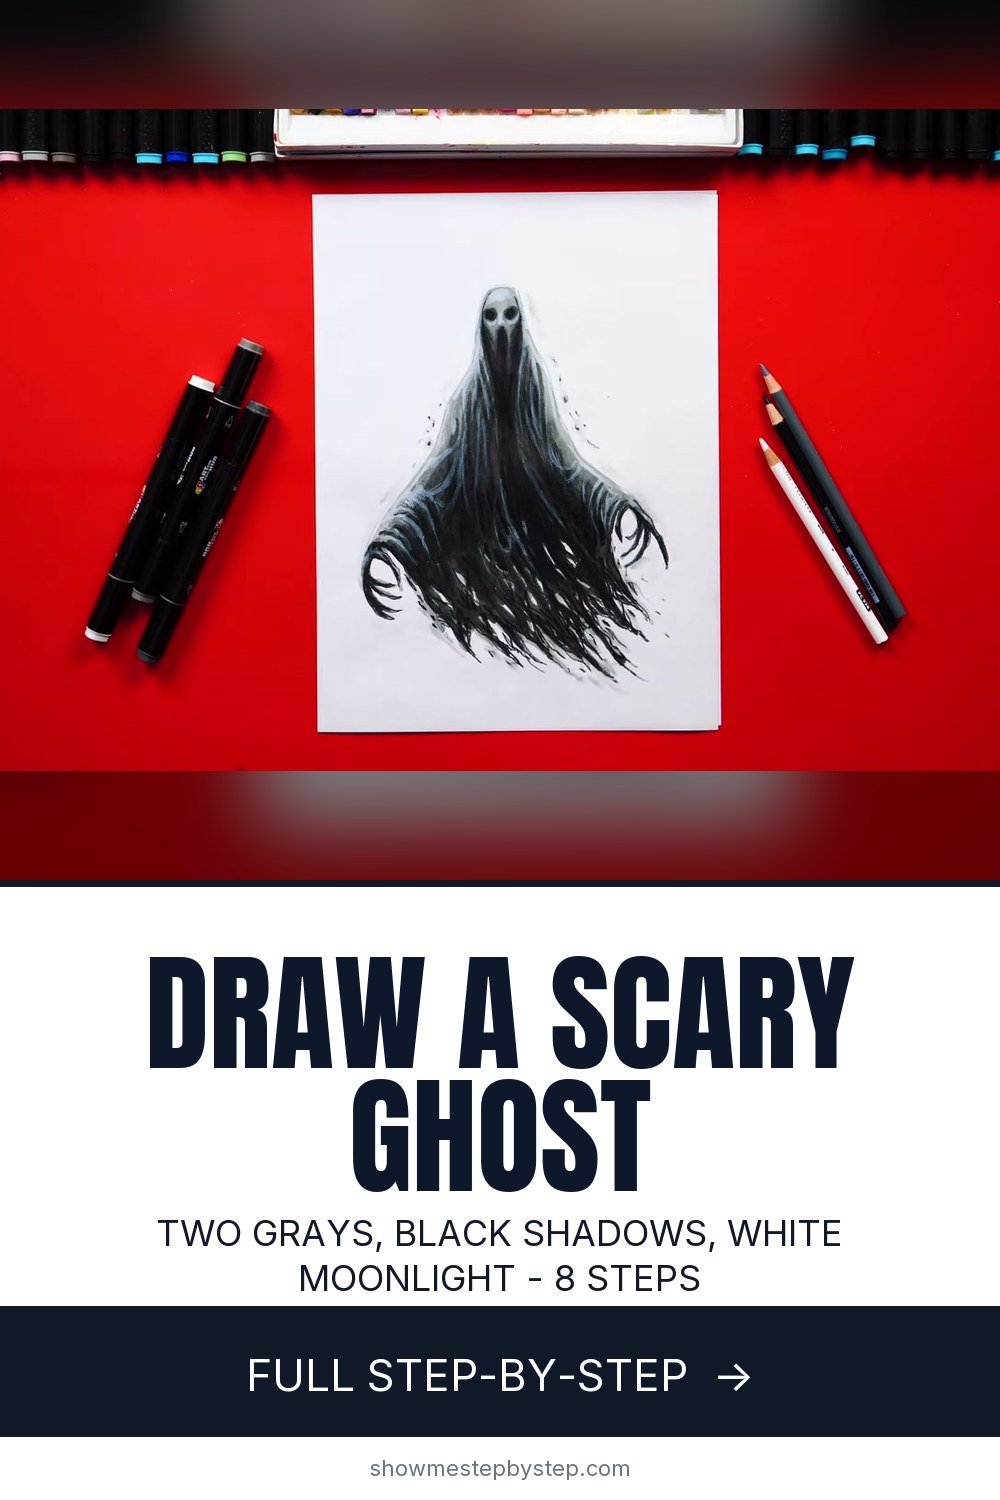
The finished result: How to Draw a Ghost - Scary Shaded Ghost in 8 Steps
Also in:Painting

A ghost is two circles and a wobbly line, which is why most ghost drawings come out cute. Cute is the default. The other kind, the one that looks like it has been at the end of a hallway for a hundred years, barely comes from the drawing at all. It comes from where you put the dark.

The walkthrough here follows Art Hub Plus, filmed straight down over the paper. The sketch takes four minutes and uses shapes a child could copy. The rest is shading, and that is the half worth slowing down for.

What makes a ghost scary instead of cute

Three decisions do it, and gore is not one of them. Blood and fangs read as a costume. Dread reads as real.

  • Eye shape. Round eyes are friendly. Tall, narrow sockets that go fully black are not. Leave the mouth out; a mouth gives the face an expression you can read.
  • Dark under the sheet. The shadow where the fabric tucks under is what says a body is in there. Skip it and you have drawn laundry.
  • Proportion. Fingers twice as long as a real hand. Shoulders that do not match.

The hollow socket here is the same shape that anchors a full skull drawing, so the time you spend on it carries past this picture.

The sheet ghost or the wispy one

Two drawings hide under the word ghost. The sheet ghost has a hem, an edge you can tear and catch in the wind. It is the easier of the two, because every fold hands you somewhere to put a shadow, and a torn hem does more for the mood than an hour of blending.

The wispy ghost has no bottom edge. The body narrows into a trailing tail that fades before it reaches the floor, and you fade it with pressure, not a line. Good effect, hard control, and it needs a dark background or the tail has nothing to dissolve into. Start with the sheet. If the shape appeals more than the shading, it works in fabric as a cheesecloth ghost.

Pencil grades and the blending stump

Two grades carry the drawing. A 2H stays pale enough that marker or softer graphite covers it later, so the whole sketch goes down in 2H and nothing you regret shows through. A 6B gives you black that still looks black inside the sockets.

A blending stump is a tight roll of paper sharpened to a point. Drag it over graphite and the grain disappears, which is what you want where the ghost thins into air. A fingertip smears too, but it leaves skin oil the next layer will not grip. In marker, the colorless blender does the same job. Either one is easier to steer when the construction underneath is sound, which is what the drawing fundamentals are for.

Leave the paper white instead of erasing it back

The brightest thing in the drawing is bare paper, and you get one supply of it. Cutting a highlight out of finished shading leaves a gray smudge with a hard rim, because graphite sinks into the tooth of the paper and never lifts all the way out.

Decide where the light is before the first gray goes down. Pick a side, leave those patches alone through every layer, and shade around them. White pencil over dark gray is the one exception, and only because it sits on top rather than lifting anything off.

Backgrounds that add dread

A ghost alone on white paper floats, and floating reads as a sticker. Put it somewhere.

A window behind it, two dark bars crossing, tells the eye it is night and indoors. A doorway is better: a black rectangle with the ghost half inside it, so part of the body is genuinely lost. Fog is the cheapest, a stump smudged sideways across the lower third, and it hides the hem.

Whichever you pick, the background has to sit darker than the ghost or the ghost stops glowing. For the rest of the Halloween set, a bat is a silhouette you fill in solid and a jack-o-lantern is three triangles and a grin.

Free printable

Print the steps and supply list for this project

One page you can take to the table. Free with a free account, no password.

Get the free printable

What you'll need

Free, for this project

Get this checklist by email

  • All 7 tools and materials, with tick boxes
  • A link to print all 8 steps on paper, to keep by you while you craft

No password. The whole tutorial stays free on this page.

Quick answer

Draw a scary Halloween ghost in 8 steps. A medium project: about 50 minutes. Materials cost about $15 to $30. You need 7 things, including Drawing pencil, Medium gray alcohol marker and Dark gray alcohol marker. The 8 steps start with sketch the Ghost's Head as a Light Pencil Oval, add an Uneven Shoulder and a Long Reaching Arm, draw the Sheet Flowing Down in Long Folds and give It a Scary Skull Face with Hollow Eyes and Long Fingers.

Step-by-step guide

8 steps, about 12 minutes. Tap a picture to jump to that step. Your progress saves automatically.

Tick each step off as you go.

  1. Step 1: Sketch the Ghost's Head as a Light Pencil Oval

    Watch this step · 1:05

    Near the top centre of the page, draw a loose oval in pencil, pressing lightly. This is only a guide and most of it will disappear under the sheet. Leave plenty of paper below it: the body and the trailing sheet take up two thirds of the drawing.

    Tip:

    Use an HB or 2H pencil for the whole sketch stage. Marker will not cover dark graphite cleanly.

    Back to all steps

  2. Step 2: Add an Uneven Shoulder and a Long Reaching Arm

    Watch this step · 1:35

    Draw one shoulder off the side of the head and bring an arm out from it, reaching forward. Make the two shoulders deliberately uneven. A lopsided ghost looks like it is moving toward you; a symmetrical one looks like a costume on a hanger.

    Tip:

    Aim the arm slightly toward the viewer rather than straight sideways. It makes the ghost feel like it is coming out of the page.

    Back to all steps

  3. Step 3: Draw the Sheet Flowing Down in Long Folds

    Watch this step · 2:30

    From either side of the head, bring two long lines down the body and let them widen toward the bottom as if the fabric is caught in wind. Add a cuff of sheet falling off the wrist of the reaching arm, and a few long fold lines running down the body from the shoulders.

    Tip:

    Let the two sides of the sheet be different lengths. Fabric in motion is never even.

    Back to all steps

  4. Step 4: Give It a Scary Skull Face with Hollow Eyes and Long Fingers

    Watch this step · 3:16

    Inside the head, draw two hollow eye sockets and a shallow triangular nose hole, like a skull with no lower jaw. Then draw the hand: three or four long, thin fingers curling out from the cuff, with one pointing, and a thumb tucked behind.

    Long fingers are what make it creepy. Human-length fingers make it a person in a sheet.

    Tip:

    Leave the mouth out entirely. A skull face with no jaw reads as far more unsettling than one with teeth.

    Back to all steps

  5. Step 5: Lay the First Gray Marker and Tear the Sheet Hem

    Watch this step · 4:12

    Switch to a medium gray marker (a CG5 or similar) and colour the whole ghost, working downward from the head. When you reach the bottom edge, take the marker off the paper in ragged points and shreds instead of following a clean curve, and leave a few gaps higher up the body as holes.

    Make it messy on purpose. This is the pass that turns a friendly bedsheet ghost into something that has been drifting around for a century.

    Tip:

    Work fast so the marker stays wet and blends. Streaks come from letting one stroke dry before the next lands beside it.

    Back to all steps

  6. Step 6: Shade a Darker Gray Layer and Leave the Highlights

    Watch this step · 5:00

    Go back over most of the ghost with a darker gray (CG9), but leave the top of the head, the back shoulder and the face in the lighter first layer. Those untouched patches are your first highlights, and the second layer is what gives the sheet weight and folds.

    Tip:

    Decide where the light is coming from before this layer and keep it consistent. Everything after this builds on that one decision.

    Back to all steps

  7. Step 7: Press Black Pencil into the Hollow Eyes and Deep Folds

    Watch this step · 6:00

    Switch to a black coloured pencil and press hard inside the eye sockets, the holes, and the long opening down the centre of the sheet. Run a band of shadow along the underside of the arm and into the deepest folds. Contrast is what makes the ghost read as three-dimensional instead of a gray shape.

    Tip:

    Sharpen the pencil for the holes and use the side of the lead for the broad shadows. One pencil, two textures.

    Back to all steps

  8. Step 8: Blend the Shading and Add White Pencil Moonlight

    Watch this step · 9:35

    Go over the pencil shading with a colourless blender marker to melt it into the gray, which softens the harsh edges and makes the whole thing look painted. Then take a white coloured pencil and pick out highlights: along the top of the head, the tops of both shoulders, the bridge of the nose, and down the ridges of the folds where moonlight would catch.

    Finish by sharpening the torn edges at the hem with the black pencil, since the blender rounds them off.

    Tip:

    Keep the highlights to the top surfaces only. White pencil in the folds flattens the drawing back out.

    Back to all steps

How to Draw a Bat - Easy Halloween Silhouette in 6 Steps

Keep going

How to Draw a Bat - Easy Halloween Silhouette in 6 Steps

6 steps · about 5 minutes

You reached the last step

Save this project to come back to it

Your ticked steps, the free printable and your other saved makes, together in My Projects. Free, no password.

You tapped Save

Save this project for later

We'll email you a link, no password.

How to Draw a Ghost - Scary Shaded Ghost in 8 Steps

  • Your saved projects in one list
  • Your ticked steps on any device

Check your inbox for an email from us. Not there? Look in your spam folder.

Free printable

Printable sheet for this project

The bonus is hidden until you sign up.

Free with a free account, no password. Every step above stays open to everyone.

Products Used

The Checklist

How to Draw a Ghost - Scary Shaded Ghost in 8 Steps

Tools
6
Materials
1
Steps
8
Video
12 min

Tools we recommend

As an Amazon Associate we earn from qualifying purchases. Links on this page may be affiliate links - clicking them and buying doesn't change your price, but helps support Crafting Step by Step.

Tags

The Crafter's Weekly

New drawing tutorials, every Sunday

One short email with the week's best step-by-step guides. Free, no spam, unsubscribe anytime.

Test your knowledge

Did the lesson stick? Start with this one.

5 questions covering what you just read. No signup, no score saved, and you can stop after this one.

Question 1 of 5

How much of the page should you leave below the head oval?

Quick reference

Key takeaways from How to Draw a Ghost - Scary Shaded Ghost in 8 Steps

5 questions, answers, and one-line explanations. Tap to expand.

  1. 1.How much of the page should you leave below the head oval?

    Answer: About two thirds of the page

    The body and the trailing sheet take up roughly two thirds of the drawing.

  2. 2.Why make the two shoulders of the ghost deliberately uneven?

    Answer: It reads as moving toward you

    A lopsided silhouette suggests motion, while a symmetrical one looks like a costume.

  3. 3.How should you finish the bottom edge of the sheet?

    Answer: In ragged points and shreds

    Lifting the marker off in torn points makes the hem look like old fabric.

  4. 4.You lay a darker second gray. Which areas stay in the first layer?

    Answer: The top of the head, back shoulder and face

    The patches you skip become the first highlights and give the ghost its form.

  5. 5.What is the white pencil for at the very end?

    Answer: Picking out the moonlight highlights

    White pencil adds the brightest lit edges, which the gray layers cannot reach.

Did this work for you?

What's next

Similar tutorials

Hand-picked next reads based on the one you just finished.

Liked this drawing tutorial?

Pick the crafts you want to hear about. One email every Sunday with new step-by-step tutorials. No spam, easy to unsubscribe.

Get more like this in your inbox

Weekly digest. Pick the categories you want. Unsubscribe anytime.

Send me tutorials about

We only email about new tutorials. Easy unsubscribe anytime.