How to Make a Latch Hook Rug - Easy Shag Rug for Beginners

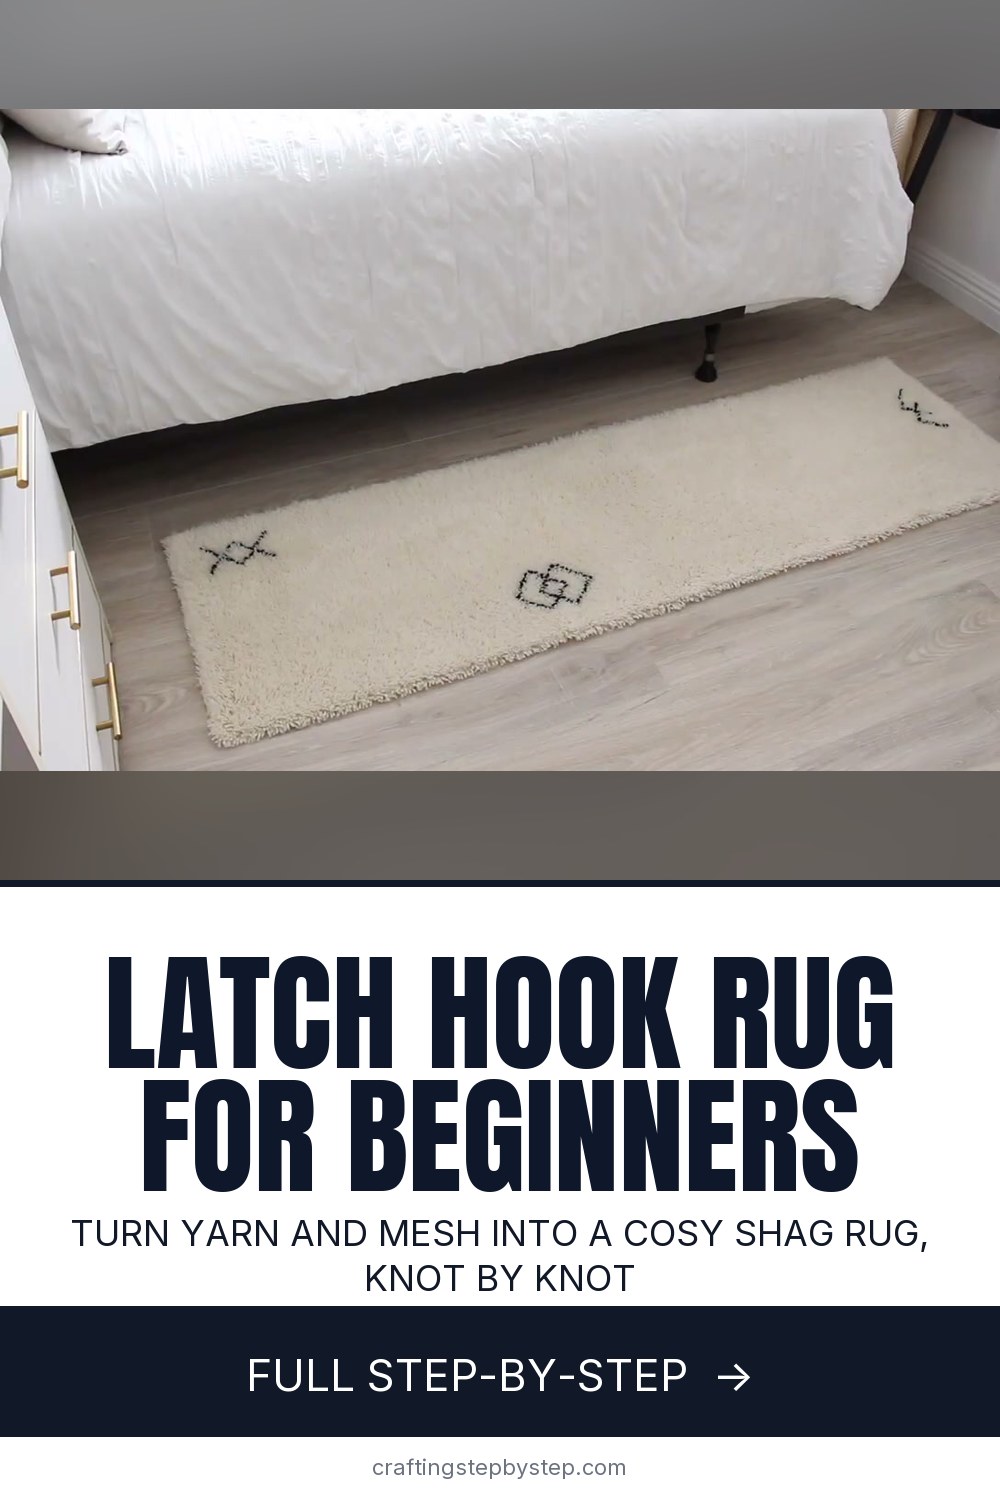
The finished result: How to Make a Latch Hook Rug - Easy Shag Rug for Beginners
  • Difficulty: Medium
  • 10 steps

You tapped Save

Save this project for later

We'll email you a link, no password.

How to Make a Latch Hook Rug - Easy Shag Rug for Beginners

  • Your saved projects in one list
  • Your ticked steps on any device

Check your inbox for an email from us. Not there? Look in your spam folder.

Print

Steps written out by Crafting Step by Step from createwithjenn's video (opens YouTube) (10:16). Published .

A latch hook rug is slow, cosy work. Every tuft is one short piece of yarn knotted onto a mesh canvas, and after a few hundred of them you have a thick shag rug you made yourself. Jenn of createwithjenn made a cream runner with a few black motifs for her bedroom, and she shares the tricks she found along the way, including a cardboard guide that makes cutting yarn much faster.

How to make a latch hook rug: the short version

  • Cut yarn into pieces about 2 1/2 inches long.
  • Push the latch hook under one bar of the canvas and fold a yarn piece over the shaft.
  • Catch the ends in the hook, pull it back, and the yarn knots itself.
  • Fill the canvas row by row, keeping every knot facing the same way.
  • Fold the edges under, whip stitch them, and hook over the fold.

Choosing canvas and yarn

Rug canvas is a stiff open mesh, usually 3.75 holes per inch. Buy it a little bigger than the rug you want, because you lose a few rows on every side to the folded edge. Jenn left 4 rows all round.

Pick a yarn that is not too thin, or the pile looks sparse and the canvas shows through. Worsted or chunky acrylic blends work well and wash easily. Jenn used Lion Brand Wool-Ease. It was soft, but she noticed it shed a lot while she worked, so keep a lint roller handy.

How much yarn you need

More than you expect. Jenn first planned a 4 1/2 by 5 1/2 foot rug, then realised after one skein that it would take months and far more yarn than she had. She switched to a runner about 5 1/2 by 1 1/2 feet, and that alone used 9 skeins. If this is your first rug, a doormat or a small wall tapestry is a much kinder place to start.

Adding a pattern

A plain rug is lovely, but a few simple motifs make it look like a shop-bought Moroccan rug. Draw your design on grid paper where one square is one knot. Keep it simple: X shapes, triangles and diamonds read well in thick pile. If you have followed a cross stitch chart before, this works the same way.

Making a bigger rug

Canvas comes in set widths, so a large rug means joining two pieces. Overlap them by 4 rows, whip stitch through both layers with strong thread, trim the extra, and then hook through both layers so the seam disappears under the pile.

Caring for a latch hook rug

Shake it out or vacuum it on a low setting without the beater bar, which can pull tufts loose. Spot clean spills with cool water and a little mild soap, then let it dry flat. A small rug can go in the washer on a gentle cycle inside a pillowcase if the yarn label allows it.

Common mistakes

  • Knots facing different ways. The pile looks patchy. Hold the hook the same way every time.
  • Uneven yarn lengths. A cardboard guide fixes this and saves time.
  • A slippery rug. Put a rug pad underneath so it stays put on a hard floor.

If you enjoy the tufted look, try punch needle for a faster loop pile. The knot itself is a lark's head knot in reverse, and leftover yarn makes great yarn pom poms.

Free printable

Print the steps and supply list for this project

One page you can take to the table. Free with a free account, no password.

Get the free printable

What you'll need

Free, for this project

Get this checklist by email

  • All 10 tools and materials, with tick boxes
  • A link to print all 10 steps on paper, to keep by you while you craft

No password. The whole tutorial stays free on this page.

Quick answer

How to make a latch hook rug: cut yarn with a cardboard guide, tie the latch hook knot, add a simple pattern and whip stitch the edges. A medium project. You need 10 things, including rug canvas, worsted or chunky yarn and contrast yarn for motifs. The 10 steps start with gather a Latch Hook, Rug Canvas and Yarn, cut the Rug Yarn Into Short Pieces and wrap Yarn Around a Cardboard Guide for Faster Cutting.

Step-by-step guide

10 steps, about 10 minutes. Tap a picture to jump to that step. Your progress saves automatically.

Tick each step off as you go.

  1. Step 1: Gather a Latch Hook, Rug Canvas and Yarn

    Watch this step · 0:57

    You need a latch hook, rug canvas and plenty of yarn. Jenn bought two mesh canvases, a set of bent latch hooks and 10 skeins of Lion Brand Wool-Ease. The bent hook is easier on your wrist than a straight one. Add sharp scissors, some cardboard for a cutting guide, strong thread and a needle for the edges, and a rug pad for the finished rug.

    Tip:

    Buy all your yarn from the same dye lot so the colour matches across the whole rug.

    Back to all steps

  2. Step 2: Cut the Rug Yarn Into Short Pieces

    Watch this step · 1:36

    Each tuft is a piece of yarn about 2 1/2 inches long. Jenn's first method was to cut a few 20 inch lengths, fold and cut them in half to make 10 inch pieces, then halve them twice more. It works, and it needs nothing but scissors. It is slow, though, and the pieces come out a little uneven, which shows in the pile.

    Tip:

    Cut a big pile before you start hooking so you are not stopping every few rows.

    Back to all steps

  3. Step 3: Wrap Yarn Around a Cardboard Guide for Faster Cutting

    Watch this step · 2:13

    After her sixth skein, Jenn found a better way. She cut two cardboard strips 2 1/4 by 4 inches and glued a narrower 1 1/4 by 3 inch strip between them, leaving a channel down the middle. Wrap the yarn around the guide, hold it down, and run your scissors along the channel. Every piece comes out the same length.

    Tip:

    Do not wrap too tightly or the yarn stretches and the pieces shrink once cut.

    Back to all steps

  4. Step 4: Push the Latch Hook Through the Rug Canvas and Fold the Yarn

    Watch this step · 2:52

    Pick the sturdier rows of the canvas to work into, and leave 4 rows empty on every side for the edge. Push the hook under one bar and back up through the next square, with the latch open. Fold a yarn piece in half over the shaft below the latch and line the ends up so they match.

    Tip:

    Work from the bottom of the canvas up so the finished pile falls away from your hands.

    Back to all steps

  5. Step 5: Pull the Latch Hook Knot Tight on the Canvas

    Watch this step · 2:57

    Pull the hook down a little so the yarn slides under the latch. Bring both ends up and into the hook. Now pull the hook back through. The latch closes, the ends travel through the loop, and you get a reverse lark's head knot. Give the ends a tug so the knot sits snug against the bar.

    Tip:

    Pull every knot with the same firmness. Loose ones look fluffy, tight ones flat.

    Back to all steps

  6. Step 6: Fill the Latch Hook Rug Canvas Row by Row

    Watch this step · 3:46

    Keep going across the row, and make sure every knot faces the same direction. To speed up, Jenn lines the yarn ends up before the hook goes in. She points the hook away from the finished pile, turns it to catch the yarn, then turns it back as she pulls. She hooks three or four pieces, then tightens them all at once.

    Tip:

    A fabric-covered surface under the canvas stops it sliding around as you work.

    Back to all steps

  7. Step 7: Chart a Simple Rug Design on Grid Paper

    Watch this step · 4:50

    For a pattern, draw it on grid paper first. Each square is one knot. Jenn kept hers sparse, with double X shapes, double triangles and a pair of interlocking diamonds in black. She tried a crisscross motif too, then swapped it because it did not match the other two. Sketching on paper makes those changes easy.

    Tip:

    Lay the chart on the canvas and count squares out from the edge so the motifs sit evenly.

    Back to all steps

  8. Step 8: Hook the Black Yarn Design Into the Rug

    Watch this step · 5:25

    Cut a small pile of the contrast colour and follow the chart square by square. Hook the motif knots exactly where the chart shows, and fill the cream around them as you reach them. Keep the chart above your work and check it often. One knot out of place is easy to spot in a simple design.

    Tip:

    Use a dark colour sparingly. A few motifs look smart; a busy pattern can look cluttered.

    Back to all steps

  9. Step 9: Fold and Whip Stitch the Latch Hook Rug Edges

    Watch this step · 7:58

    For neat edges, fold the spare canvas under by 2 rows and whip stitch the two layers together with strong thread. Knot the end firmly. At each corner, cut the canvas and overlap the sides so they lie flat. You can do this at the start if you already know the final size, which makes the edge rows easier.

    Tip:

    Upholstery thread is worth it here. Ordinary sewing thread can snap under the weight.

    Back to all steps

  10. Step 10: Hook Yarn Into the Folded Rug Edges to Finish

    Watch this step · 8:58

    Latch hook the 2 folded rows all the way round, working through both layers, so the edge is covered in pile like the rest of the rug. Trim any long tufts. Lay a rug pad underneath so it does not slide on a hard floor. Jenn's runner took about a month and 9 skeins of yarn.

    Tip:

    Shake the rug out well when it is done. Loose fibres keep coming out for the first few days.

    Back to all steps

How to Make a Concrete Gazing Ball for the Garden

Keep going

How to Make a Concrete Gazing Ball for the Garden

Keep going with crafts

More on this topic, picked for this latch hook rug.

You reached the last step

Save this project to come back to it

Your ticked steps, the free printable and your other saved makes, together in My Projects. Free, no password.

You tapped Save

Save this project for later

We'll email you a link, no password.

How to Make a Latch Hook Rug - Easy Shag Rug for Beginners

  • Your saved projects in one list
  • Your ticked steps on any device

Check your inbox for an email from us. Not there? Look in your spam folder.

Free printable

Printable sheet for this project

The bonus is hidden until you sign up.

Free with a free account, no password. Every step above stays open to everyone.

Products Used

The Checklist

How to Make a Latch Hook Rug - Easy Shag Rug for Beginners

Tools
5
Materials
5
Steps
10
Video
10 min

Tools we recommend

As an Amazon Associate we earn from qualifying purchases. Links on this page may be affiliate links - clicking them and buying doesn't change your price, but helps support Crafting Step by Step.

Tags

The Crafter's Weekly

New crafts tutorials, every Sunday

One short email with the week's best step-by-step guides. Free, no spam, unsubscribe anytime.

Did this work for you?

What's next

Related collections

Curated theme pages that include this tutorial.

Similar tutorials

Hand-picked next reads based on the one you just finished.

Liked this crafts tutorial?

Pick the crafts you want to hear about. One email every Sunday with new step-by-step tutorials. No spam, easy to unsubscribe.

Get more like this in your inbox

Weekly digest. Pick the categories you want. Unsubscribe anytime.

Send me tutorials about

We only email about new tutorials. Easy unsubscribe anytime.