How to Make a Paper Wallet (Easy Origami, No Glue)

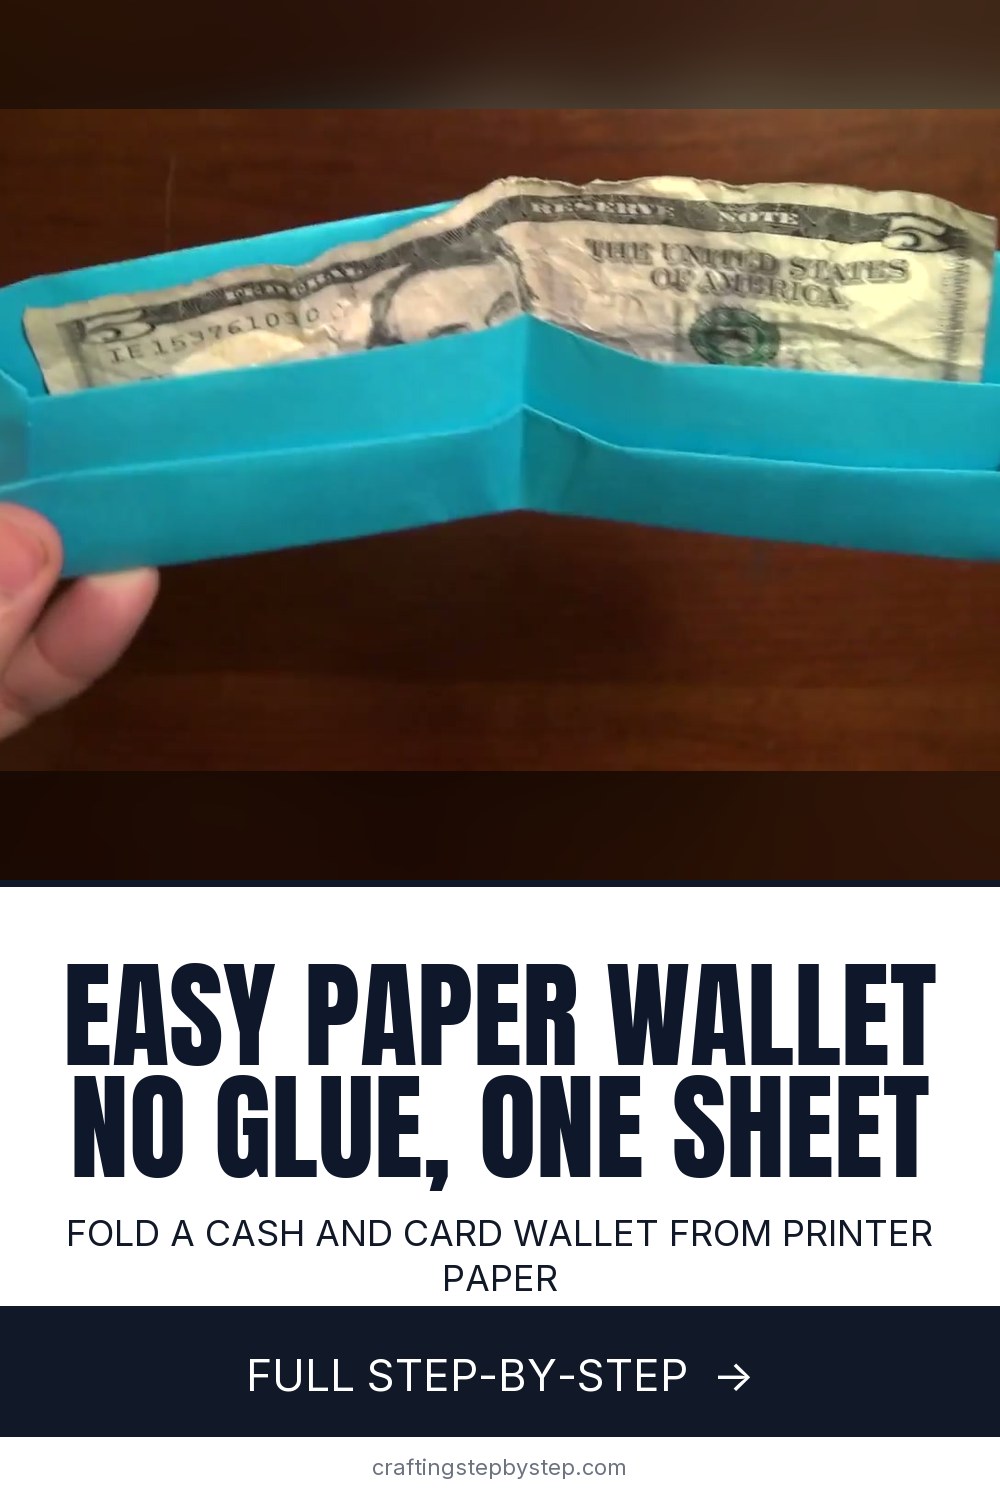
The finished result: How to Make a Paper Wallet (Easy Origami, No Glue)
  • Difficulty: Easy
  • About 15 minutes
  • 9 steps

You tapped Save

Save this project for later

We'll email you a link, no password.

How to Make a Paper Wallet (Easy Origami, No Glue)

  • Your saved projects in one list
  • Your ticked steps on any device

Check your inbox for an email from us. Not there? Look in your spam folder.

Print

Steps written out by Crafting Step by Step from Rob's World's video (opens YouTube) (8:33). Published .

A paper wallet is folded from one sheet of ordinary printer paper, with no cutting, glue or tape. Rob from Rob's World designed this one himself. It folds into a bifold wallet with a long pocket for bills and a smaller one in front for a couple of cards. It is a fun project to fold with kids, a clever way to give cash as a gift, and sturdier than you would expect from a sheet of copy paper.

How to make a paper wallet: the short version

  • Fold a letter sheet in half, then fold the top and bottom edges to the center.
  • Fold the bottom past its edge and lock it to make the front pocket.
  • Tuck the top edge into that pocket and fold the free edge down.
  • Fold each end in, fold the corners like a paper airplane and tuck the tabs back.
  • Fold the whole thing in half.

Choosing paper

Standard 8.5 by 11 inch letter paper is the size Rob designed it for, and A4 works the same. Bright colored copy paper looks the most like a real wallet. For a two-tone wallet that lasts longer, stack two sheets of different colors and fold them as one. The bottom sheet's color ends up on the outside. Rob suggests trying a single sheet first, because two sheets are harder to crease.

Skip cardstock for the first try. It cracks along the many folds at the ends. Thin wrapping paper is too soft to hold a card.

Sharp creases make the difference

Almost every problem with an origami wallet comes from soft creases. Run your fingernail, or a bone folder, along every fold. Line edges up carefully before you press. If the early folds are off by a little, the pockets end up crooked and the ends will not tuck neatly.

Making it last

The finished wallet holds together on its own. If the end tabs bother you, Rob says a tiny piece of clear tape on each one keeps it from ever coming apart. A strip of clear packing tape along the spine helps if it will live in a back pocket.

Ideas for your paper wallet

  • Cash gift. Fold one from birthday or Christmas paper and tuck the bills inside.
  • Gift card holder. The front pocket fits two cards.
  • Play money. Grandkids love a wallet for a pretend shop.
  • Travel. Keep foreign coins or receipts in a separate wallet.

Common problems

  • The pocket will not stay closed. The lock fold at the bottom was not creased hard enough. Crease it again from both sides.
  • The ends bulge. Fold the sides in no wider than your pinky.
  • It tears at the corners. The paper is too thin or too stiff. Try regular 20 lb copy paper.

More paper folding

New to folding? Start with origami basics. For gift giving, try folding money into a heart or a paper envelope. Then fold an origami box or an origami bookmark.

Free printable

Print the steps and supply list for this project

One page you can take to the table. Free with a free account, no password.

Get the free printable

What you'll need

Free, for this project

Get this checklist by email

  • All 3 tools and materials, with tick boxes
  • A link to print all 9 steps on paper, to keep by you while you craft

No password. The whole tutorial stays free on this page.

Quick answer

Fold a paper wallet from one sheet of printer paper, no glue or cutting. An easy project: about 15 minutes. You need 3 things, including clear tape and bone folder. The 9 steps start with fold the Paper Wallet Sheet in Half and Crease It, fold the Top and Bottom Edges to the Center Crease of the Paper Wallet and fold the Bottom of the Paper Wallet a Little Past the Bottom Edge.

Step-by-step guide

9 steps, about 9 minutes. Tap a picture to jump to that step. Your progress saves automatically.

Tick each step off as you go.

  1. Step 1: Fold the Paper Wallet Sheet in Half and Crease It

    Watch this step · 1:48

    Lay one sheet of letter paper on the table in portrait, the long side up and down. Fold the top edge down to meet the bottom edge. Line the corners up, then crease along the fold and run your fingernail over it to make it sharp. Unfold the sheet. You now have a line across the middle that divides the paper in half.

    Tip:

    For a sturdier two-tone wallet, stack two sheets and fold them as one.

    Back to all steps

  2. Step 2: Fold the Top and Bottom Edges to the Center Crease of the Paper Wallet

    Watch this step · 2:45

    Take the top edge and fold it down so it lands right on the center line. Crease it flat. Then fold the bottom edge up to the same center line and crease it too. Keep both folds lined up exactly on the middle crease. These two folds set the height of every pocket that follows, so take your time here.

    Tip:

    A bone folder gives you crisp creases and saves your fingernails.

    Back to all steps

  3. Step 3: Fold the Bottom of the Paper Wallet a Little Past the Bottom Edge

    Watch this step · 3:05

    Now fold the bottom section down, but take it a little past the bottom edge instead of lining it up. The easiest way is to flip the paper over, pull the edge down until it pops out, then use your finger to slide the fold in until there is a small overhang. Crease it right there. The overhang becomes the lock for the front pocket.

    Tip:

    Aim for an overhang about a quarter inch wide. You can pull it out more if needed.

    Back to all steps

  4. Step 4: Fold the Overhang Up to Lock the Paper Wallet's Bottom Pocket

    Watch this step · 3:38

    Take the extra strip that sticks out past the edge and fold it along that edge, all the way across. Crease it hard with your fingernail. This narrow fold locks the bottom layer in place. Flip the paper back over and you will see a neat pocket along the bottom. This is the card pocket of the finished wallet.

    Tip:

    Crease the lock from both sides so the pocket stays shut.

    Back to all steps

  5. Step 5: Tuck the Folded Top Edge Into the Paper Wallet Pocket

    Watch this step · 4:00

    Unfold the top edge you folded earlier. Fold it back the other way along the same crease and press it flat. Then take that folded edge and slide it down inside the bottom pocket you made. Lift the paper in your hands if that makes it easier to guide the edge in. Push it all the way down so it sits snugly.

    Tip:

    If the edge catches, curve the paper slightly so the pocket opens.

    Back to all steps

  6. Step 6: Check the Three Pocket Layers of the Paper Wallet

    Watch this step · 4:49

    Now fold the free top edge down so it sits a little below the top of the pocket, and crease it across. Lift the bottom edge, pull the pocket back, and let the bottom pocket sit on top again. Lay the strip flat and check it. You should see three stacked layers. The back layer is the bill pocket and the front is the card pocket.

    Tip:

    Smooth everything flat before you start on the ends.

    Back to all steps

  7. Step 7: Fold the Paper Wallet's Side In and the Corner Down Like an Airplane

    Watch this step · 5:30

    Fold the left end in by about the width of your pinky and crease it. Unfold it, then fold the top corner down so the top edge lines up with that new crease, like the nose of a paper airplane. Unfold the bottom pocket, fold the side in again and push it down, then pinch the edge and fold the pocket back up.

    Tip:

    Keep the side folds narrow. Wide ones make the wallet bulge.

    Back to all steps

  8. Step 8: Fold the End Tab Back Behind the Paper Wallet

    Watch this step · 5:45

    Turn the wallet over. Fold the corner in again like an airplane, then fold the whole end tab back onto the back of the wallet. Give it a firm pinch and round it off a little with your fingers. Flip it back over and the left side is done. Repeat steps seven and eight on the right end so both sides match.

    Tip:

    Rob adds a tiny piece of tape on each tab if you want it to never come apart.

    Back to all steps

  9. Step 9: Fold the Paper Wallet in Half and Crease the Spine

    Watch this step · 7:26

    Put your thumb in the middle and push gently to round the wallet. Fold one end across to meet the other, then squeeze and pinch along the fold to crease the spine. Open it up and you have a bifold paper wallet with a big pocket for cash and a small one for cards. Slip in a bill to test it.

    Tip:

    Crease the spine a few times so the wallet closes flat.

    Back to all steps

How to Make a Paper Easter Bunny

Keep going

How to Make a Paper Easter Bunny

Keep going with paper crafts

More on this topic, picked for this paper wallet.

You reached the last step

Save this project to come back to it

Your ticked steps, the free printable and your other saved makes, together in My Projects. Free, no password.

You tapped Save

Save this project for later

We'll email you a link, no password.

How to Make a Paper Wallet (Easy Origami, No Glue)

  • Your saved projects in one list
  • Your ticked steps on any device

Check your inbox for an email from us. Not there? Look in your spam folder.

Free printable

Printable sheet and shopping list for this project

The bonus is hidden until you sign up.

Free with a free account, no password. Every step above stays open to everyone.

Products Used

The Checklist

How to Make a Paper Wallet (Easy Origami, No Glue)

Tools
1
Materials
2
Steps
9
Video
9 min

Tools we recommend

As an Amazon Associate we earn from qualifying purchases. Links on this page may be affiliate links - clicking them and buying doesn't change your price, but helps support Crafting Step by Step.

Tags

The Crafter's Weekly

New paper crafts tutorials, every Sunday

One short email with the week's best step-by-step guides. Free, no spam, unsubscribe anytime.

Did this work for you?

What's next

Related collections

Curated theme pages that include this tutorial.

Similar tutorials

Hand-picked next reads based on the one you just finished.

Liked this paper crafts tutorial?

Pick the crafts you want to hear about. One email every Sunday with new step-by-step tutorials. No spam, easy to unsubscribe.

Get more like this in your inbox

Weekly digest. Pick the categories you want. Unsubscribe anytime.

Send me tutorials about

We only email about new tutorials. Easy unsubscribe anytime.