How to Fold Money Into a Heart

Based on a video by Art of Fold

Opens their YouTube channel

Steps written out by CraftingStepByStep · Published · Updated

Watch the original video (opens YouTube)
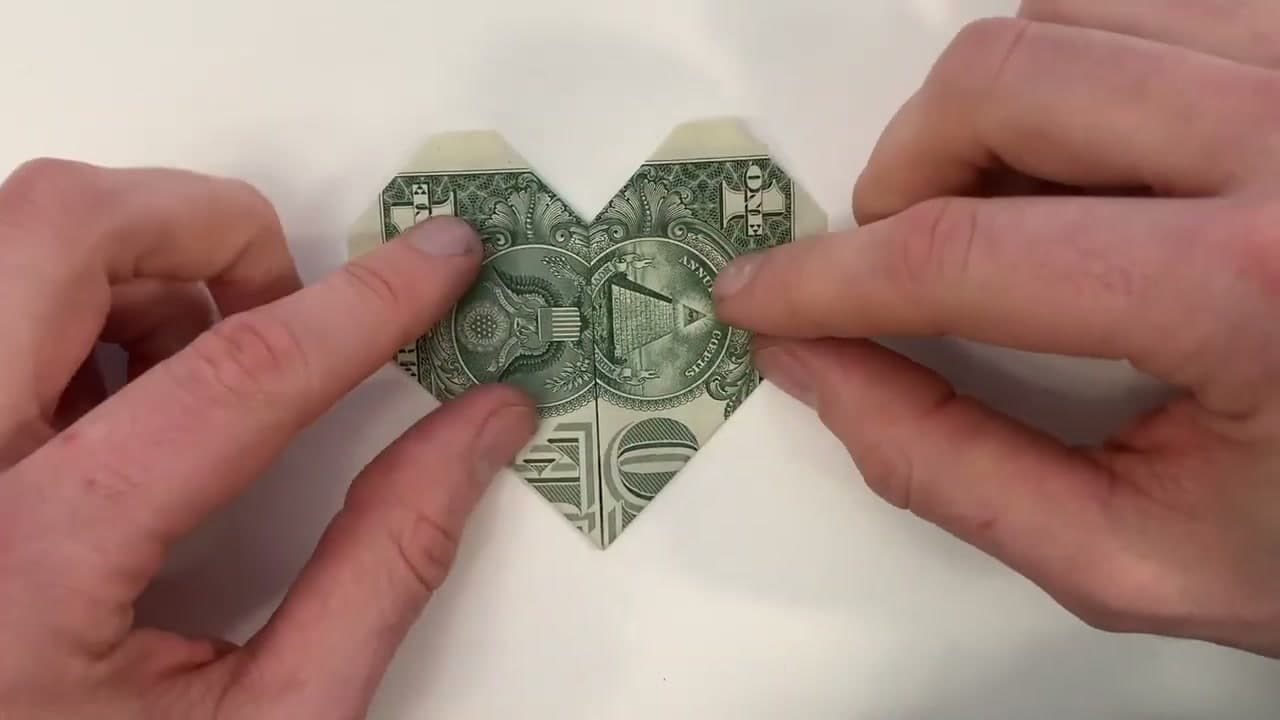
The finished result: How to Fold Money Into a Heart
Also in:Crafts

A dollar bill folded into a heart is the kind of small thing people keep. Tuck one into a birthday card, leave one on the table as a tip, or hand one over at a graduation. No glue, no tape, nothing to cut. One bill and about four minutes.

This walkthrough follows Art of Fold, who calls it the easiest heart you can fold from a dollar. His version runs on seven folds and skips the squash folds that make most money hearts fiddly. He starts with the front of the bill facing up, which lands the Great Seal on the face of the finished heart. Start with the back of the bill up instead and you get a paler heart with more cream showing, so fold one of each and pick.

A US dollar measures 156mm by 66mm. Cut scrap paper to those proportions and you can practise the whole sequence a few times before you crease real money. Art of Fold has a stack of dollar folds on his channel if you want to keep going.

Which bills fold best

Crisp ones. A bill straight from the bank holds a sharp crease and springs back into shape when you press it. A soft bill that has lived in a wallet for a year folds like cloth, and the lobes of the heart go floppy.

Stuck with a limp one? Lay it inside a heavy book overnight. That flattens the old creases enough to fold cleanly. Skip the iron - heat can scorch the ink.

Fives, tens, twenties and hundreds are all the same size as a one, so the folds do not change. The only difference is which portrait ends up on the face. For a bigger gift, fold a twenty and the heart says so without a word.

Ways to give a money heart

  • Tooth fairy. A heart under the pillow beats a flat bill every time.
  • Valentine's Day. Slip one into a card or a lunchbox.
  • Graduation and wedding cards. Fold several and line them up inside the card.
  • Tipping. Leave one for a server or a housekeeper who went out of their way.

Keeping it in a card without tape

Tape on a bill leaves a sticky mark and can tear it when it comes off. Cut two small diagonal slits in the card instead and tuck the bottom point and one lobe through them, the way a photo corner holds a print. A glue dot on the card, not the bill, also works. If you are making the card from scratch, our handmade card guide has a fold that leaves room for it.

Common mistakes

  • Soft creases. Run a thumbnail or a bone folder along every fold. A heart with lazy creases opens up in your hand.
  • Folding off-center. If the center crease in step 3 is crooked, one lobe comes out bigger than the other. Line the short ends up exactly before you press.
  • Uneven corner folds. Fold all four corners from the same halfway point, then compare left and right before you flip it.

Want the same shape in paper? We have a paper origami heart and an origami starter guide with the base folds everything else builds on. For a cash gift with more presence, a money lei strings a whole run of bills together.
What you'll need

Step-by-step guide

7 steps, about 4 minutes. Tap a picture to jump to that step. Your progress saves automatically.

Tick each step off as you go.

  1. Step 1: Lay the Dollar Bill Face Up

    Watch this step · 1:10

    Put a dollar bill flat on the table with the front facing up and Washington looking straight at you. Run your palm across it and push out any ripples or old wallet creases running through the middle.

    The flatter the bill starts, the cleaner every fold after this one sits. A newer bill holds a crease better than a soft one, though a worn bill still works if you press harder. Give yourself a clear patch of table so nothing drags on the corners.

    Tip:

    Folding on paper first is worth the two minutes. Cut a sheet to 156mm by 66mm and the proportions match a real bill exactly.

    Back to all steps

  2. Step 2: Fold the Bottom Edge of the Bill Up a Third

    Watch this step · 1:38

    Bring the bottom edge of the bill up toward the top as though you were folding the note into thirds, and press the crease flat. Stop while a sliver of Washington's hair still shows above the folded edge. That sliver is the reference Art of Fold uses instead of a measurement.

    Keep the new folded edge parallel with the top edge of the bill. When you get it right the two bands you can see are close to the same height. Close is good enough here.

    Tip:

    Do not reach for a ruler. Fold by eye, then check the two bands. If the top band looks fatter, open it and slide the fold up a little.

    Back to all steps

  3. Step 3: Crease the Folded Bill in Half, Then Unfold

    Watch this step · 1:56

    Take the right end of the folded strip and bring it across to meet the left end. Line the two short edges up before you press anything, then run your thumb down the fold to set a firm crease through the middle.

    Open it straight back out flat. You are not leaving it folded. That single crease down the center is the guide line for the two diagonal folds coming next, so it needs to be sharp enough to see.

    Tip:

    A crooked center crease throws off both diagonals later and leaves you with one lobe bigger than the other. Square the ends up first.

    Back to all steps

  4. Step 4: Fold Both Bottom Edges In to the Center Crease

    Watch this step · 2:20

    Work on the right half. Swing the bottom edge up until it lies along the center crease. The strip breaks into a diagonal and the corner drops into a point below. Press it down.

    Do the same on the left half. The two diagonals meet at the middle and the two points come together into the V that becomes the bottom of the heart. Match the second fold to the first by eye so the V sits straight.

    Tip:

    Your hands cover the model while you do this one. Fold one side, take your hands off and look, then fold the other to match what you see.

    Back to all steps

  5. Step 5: Turn the Bill Over and Fold the First Corner Down

    Watch this step · 3:10

    Flip the whole model over, keeping the point at the bottom. You are looking at four square corners along the top now. Fold the first one down along a line roughly halfway between the two horizontal edges above it.

    Want a reference? Pinch a small mark at that halfway point and fold the corner to the pinch. The mark vanishes inside the model once the corner is down, and after one corner you will see the angle well enough to skip the pinch on the rest.

    Tip:

    This does not have to be exact. Art of Fold folds all four by eye and the heart still comes out even, because what matters is that the four match each other.

    Back to all steps

  6. Step 6: Fold the Remaining Three Corners of the Heart

    Watch this step · 3:54

    Fold the other three corners down by the same amount, each one starting from that same point in the middle. Copy the angle you used on the first corner and keep checking the pair on each side against each other.

    Once all four are down, the shape reads as a heart from this side: two rounded lobes across the top, a notch between them and the point at the bottom. The cream margins of the bill show at the shoulders where the corners went under.

    Tip:

    If a corner will not lie flat, it has gone past the center point. Open it and take a little less.

    Back to all steps

  7. Step 7: Flip the Folded Dollar Heart Over

    Watch this step · 3:59

    Turn the model back over. The green side comes up and the heart is done, with the Great Seal sitting square in the middle of it. Press the whole thing flat under your palm to sharpen the creases.

    Tuck any loose corner back under the flap it belongs to so the outline stays clean. Slip the heart into a card, stand it against a mug on a table, or put it in a small frame if it is going on a wall.

    Tip:

    Press it under a heavy book for a minute before you give it away. It holds its shape for weeks after that.

    Back to all steps

Keep going

How to Make a Paper Popper - Loud Snap From One Sheet of Paper

9 steps · about 9 minutes

Products Used

The Checklist

How to Fold Money Into a Heart

Tools
3
Materials
2
Steps
7
Video
4 min

Tools we recommend

As an Amazon Associate we earn from qualifying purchases. Links on this page may be affiliate links - clicking them and buying doesn't change your price, but helps support CraftingStepByStep.

Tags

The Crafter's Weekly

New paper crafts tutorials, every Sunday

One short email with the week's best step-by-step guides. Free, no spam, unsubscribe anytime.

Test your knowledge

Did the lesson stick? Start with this one.

5 questions covering what you just read. No signup, no score saved, and you can stop after this one.

Question 1 of 5

Which way up does the bill start?

Quick reference

Key takeaways from How to Fold Money Into a Heart

5 questions, answers, and one-line explanations. Tap to expand.

  1. 1.Which way up does the bill start?

    Answer: Front up, Washington facing you

    Starting front up lands the Great Seal on the face of the finished heart.

  2. 2.What tells you the first fold has gone far enough?

    Answer: A sliver of Washington's hair still shows

    That sliver is the reference the fold uses instead of measuring thirds.

  3. 3.What happens to the halfway crease after you make it?

    Answer: You open the bill straight back out

    It is only a reference line for the two diagonals that come next.

  4. 4.How many corners get folded down to round off the lobes?

    Answer: Four

    All four top corners come down by the same amount from the same middle point.

  5. 5.How can you practise before creasing real money?

    Answer: Cut scrap paper to 156mm by 66mm

    Matching a real dollar's proportions is what makes the practice transfer.

Did this work for you?

What's next

Related collections

Curated theme pages that include this tutorial.

Similar tutorials

Hand-picked next reads based on the one you just finished.

Liked this paper crafts tutorial?

Pick the crafts you want to hear about. One email every Sunday with new step-by-step tutorials. No spam, easy to unsubscribe.

Get more like this in your inbox

Weekly digest. Pick the categories you want. Unsubscribe anytime.

Send me tutorials about

We only email about new tutorials. Easy unsubscribe anytime.