How to Gel Plate Print: Feather and Leaf Monoprints

Save it for later. We'll email you a link, no password.

Find it again on your phone or computer, with your finished steps ticked.

You tapped Save

Save this project for later

We'll email you a link, no password.

How to Gel Plate Print: Feather and Leaf Monoprints

  • Your saved projects in one list
  • Your ticked steps on any device

Check your inbox for an email from us. Not there? Look in your spam folder.

  • 10 steps
  • 9:22 video
  • Difficulty: Easy
  • About 45 minutes, plus 30 minutes to dry or set
  • Paper Crafts

Based on a video by Josie Lewis

Opens their YouTube channel

Steps written out by Crafting Step by Step · Published

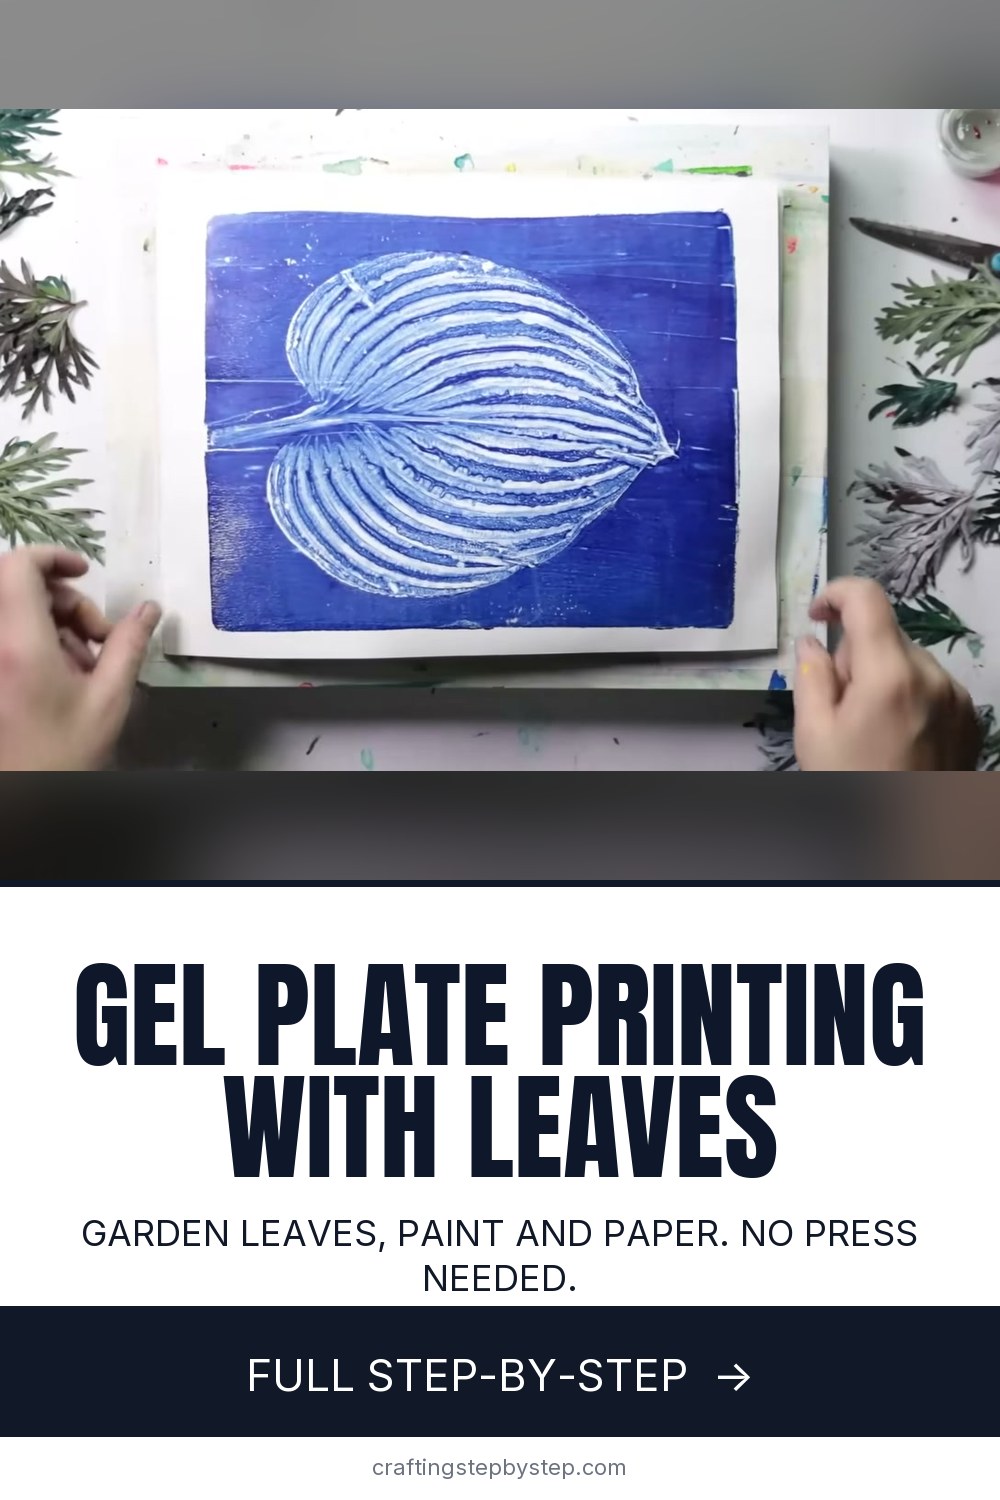
The finished result: How to Gel Plate Print: Feather and Leaf Monoprints

Gel plate printing is one of the easiest kinds of printmaking to start. You roll paint onto a soft, squishy plate, press things into it, lay paper on top and pull a one-of-a-kind print. No press, no carving and no special skills. In this lesson Josie Lewis shows two of her favorite projects: a feather print on a rainbow gradient, and a two-layer leaf print that uses a ghost image to pick up every vein.

How to gel plate print: the basic cycle

  • Roll a thin, even layer of acrylic paint onto the plate with a brayer.
  • Press a leaf, feather, stencil or texture into the wet paint.
  • Lay paper on top and rub firmly all over.
  • Peel the paper away. That is your print.

Each print is a monoprint, which means you only get one like it. That is half the fun.

What you need

A gel plate (8 x 10 inches is a good first size), a soft rubber brayer, ordinary acrylic paint and some paper. Heavy body or craft acrylics both work. Josie uses 140 lb watercolor paper because it is sturdy enough to rub hard and takes several layers, but copy paper, cardstock and book pages all print well too. Gel plates are reusable and last for years. Homemade gelatin plates work, but they need the fridge and go moldy within weeks.

Things to print with

Look around your house and garden. Flat leaves with strong veins (hosta, fern, sage, maple), feathers, embroidery floss, string, bubble wrap, mesh produce bags, lace, stencils and cut paper shapes all leave great marks. Thick, lumpy objects do not. The flatter the item, the crisper the print.

First print vs ghost print

The first pull lifts the paint around your leaves, so you get a pale silhouette on color. Remove the leaves and the plate still holds a detailed impression of every vein. Let that dry, roll a fresh contrasting layer over it and pull again. The wet layer grabs the dry one and you get the ghost print, often the best print of the session.

Cleaning and storing the plate

Between prints you can keep going over old paint, which adds lovely layers. When you finish, pull a few prints on scrap paper to lift leftover paint, then wipe the plate with baby wipes or soapy water. Store it flat on its plastic sheet, away from heat and sun.

Common mistakes

  • Too much paint. Thick paint fills in the detail. Roll it thin enough to hear a light sticky hiss.
  • Working too slowly. Acrylic dries fast on the plate. Have your leaves and paper ready before you roll.
  • Light pressure. Rub every inch with your palms and fingers so the paper meets the paint everywhere.
  • Pulling the second layer too soon. For a ghost print the first layer must be fully dry. Wait 5 to 10 minutes.

What to do with your prints

Use them as backgrounds for handmade cards, cut them up for collage, or glue them into a junk journal. Leaf prints from the garden pair well with pressed flowers. If you enjoy printing, try block printing on fabric next. Gel printing is also a lovely, low-mess activity to share with grandchildren.

Free printable

Print the steps and supply list for this project

One page you can take to the table. Free with a free account, no password.

Get the free printable

What you'll need

Free, for this project

Get this checklist by email

  • All 8 tools and materials, with tick boxes
  • A link to print all 10 steps on paper, to keep by you while you craft

No password. The whole tutorial stays free on this page.

Quick answer

How to gel plate print step by step: roll a gradient, press in leaves or a feather, pull a monoprint, then a detailed ghost print. An easy project: about 45 minutes, plus 30 minutes to dry or set. You need 8 things, including acrylic paint, watercolor paper or cardstock and fresh leaves. The 10 steps start with squeeze Acrylic Paint Onto the Gel Plate and roll a Gradient Across the Gel Plate With a Brayer.

Step-by-step guide

10 steps, about 9 minutes. Tap a picture to jump to that step. Your progress saves automatically.

Tick each step off as you go.

  1. Step 1: Squeeze Acrylic Paint Onto the Gel Plate

    Watch this step · 2:12

    Set your gel plate on a flat, protected surface. Squeeze a short line of acrylic paint along one edge of the plate. For a rainbow gradient like Josie's, lay two or three colors side by side in a row, pink, orange and yellow here. Use less paint than you think. A thin bead goes a long way once it is rolled out.

    Tip:

    Colors that sit next to each other on the color wheel blend into a clean gradient.

    Back to all steps

  2. Step 2: Roll a Gradient Across the Gel Plate With a Brayer

    Watch this step · 2:38

    Roll the brayer through the paint and across the plate, then lift it and roll again in the same direction. Keep going until the colors blend where they meet and the whole plate is evenly covered. A long brayer makes gradients easier. You want a thin layer with a fine, velvety texture, not thick ridges.

    Tip:

    Roll in one direction only. Going back and forth smears the gradient into mud.

    Back to all steps

  3. Step 3: Lay a Feather on the Wet Paint on the Gel Plate

    Watch this step · 2:58

    Place a flat feather onto the wet paint. Work quickly here, because acrylic paint dries fast and a dry layer will not transfer. Leaves, string or a stencil all work the same way. Whatever you lay down blocks the paint, so it will show as a silhouette in the background color.

    Tip:

    Flatter objects give sharper edges. Press curled feathers flat with a fingertip.

    Back to all steps

  4. Step 4: Press Paper Firmly Over the Gel Plate

    Watch this step · 3:12

    Lay a sheet of paper over the plate and press it down with both hands. Rub firmly all over, from the middle out to the edges, so the paper picks up the paint everywhere. Josie uses a sheet of watercolor paper that already has a gradient printed on it, so the feather shape will show that color underneath.

    Tip:

    Use a pre-printed sheet for extra color in the silhouette.

    Back to all steps

  5. Step 5: Pull the Feather Print From the Gel Plate

    Watch this step · 3:30

    Peel the paper up from one corner in a slow, steady motion. This reveal is the best part. The paint from the plate now covers the paper, and the feather has left a crisp silhouette showing the color underneath. Every print is a little different, which is why it is called a monoprint.

    Tip:

    Lay prints flat to dry so the paint does not stick to anything.

    Back to all steps

  6. Step 6: Roll a Thin Layer of Paint for a Leaf Print

    Watch this step · 3:42

    Clean or wipe the plate, then add a little magenta paint and roll it out with the brayer. Keep this layer very thin. Too much paint is the most common mistake, and it fills in the fine detail you want from the leaves. Cover the whole plate evenly and move on straight away.

    Tip:

    If the paint looks shiny and wet, roll a few more passes to thin it.

    Back to all steps

  7. Step 7: Arrange Fresh Leaves on the Painted Gel Plate

    Watch this step · 4:06

    Lay fresh leaves on the wet paint with the vein side down. Feathery sprigs like the ones here give lots of detail. Arrange them with some space between each one so every shape reads clearly in the finished print. Work fast, since you only have a short window before the paint starts to dry.

    Tip:

    Gather leaves the same day. Fresh, flexible leaves print better than dried ones.

    Back to all steps

  8. Step 8: Pull the First Leaf Print to Lift the Background

    Watch this step · 5:00

    Press paper over the plate and rub firmly everywhere. Peel it off to reveal the first pull: white leaf silhouettes on magenta. Keep it, it is a good print. But leave the leaves on the plate for a moment, then lift them off. The plate now holds a detailed impression of every vein, ready for the ghost print.

    Tip:

    Lift leaves off with tweezers if they are delicate.

    Back to all steps

  9. Step 9: Roll a Cream Layer Over the Dry Ghost Image

    Watch this step · 5:48

    Let the leaf impression on the plate dry completely, about 5 to 10 minutes. Then roll a thin layer of cream or off-white paint over the whole plate. This time you want the new layer wet. It covers the dried leaf image and will lift it up when you print.

    Tip:

    Touch a corner lightly to check the first layer is dry before you roll.

    Back to all steps

  10. Step 10: Pull the Ghost Print and Reveal the Leaf Detail

    Watch this step · 6:33

    Press a fresh sheet of paper over the plate and rub firmly all over. Then let it sit until the paint is fully dry, around 15 minutes. Peel it away and the wet cream layer brings the dry leaf print with it. You get crisp pink leaves with every vein on a soft cream background.

    Tip:

    Patience pays here. Pulling too early leaves the detail behind.

    Back to all steps

How to Make a Wrapping Paper Bow

Keep going

How to Make a Wrapping Paper Bow

You reached the last step

Save this project to come back to it

Your ticked steps, the free printable and your other saved makes, together in My Projects. Free, no password.

You tapped Save

Save this project for later

We'll email you a link, no password.

How to Gel Plate Print: Feather and Leaf Monoprints

  • Your saved projects in one list
  • Your ticked steps on any device

Check your inbox for an email from us. Not there? Look in your spam folder.

Free printable

Printable sheet for this project

The bonus is hidden until you sign up.

Free with a free account, no password. Every step above stays open to everyone.

Products Used

The Checklist

How to Gel Plate Print: Feather and Leaf Monoprints

Tools
3
Materials
5
Steps
10
Video
9 min

Tools we recommend

As an Amazon Associate we earn from qualifying purchases. Links on this page may be affiliate links - clicking them and buying doesn't change your price, but helps support Crafting Step by Step.

Tags

The Crafter's Weekly

New paper crafts tutorials, every Sunday

One short email with the week's best step-by-step guides. Free, no spam, unsubscribe anytime.

Did this work for you?

What's next

Related collections

Curated theme pages that include this tutorial.

Similar tutorials

Hand-picked next reads based on the one you just finished.

Liked this paper crafts tutorial?

Pick the crafts you want to hear about. One email every Sunday with new step-by-step tutorials. No spam, easy to unsubscribe.

Get more like this in your inbox

Weekly digest. Pick the categories you want. Unsubscribe anytime.

Send me tutorials about

We only email about new tutorials. Easy unsubscribe anytime.