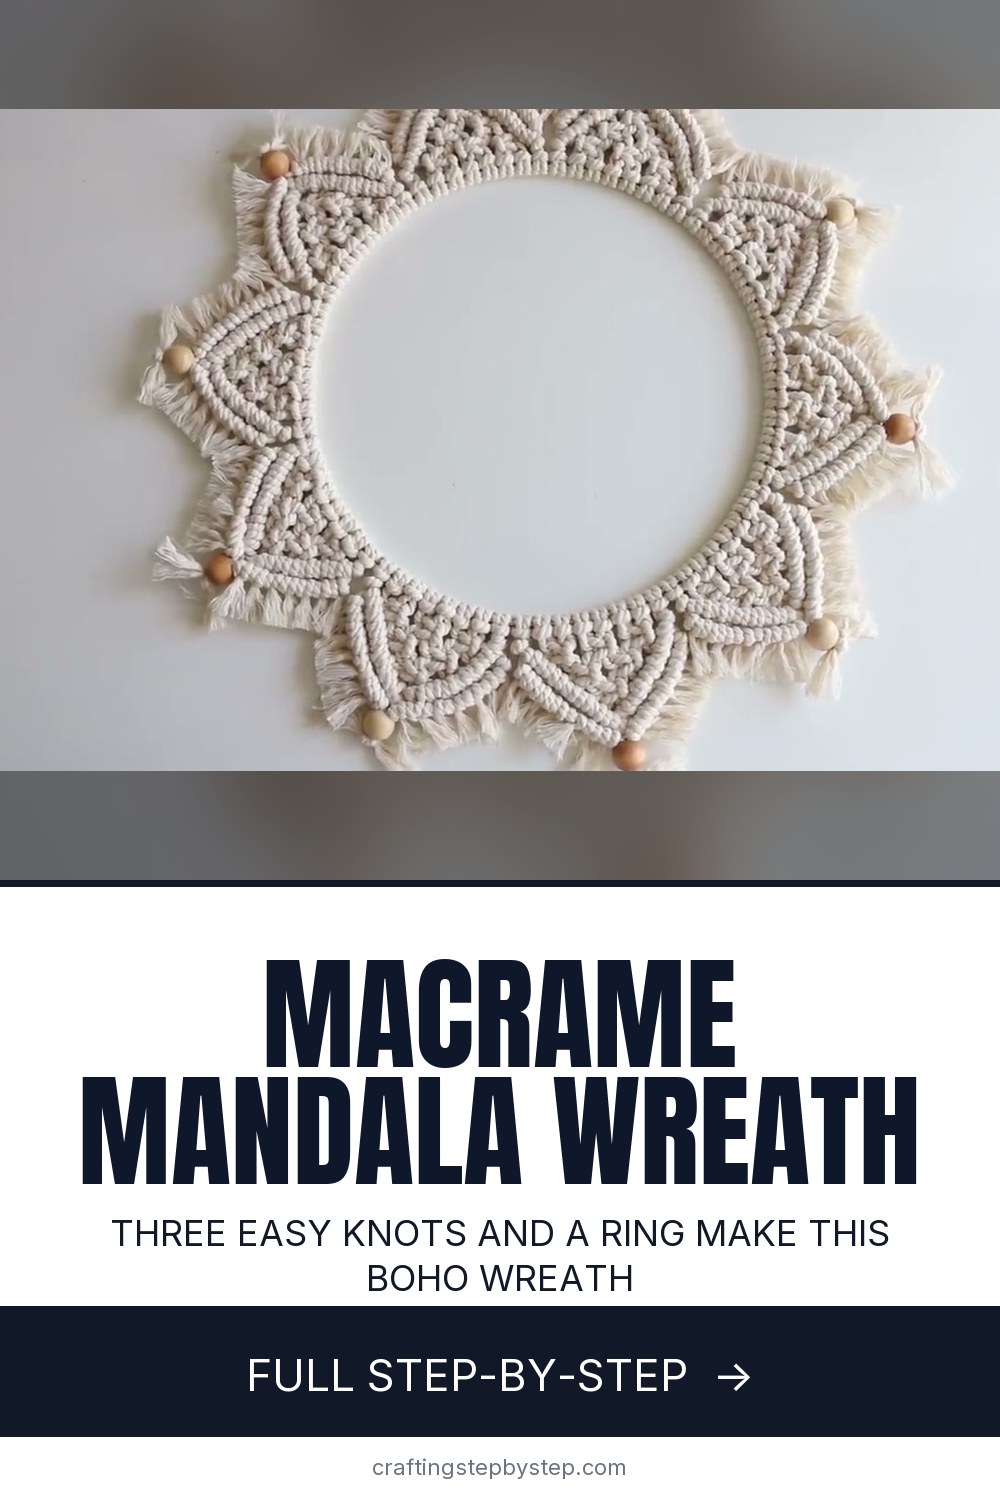
How to Make a Macrame Wreath (Easy Mandala Ring)

The finished result: How to Make a Macrame Wreath (Easy Mandala Ring)
  • Difficulty: Medium
  • About 2 hours 30 minutes
  • 9 steps

You tapped Save

Save this project for later

We'll email you a link, no password.

How to Make a Macrame Wreath (Easy Mandala Ring)

  • Your saved projects in one list
  • Your ticked steps on any device

Check your inbox for an email from us. Not there? Look in your spam folder.

Print

Steps written out by Crafting Step by Step from Melanie Ham's video (opens YouTube) (12:28). Published .

Also in:Crafts

A macrame wreath looks fancy, but it is one small knotted shape repeated around a metal ring. Melanie Ham shows the whole thing on her channel: a cream mandala wreath with ten scalloped units, a wood bead at each point and a soft brushed fringe. Hang it on a door or wall, or lay it flat on a table as a centerpiece with a candle in the middle. If you can tie a square knot, you can make this.

How to make a macrame wreath: the short version

  • Cut 80 cords, each 24 inches long.
  • Tie eight cords onto the ring with lark's head knots.
  • Tie square knots in rows to make a small triangle.
  • Frame the triangle with two rounds of double half hitches.
  • Add a bead, cut and brush the fringe, then repeat nine more times.

Cord, ring and size

Melanie uses a 3 to 4 mm twisted cotton cord. Twisted (3-ply) cord brushes out into a fluffy fringe much more easily than braided cord, so stick with it for this project. A 10 inch metal ring holds ten units snugly. On a 12 or 14 inch ring, add one or two more units, and keep each one eight cords wide so the pattern stays the same. You need about 160 feet of cord in all, which is less than half of a typical spool.

The three knots in plain words

Lark's head: fold a cord in half, lay the loop over the ring, and pull the tails through the loop. Square knot: with four strands, cross the right strand over the middle two, then the left strand over it, under the middle and up through the loop. Repeat the other way to lock it. Double half hitch: hold one strand tight as a lead cord, then wrap each strand around it twice. The angle you hold the lead cord at becomes the shape of the border.

Keeping all ten units the same

Tie the cords for each new unit right up against the last one, with no gap on the ring. Pull every square knot to the same snugness. Uneven tension is what makes one point longer than the others. Cut the fringe on each unit to the same length, about 3/4 inch below the bead, before you brush it. A small card cut to that width makes a handy guide.

Holiday and gift ideas

  • Tuck a sprig of eucalyptus or faux pine into the top for a Christmas door wreath.
  • Swap wood beads for red or gold ones for the holidays.
  • Make a 6 inch version with fewer units as a gift or ornament.
  • Lay it flat around a pillar candle on a hurricane glass for a table centerpiece.

Common problems

  • The units slide around the ring. Push them close together; a full ring holds them in place.
  • The half hitch border gaps. Press the strands back together with your fingers as you go.
  • The fringe will not fluff. Separate the twists with a needle before you brush.

New to these knots? See how to tie a lark's head knot, how to do square knots and how to tie a half hitch. For more winter decor, make a macrame snowflake or a classic Christmas wreath.

Free printable

Print the steps and supply list for this project

One page you can take to the table. Free with a free account, no password.

Get the free printable

What you'll need

Free, for this project

Get this checklist by email

  • All 8 tools and materials, with tick boxes
  • A link to print all 9 steps on paper, to keep by you while you craft

No password. The whole tutorial stays free on this page.

Quick answer

Make a macrame mandala wreath on a metal ring with square knots and half hitches, wood beads and a brushed fringe. A medium project: about 2 hours 30 minutes. Materials cost about $8 to $18. You need 8 things, including 3-4mm twisted cotton macrame cord, 10-inch metal ring and wood beads. The 9 steps start with gather the Macrame Cord, Metal Ring and Beads, tie Lark's Head Knots Onto the Macrame Wreath Ring and tie the First Row of Macrame Square Knots.

Step-by-step guide

9 steps, about 12 minutes. Tap a picture to jump to that step. Your progress saves automatically.

Tick each step off as you go.

  1. Step 1: Gather the Macrame Cord, Metal Ring and Beads

    Watch this step · 0:40

    Get out your twisted cotton cord, a 10 inch metal ring, ten wood beads, sharp scissors and a pet slicker brush. Cut the cord into 24 inch lengths. Each unit of the wreath uses eight cords and there are ten units, so you need 80 pieces. Cut them all at once and keep them in a bundle. The beads are optional if you prefer a plain look.

    Tip:

    Cut one cord, then use it as a measuring guide for the rest.

    Back to all steps

  2. Step 2: Tie Lark's Head Knots Onto the Macrame Wreath Ring

    Watch this step · 1:36

    Fold a cord in half to make a loop. Lay the loop over the front of the ring, then bring the two tails down through it and pull snug. That is a lark's head knot. Add eight cords side by side for one unit, which gives you 16 strands. You can work flat on a table, or hang the ring from a drawer pull or a cabinet knob.

    Tip:

    Push each new knot tight against the last one so no ring shows between them.

    Back to all steps

  3. Step 3: Tie the First Row of Macrame Square Knots

    Watch this step · 2:50

    Leave the two outer strands on each side alone for now. Take the middle four strands. Cross the right strand over the two center strands, lay the left strand over it, then pass the left strand behind and up through the loop. Tighten, then repeat in the opposite direction. That is one square knot. Tie two more beside it so the row has three.

    Tip:

    Always start the first half on the same side so every knot looks the same.

    Back to all steps

  4. Step 4: Add Offset Square Knots to Shape the Triangle

    Watch this step · 4:22

    For the second row, take the right two strands from one knot and the left two from its neighbor, and tie a square knot between them. Do this in both gaps so the row has two knots sitting offset. Then take the center four strands and tie one last square knot below them. You now have a small triangle of six square knots hanging from the ring.

    Tip:

    Pull each knot to the same tightness so the triangle stays even.

    Back to all steps

  5. Step 5: Tie Double Half Hitches Along the Triangle Edge

    Watch this step · 5:45

    Bring in the outer strands you left aside. Take the far right strand as your lead cord and hold it at an angle along the edge of the triangle. Wrap the next strand over and around it twice and pull up to tighten. Keep going down the edge, one strand at a time, until you reach the center. Then do the same from the left side.

    Tip:

    The angle you hold the lead cord at sets the curve, so hold it steady.

    Back to all steps

  6. Step 6: Work a Second Round of Half Hitches for the Border

    Watch this step · 9:00

    Close the point where the two sides meet by tying one lead cord around the other. Then pick up the next strand as a new lead cord and run a second round of double half hitches down each side, tight under the first. Press the strands together with your fingers if they start to spread. Leave the two lead cords hanging at the center when you finish.

    Tip:

    Working from the left can feel backward. Go slowly and check each wrap.

    Back to all steps

  7. Step 7: Add a Wood Bead Below the Macrame Unit

    Watch this step · 10:30

    Thread one center lead cord through a tapestry needle and push it through the hole of a wood bead, then do the same with the other. Slide the bead up tight under the point of the unit. Tie the two cords together in a single knot right under the bead to hold it. If you skip the bead, tie the two lead cords around each other to close the point.

    Tip:

    Thread one cord at a time. Both at once is too bulky for the bead hole.

    Back to all steps

  8. Step 8: Unravel and Brush Out the Macrame Fringe

    Watch this step · 11:30

    Cut all the strands at the bottom to about 3/4 inch with ordinary scissors. Then use the tapestry needle to pull apart the twists on each strand so the plies separate. Once they are loose, comb the fringe with a pet slicker brush. It turns the cord into a soft, fluffy fringe in a few strokes. Leave it unbrushed if you prefer a rope look.

    Tip:

    Hold the knots flat with your other hand while you brush so they stay neat.

    Back to all steps

  9. Step 9: Trim the Fringe and Repeat Around the Wreath Ring

    Watch this step · 12:08

    Brushing makes the fringe a bit ragged, so trim it again with sharp fabric scissors for a crisp, even edge. Match the length to your other units. Then slide the finished unit to one side, tie on eight more cords right next to it and repeat steps 2 to 9. Ten units fill a 10 inch ring all the way around.

    Tip:

    Save your best fabric scissors for this final trim. Dull blades leave fuzzy ends.

    Back to all steps

How to Make a Macrame Christmas Tree Ornament

Keep going

How to Make a Macrame Christmas Tree Ornament

10 steps · about 9 minutes

Keep going with macramé

More on this topic, picked for this macrame wreath.

You reached the last step

Save this project to come back to it

Your ticked steps, the free printable and your other saved makes, together in My Projects. Free, no password.

You tapped Save

Save this project for later

We'll email you a link, no password.

How to Make a Macrame Wreath (Easy Mandala Ring)

  • Your saved projects in one list
  • Your ticked steps on any device

Check your inbox for an email from us. Not there? Look in your spam folder.

Free printable

Printable sheet and shopping list for this project

The bonus is hidden until you sign up.

Free with a free account, no password. Every step above stays open to everyone.

Products Used

The Checklist

How to Make a Macrame Wreath (Easy Mandala Ring)

Tools
5
Materials
3
Steps
9
Video
12 min

Tools we recommend

As an Amazon Associate we earn from qualifying purchases. Links on this page may be affiliate links - clicking them and buying doesn't change your price, but helps support Crafting Step by Step.

Tags

The Crafter's Weekly

New macramé tutorials, every Sunday

One short email with the week's best step-by-step guides. Free, no spam, unsubscribe anytime.

Did this work for you?

What's next

Related collections

Curated theme pages that include this tutorial.

Similar tutorials

Hand-picked next reads based on the one you just finished.

Liked this macramé tutorial?

Pick the crafts you want to hear about. One email every Sunday with new step-by-step tutorials. No spam, easy to unsubscribe.

Get more like this in your inbox

Weekly digest. Pick the categories you want. Unsubscribe anytime.

Send me tutorials about

We only email about new tutorials. Easy unsubscribe anytime.