How to Make a Charm Bracelet With Stretch Cord

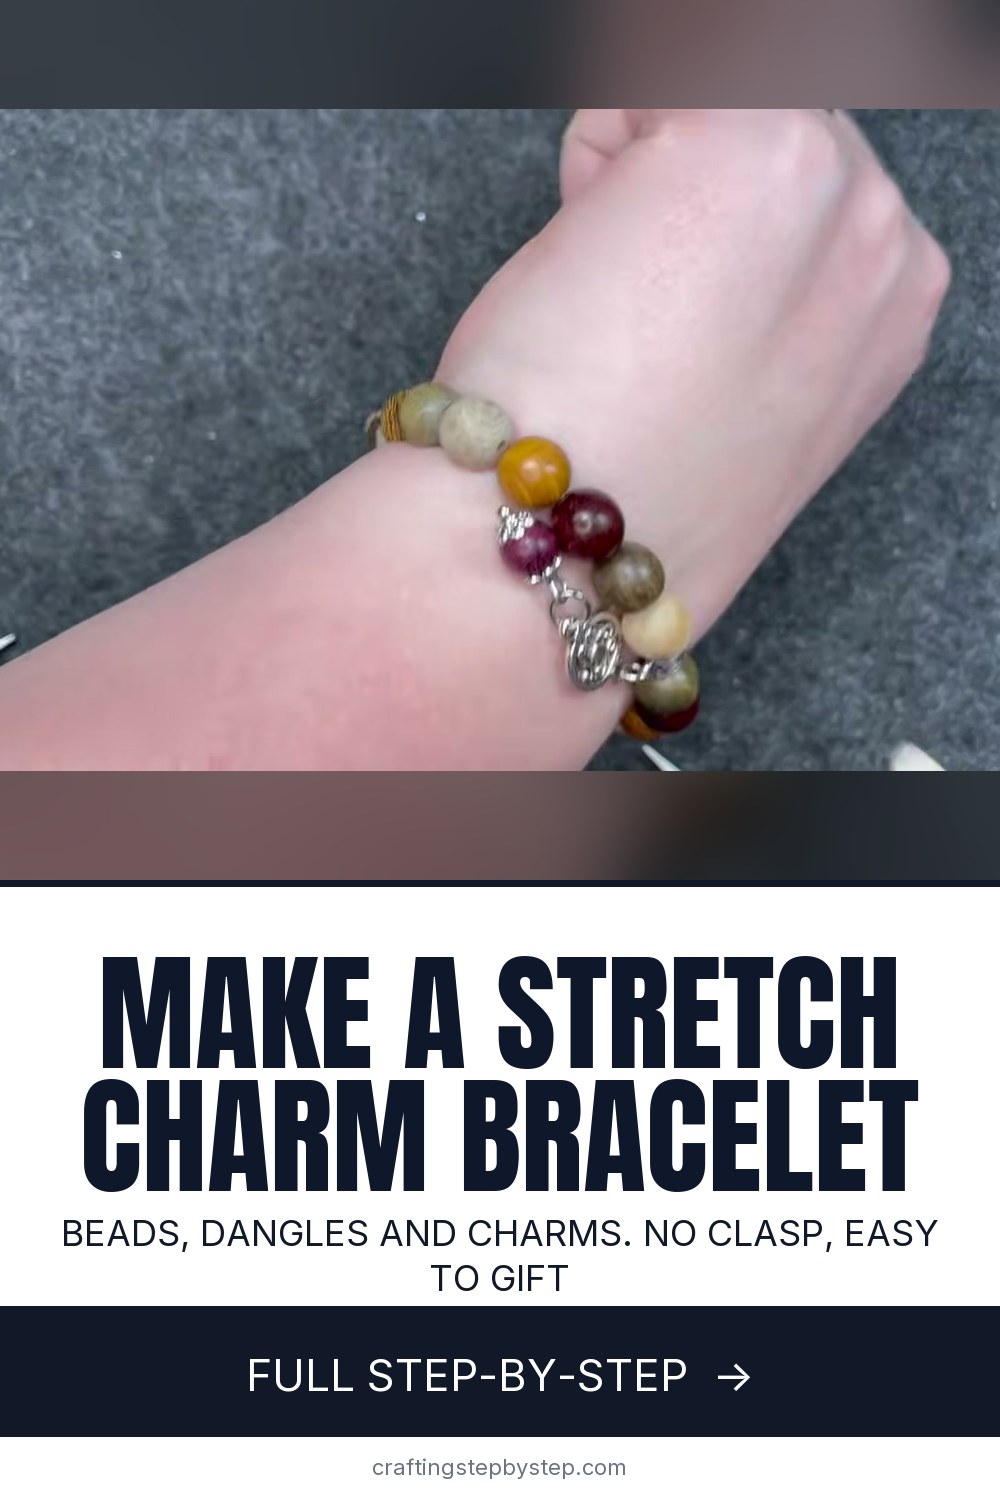
The finished result: How to Make a Charm Bracelet With Stretch Cord
  • Difficulty: Easy
  • About 30 minutes, plus 12 hours to dry or set
  • 10 steps

You tapped Save

Save this project for later

We'll email you a link, no password.

How to Make a Charm Bracelet With Stretch Cord

  • Your saved projects in one list
  • Your ticked steps on any device

Check your inbox for an email from us. Not there? Look in your spam folder.

Print

Steps written out by Crafting Step by Step from Craft Time by Kasi's video (opens YouTube) (19:15). Published .

A charm bracelet is a plain bead bracelet with something extra hanging from it. It is easier than it looks. Kasi from Craft Time by Kasi makes one from wooden beads on stretch cord, then adds two small dangles with silver bead caps and swirly connector charms. There is no clasp, so it slips on and off over the hand. Once you know the method, you can swap in any beads and any charms you like.

How to make a charm bracelet: what you need

  • Stretch cord. Clear elastic, about 12 inches per bracelet. 0.7mm suits most 8mm beads.
  • Beads. About 18 to 19 beads of 8mm for an average wrist.
  • Charm holders. Two large-hole silver beads. The charm hangs from these, and one hides the knot.
  • For the charms. Head pins, bead caps, small 6mm beads, connector charms and jump rings.
  • Tools. Round nose pliers, two chain nose pliers, flush cutters, a bead stopper and gel super glue.

Sizing a stretch charm bracelet

Wrap a soft tape measure around the wrist bone, snug but not tight. Add half an inch to one inch for comfort. Kasi aims for 7 1/2 inches, a common adult size. Lay the strung beads against a ruler before you tie. If it runs long, take one bead off. Remember that big beads and dangling charms make a bracelet sit tighter, so size up a little for chunky designs.

WristBracelet length
Child5 1/2 to 6 inches
Small adult6 1/2 to 7 inches
Average adult7 to 7 1/2 inches
Large adult8 inches

Why the knot matters

Stretch bracelets fail at the knot, not the cord. Pre-stretching the elastic stops it sagging later. A surgeon's knot (a plain knot, then a second one wrapped twice) grips better than a granny knot. A drop of gel glue locks it. Hiding the knot inside a charm holder protects it from rubbing. Let the glue cure overnight before you roll the bracelet on.

Charm ideas

Charms make a bracelet personal. Try a birthstone bead on each dangle, a letter charm for a grandchild's initial, a small heart or a holiday charm you change with the season. Keep the total to two or three. More than that and the bracelet twists and the charms tangle. A matching pair, one for you and one for a friend, makes a sweet gift.

Common problems

  • Cord snapped. A rough bead hole cut it. Use an awl to clear any blocked holes first.
  • Charm fell off. The jump ring was pulled open sideways. Twist rings open and closed.
  • Knot slipped. Not enough glue, or you stretched it before it cured.

More bracelets to try

Practice opening rings with how to open a jump ring. For a plain version, see how to make a beaded bracelet. Prefer cord? Try string bracelets and a bracelet knot.

Free printable

Print the steps and supply list for this project

One page you can take to the table. Free with a free account, no password.

Get the free printable

What you'll need

Free, for this project

Get this checklist by email

  • All 15 tools and materials, with tick boxes
  • A link to print all 10 steps on paper, to keep by you while you craft

No password. The whole tutorial stays free on this page.

Quick answer

How to make a charm bracelet on stretch cord: string beads, hide a glued knot and hang bead dangles and charms with jump rings. An easy project: about 30 minutes, plus 12 hours to dry or set. Materials cost about $3 to $8. You need 15 things, including clear stretch cord, 8mm wooden beads and 6mm beads. The 10 steps start with pre-Stretch the Elastic Cord for the Charm Bracelet and string Wooden Beads Onto the Charm Bracelet Cord.

Step-by-step guide

10 steps, about 19 minutes. Tap a picture to jump to that step. Your progress saves automatically.

Tick each step off as you go.

  1. Step 1: Pre-Stretch the Elastic Cord for the Charm Bracelet

    Watch this step · 4:18

    Cut a little over 12 inches of clear stretch cord. Before any beads go on, work along it a few inches at a time and give each section a firm tug. This pre-stretch takes out the slack the cord would lose later on your wrist. Skip it and the finished bracelet can sag and show gaps between the beads after a few wears.

    Tip:

    Pull firmly but not hard enough to thin the cord. You want it relaxed, not weakened.

    Back to all steps

  2. Step 2: String Wooden Beads Onto the Charm Bracelet Cord

    Watch this step · 6:45

    Clip a bead stopper onto one end so nothing slides off. String the beads in a random order, but try not to put two of the same color side by side. Kasi uses nineteen 8mm wooden beads in natural shades. If a bead hole is blocked, push an awl through it before stringing. Stop at about half your beads.

    Tip:

    Lay your beads out in order on a towel first so you can see the color pattern.

    Back to all steps

  3. Step 3: Add Silver Charm Holder Beads and Check the Bracelet Length

    Watch this step · 6:56

    Slide on a silver charm holder like any other bead, then string the second half of your beads. The other charm holder goes on last. Lay the strand along a ruler. Kasi's came to 8 inches, so she took one bead off to reach 7 1/2. Those two charm holders are where the charms will hang.

    Tip:

    Measure with the charm holders on. They add length too.

    Back to all steps

  4. Step 4: Tie the Charm Bracelet Elastic in a Surgeon's Knot

    Watch this step · 9:15

    Take off the bead stopper and bring both ends together. Tie a plain knot, left over right. Then tie a second knot, but wrap the cord over twice before pulling it through. Pull it snug without yanking. Tie the knot right next to a charm holder, because that wide hole will slide over and hide it.

    Tip:

    Watch your nails near the knot. They can nick the elastic.

    Back to all steps

  5. Step 5: Glue the Charm Bracelet Knot With Gel Super Glue

    Watch this step · 10:40

    Hold the two beads on either side of the knot apart with one hand. Keep the charm holder loose so it can move. Shake the glue, then put a healthy drop of gel super glue on the knot and work it into both sides. Gel stays where you put it, so it does not run into the beads or onto your fingers.

    Tip:

    Use gel, not liquid glue. Liquid wicks along the cord and can stiffen it.

    Back to all steps

  6. Step 6: Trim the Elastic Tails and Hide the Knot in the Charm Holder

    Watch this step · 11:02

    While the glue is still wet, snip both tails close to the knot with flush cutters. Then slide the loose charm holder over the knot so it disappears inside. Let go and check that no cord ends poke out. The bracelet part is done. Leave it to dry before you stretch it much.

    Tip:

    Flush cutters give a clean, close cut that scissors cannot match.

    Back to all steps

  7. Step 7: Stack a Bead and Bead Caps on a Head Pin for a Charm Dangle

    Watch this step · 12:22

    Each charm starts as a small dangle. Thread a ball end head pin with a bead cap facing up, a 6mm wooden bead, then a second bead cap facing down. The caps hug the bead from above and below so it looks finished. Make two of these, one for each charm holder on the bracelet.

    Tip:

    Use a contrasting bead color for the dangles so the charms stand out.

    Back to all steps

  8. Step 8: Bend a Wire Loop at the Top of the Charm Dangle

    Watch this step · 12:55

    Grip the head pin with round nose pliers right above the top bead cap. Bend the wire over at an angle, then wrap it back around the pliers with your fingers to start a loop. Hold the tail and snip it off inside the loop with flush cutters. Close the loop with the round nose pliers.

    Tip:

    Cover the wire with a finger when you cut. The tail can fly off.

    Back to all steps

  9. Step 9: Join the Charm Dangle to a Connector With a Jump Ring

    Watch this step · 15:15

    Hold a jump ring with two pairs of chain nose pliers, one on each side of the opening. Twist one hand toward you and the other away to open it sideways. Hook on the dangle and one end of a silver connector charm. Twist the ring closed so the ends meet flush. Repeat for the second charm.

    Tip:

    Never pull a jump ring apart. Twisting keeps its round shape.

    Back to all steps

  10. Step 10: Attach the Charms to the Bracelet Charm Holders

    Watch this step · 16:10

    Open another jump ring the same way. Slip it through the charm holder on the bracelet, then through the free end of a connector charm. Close it. Do the same with the second charm on the other holder. The charms now dangle from the bracelet. Let the glue cure overnight, then roll it onto your wrist.

    Tip:

    Roll a stretch bracelet on and off. Pulling it wide wears out the knot.

    Back to all steps

How to Make String Bracelets - Easy Fishtail Pattern

Keep going

How to Make String Bracelets - Easy Fishtail Pattern

7 steps · about 8 minutes

Keep going with jewelry making

More on this topic, picked for this charm bracelet with stretch cord.

You reached the last step

Save this project to come back to it

Your ticked steps, the free printable and your other saved makes, together in My Projects. Free, no password.

You tapped Save

Save this project for later

We'll email you a link, no password.

How to Make a Charm Bracelet With Stretch Cord

  • Your saved projects in one list
  • Your ticked steps on any device

Check your inbox for an email from us. Not there? Look in your spam folder.

Free printable

Printable sheet and shopping list for this project

The bonus is hidden until you sign up.

Free with a free account, no password. Every step above stays open to everyone.

Products Used

The Checklist

How to Make a Charm Bracelet With Stretch Cord

Tools
6
Materials
9
Steps
10
Video
19 min

Tools we recommend

As an Amazon Associate we earn from qualifying purchases. Links on this page may be affiliate links - clicking them and buying doesn't change your price, but helps support Crafting Step by Step.

Tags

The Crafter's Weekly

New jewelry making tutorials, every Sunday

One short email with the week's best step-by-step guides. Free, no spam, unsubscribe anytime.

Did this work for you?

What's next

Related collections

Curated theme pages that include this tutorial.

Similar tutorials

Hand-picked next reads based on the one you just finished.

Liked this jewelry making tutorial?

Pick the crafts you want to hear about. One email every Sunday with new step-by-step tutorials. No spam, easy to unsubscribe.

Get more like this in your inbox

Weekly digest. Pick the categories you want. Unsubscribe anytime.

Send me tutorials about

We only email about new tutorials. Easy unsubscribe anytime.