How to Draw an Axolotl - Easy Step by Step for Kids

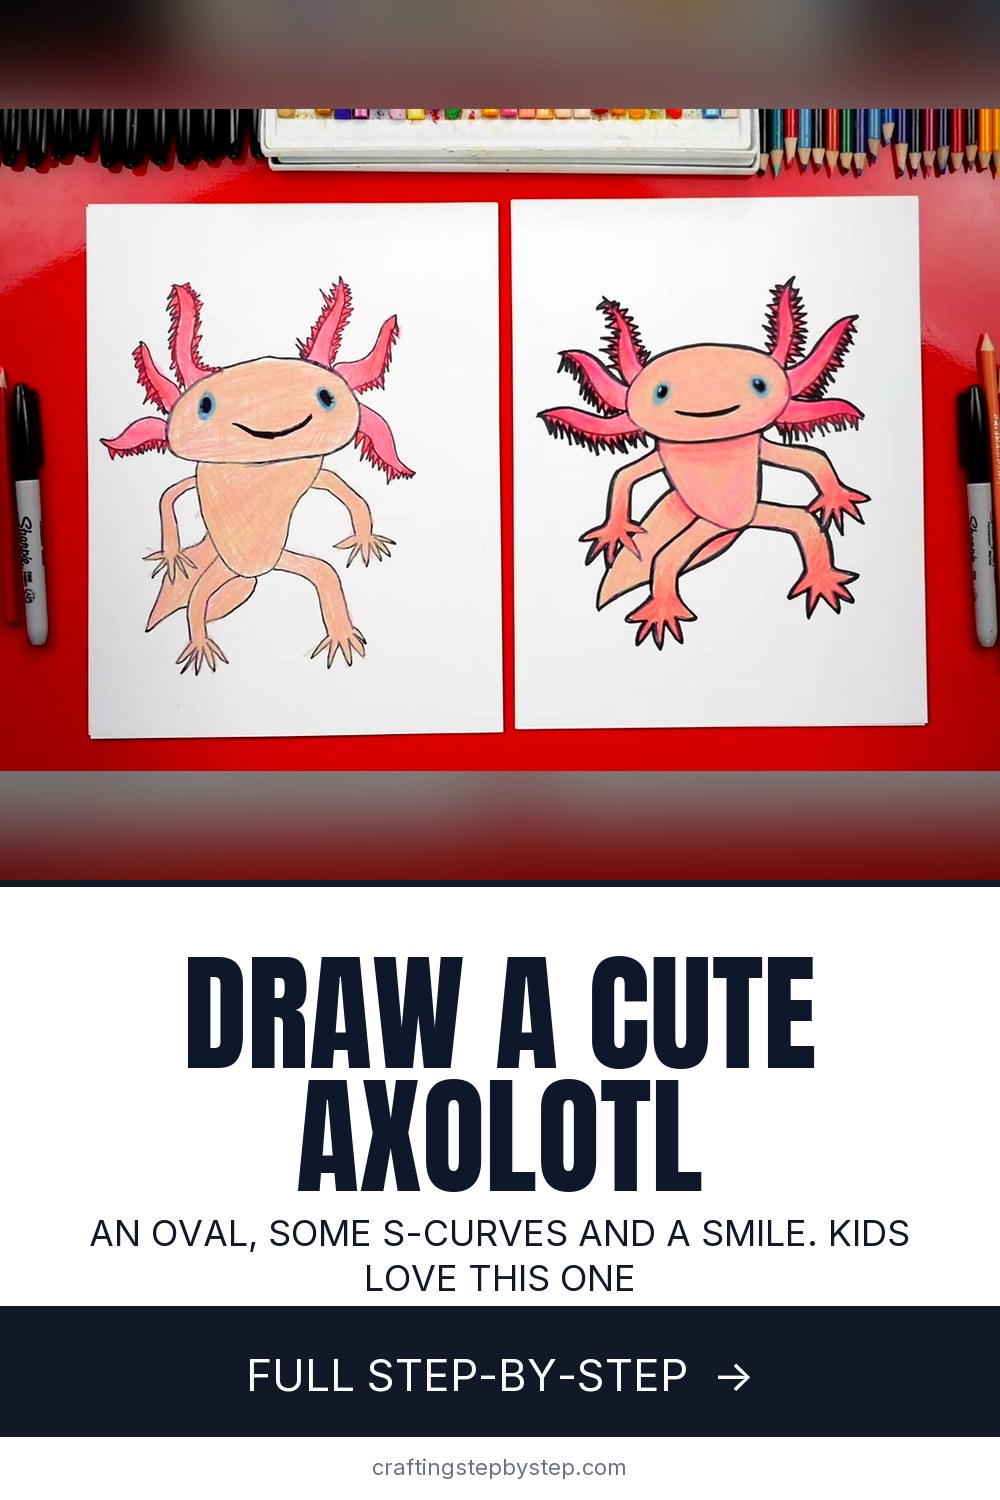
The finished result: How to Draw an Axolotl - Easy Step by Step for Kids
  • Difficulty: Easy
  • About 30 minutes
  • 10 steps

You tapped Save

Save this project for later

We'll email you a link, no password.

How to Draw an Axolotl - Easy Step by Step for Kids

  • Your saved projects in one list
  • Your ticked steps on any device

Check your inbox for an email from us. Not there? Look in your spam folder.

Print

Steps written out by Crafting Step by Step from Art for Kids Hub's video (opens YouTube) (8:43). Published .

The axolotl is a pink salamander with frilly gills that sticks out of its head like a crown, and kids love it. Rob from Art for Kids Hub draws one with his daughter Hadley, side by side, so you can follow either version. The whole drawing is built from simple shapes: an oval, S-curves, a U and a few bent lines. You need a black marker, plain paper and colored pencils.

How to draw an axolotl: the short version

  • Draw a wide, bumpy oval for the head.
  • Add oval eyes and a big smile.
  • Draw three S-curve gills on each side and fringe them with zigzags.
  • Hang a U-shaped body under the head.
  • Add bent arms and legs with five fingers and toes.
  • Tuck a tail behind one leg, then color it in.

Marker or pencil?

Rob and Hadley draw straight in marker, which keeps kids from erasing and redrawing the same line ten times. Wobbly lines are fine. Axolotls have bumpy heads anyway. If you would rather plan first, sketch lightly in pencil, trace over it with a fine black marker and erase the pencil once the ink is dry.

Getting the gills right

The gills are what make it an axolotl and not a frog. Each one is an S-line that goes up and out, then a second line that starts at a point and comes back to the head, wider at the bottom. The top gills get fringe on both sides because they face you. The lower ones get fringe only on the underside, since they are turned slightly away. Mix long and short spikes so the fringe looks feathery.

Coloring ideas

The classic pet axolotl is pink, and that is what they color here. Peach mixed with pink for the body, crimson red layered with pink for the gills, blue around the eyes and a white dot in each eye for shine. Wild axolotls are a dark olive brown with speckles. There are also golden, black and pale white ones with pink gills, so any of those is a real color choice.

Make it a scene

Axolotls live in lakes and canals near Mexico City, so add a pond background: wavy water lines, rocks, a few plants and some bubbles. A fun fact for the kids: they can grow back a lost leg, part of their heart and even parts of their brain.

Drawing it together with a child

This lesson works well as a side by side activity, the way Rob and Hadley do it. Give each person their own sheet and draw one step at a time, then compare. Nobody's axolotl will match, and that is the fun part. Pause the video whenever someone needs more time, especially on the gill fringe. Younger kids can skip the fringe and the fingers and still end up with a recognizable axolotl. Older kids can add spots, a background or a second axolotl swimming behind the first.

Common problems

  • The head is too small. Make the oval wider than you think. The body hangs under it and the gills need room.
  • Legs look stiff. Bend every arm and leg once. A bent line reads as swimming.
  • Fingers got crowded. Draw the thumb first, then fit the rest. An extra finger is fine, as Rob shows.

More animals to draw

Keep the water theme going with a fish or a shark. Try a hedgehog next, or step up to a dragon.

Free printable

Print the steps and supply list for this project

One page you can take to the table. Free with a free account, no password.

Get the free printable

What you'll need

Free, for this project

Get this checklist by email

  • All 4 tools and materials, with tick boxes
  • A link to print all 10 steps on paper, to keep by you while you craft

No password. The whole tutorial stays free on this page.

Quick answer

Learn how to draw an axolotl with frilly gills in 10 easy steps. An easy project: about 30 minutes. You need 4 things, including plain white paper, black permanent marker and colored pencils. The 10 steps start with draw a Bumpy Oval for the Axolotl Head, add the Axolotl Eyes and Smiling Mouth, draw the First S-Curve Axolotl Gill, draw Three Gill Branches on Each Side of the Axolotl Head and add Zigzag Fringe to the Axolotl Gills.

Step-by-step guide

10 steps, about 9 minutes. Tap a picture to jump to that step. Your progress saves automatically.

Tick each step off as you go.

  1. Step 1: Draw a Bumpy Oval for the Axolotl Head

    Watch this step · 0:34

    Start near the top of the paper with a wide oval for the head. Make it wider than it is tall and leave room on both sides, since the gills will stick out a long way. It does not have to be smooth. Axolotls have bumpy heads, so a wobbly line looks right. Rob and Hadley draw in black marker from the start.

    Tip:

    Place the oval in the top third of the page. The body and tail fill the rest.

    Back to all steps

  2. Step 2: Add the Axolotl Eyes and Smiling Mouth

    Watch this step · 1:06

    Draw two small ovals for the eyes, set wide apart and tipped toward the top of the head. Color them in solid black. Then draw a big happy smile right across the middle of the face. Go over the smile a second time to thicken it so the mouth looks a little open. That wide grin is a big part of the axolotl's charm.

    Tip:

    Leave a tiny white spot in each eye if you want them to look shiny.

    Back to all steps

  3. Step 3: Draw the First S-Curve Axolotl Gill

    Watch this step · 1:30

    The gills grow out of the sides of the head. From the upper side of the oval, draw an S-line that goes up and out. Then draw a second line from the tip of that S back down to the head, so the gill is pointed at the end and wider at the bottom. Repeat the same shape on the other side so they match.

    Tip:

    Pause the video and redo the first gill until you like it. The rest copy it.

    Back to all steps

  4. Step 4: Draw Three Gill Branches on Each Side of the Axolotl Head

    Watch this step · 2:18

    Add a second gill above the first one on each side, starting right next to it. Use the same S-line out and a line back in. Then add a third gill lower down on each side, curving out and down. You now have three branches on each side, like a crown. Small differences between them are fine and make it look natural.

    Tip:

    Turn the paper as you draw. Curves are easier when your hand moves naturally.

    Back to all steps

  5. Step 5: Add Zigzag Fringe to the Axolotl Gills

    Watch this step · 2:52

    Now give the gills their feathery look. Draw small zigzag spikes along the edges of each gill, working from the base up to the tip. The top gills face you, so they get fringe on both sides. The lower gills are turned away a bit, so fringe only their undersides. Mix long and short spikes. This step takes the longest, so slow down.

    Tip:

    Keep the spikes pointing outward from the gill, like the bristles on a brush.

    Back to all steps

  6. Step 6: Draw the U-Shaped Axolotl Body

    Watch this step · 4:12

    Under the head, draw a simple U shape for the body. Start at one side of the bottom of the head, curve down and come back up to the other side. Keep it a bit narrower than the head. Rob makes his body a little longer and Hadley keeps hers short and round. Both look good, so pick the shape you like.

    Tip:

    A wider U gives you a chubby, baby axolotl. A narrow one looks grown up.

    Back to all steps

  7. Step 7: Draw the Axolotl Arms and Fingers

    Watch this step · 4:56

    Start each arm right next to the neck. Draw a line that comes out to the side and bends down, then a second line next to it to give the arm thickness. At the end of each arm, draw the thumb as a small sideways V, then add the other fingers the same way and connect back to the arm. Aim for five fingers on each hand.

    Tip:

    Draw the thumb first. It gives you a starting point for the rest.

    Back to all steps

  8. Step 8: Draw the Axolotl Back Legs and Toes

    Watch this step · 6:05

    The back legs start at the bottom of the body. Draw a line that comes out and bends down at the end, then a matching line above it for the top of the leg. If a leg runs into a hand, stop at the fingers and continue on the other side so it looks like it goes behind. Finish each foot with five toes, drawn like the fingers.

    Tip:

    Overlapping lines like this make the drawing look 3D with no shading at all.

    Back to all steps

  9. Step 9: Draw the Axolotl Tail Behind the Legs

    Watch this step · 6:55

    Draw a curve that comes down from the body and meets one of the back legs. Imagine the tail going behind that leg and continue it a little lower on the other side. Then draw the top edge of the tail curving up to meet the hand. Stop at the fingers and pick up the line past them so the tail tucks behind.

    Tip:

    Bring the tail to a soft point. Axolotl tails are flat and fin-like.

    Back to all steps

  10. Step 10: Color the Axolotl With Peach and Pink Pencils

    Watch this step · 7:42

    Color the body with peach and pink layered together for a soft, warm skin tone. For the gills, layer crimson red over pink so they look darker and brighter than the body. Add blue around the eyes. Finish with a white colored pencil to dot a highlight in each eye. Color in small circles for smooth, even shading.

    Tip:

    Start light and add layers. You can always go darker, but not lighter.

    Back to all steps

How to Draw a Christmas Ornament

Keep going

How to Draw a Christmas Ornament

Keep going with drawing

More on this topic, picked for this axolotl.

You reached the last step

Save this project to come back to it

Your ticked steps, the free printable and your other saved makes, together in My Projects. Free, no password.

You tapped Save

Save this project for later

We'll email you a link, no password.

How to Draw an Axolotl - Easy Step by Step for Kids

  • Your saved projects in one list
  • Your ticked steps on any device

Check your inbox for an email from us. Not there? Look in your spam folder.

Free printable

Printable sheet and shopping list for this project

The bonus is hidden until you sign up.

Free with a free account, no password. Every step above stays open to everyone.

Products Used

The Checklist

How to Draw an Axolotl - Easy Step by Step for Kids

Tools
3
Materials
1
Steps
10
Video
9 min

Tools we recommend

As an Amazon Associate we earn from qualifying purchases. Links on this page may be affiliate links - clicking them and buying doesn't change your price, but helps support Crafting Step by Step.

Tags

The Crafter's Weekly

New drawing tutorials, every Sunday

One short email with the week's best step-by-step guides. Free, no spam, unsubscribe anytime.

Did this work for you?

What's next

Related collections

Curated theme pages that include this tutorial.

Similar tutorials

Hand-picked next reads based on the one you just finished.

Liked this drawing tutorial?

Pick the crafts you want to hear about. One email every Sunday with new step-by-step tutorials. No spam, easy to unsubscribe.

Get more like this in your inbox

Weekly digest. Pick the categories you want. Unsubscribe anytime.

Send me tutorials about

We only email about new tutorials. Easy unsubscribe anytime.