How to Draw a Cornucopia

Save it for later. We'll email you a link, no password.

Find it again on your phone or computer, with your finished steps ticked.

You tapped Save

Save this project for later

We'll email you a link, no password.

How to Draw a Cornucopia

  • Your saved projects in one list
  • Your ticked steps on any device

Check your inbox for an email from us. Not there? Look in your spam folder.

  • 10 steps
  • 13:11 video
  • Difficulty: Easy
  • About 40 minutes
  • Drawing

Based on a video by Art for Kids Hub

Opens their YouTube channel

Steps written out by Crafting Step by Step · Published · Updated

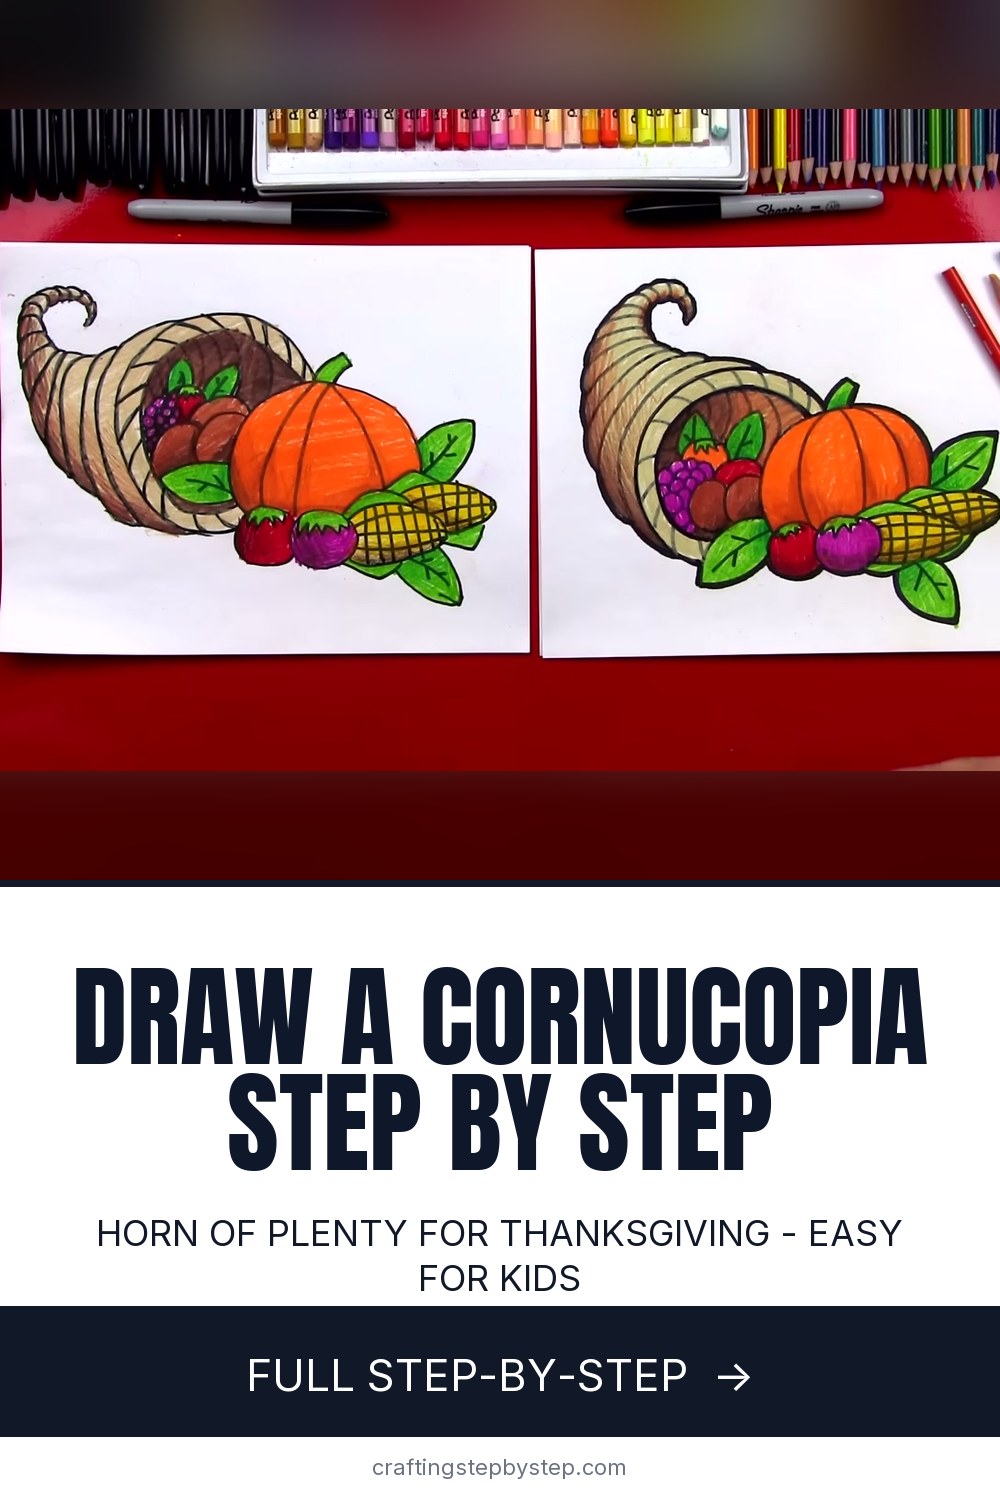
The finished result: How to Draw a Cornucopia

A cornucopia is a horn-shaped basket spilling over with fruit and vegetables. People call it the horn of plenty, and it stands for a good harvest. This drawing lesson comes from Art for Kids Hub, where a dad and his son draw side by side. You draw the food first, then wrap the woven horn around it, so nothing ever has to be erased out of the way.

You need a black marker, a pencil, an eraser, paper and colored pencils. Plan on about fifteen minutes, plus coloring time.

Why you draw the fruit before the basket

It feels backward. But the vegetables sit in front of the horn, so they get drawn whole and the basket only shows where nothing covers it. That trick is called overlapping, and it is what makes the picture look deep instead of flat. Each new shape stops when it bumps into one you already drew.

Choosing your supplies

A fine point black permanent marker gives the bold outline in the video. The pencil only comes out for the curly tip of the horn, where a guideline helps a lot. Use a soft eraser so you do not smear the marker once it is dry.

Colored pencils beat markers here. You need at least two browns for the basket, a tan, orange, green, purple, red and yellow. Pencils also let you shade from dark to light, which turns the horn into a real 3D basket.

Turn the paper sideways. The finished horn is wider than it is tall, and the curl needs room at the top left. Plain printer paper works for practice. Use heavier sketch paper for a drawing you plan to hang up.

Filling your horn of plenty

The video uses corn, a pumpkin, round vegetables, potatoes and grapes. Swap in whatever your family puts on the table. Apples, pears, gourds, squash and a few fall leaves all fit. Keep big shapes in front and small ones tucked toward the opening. If you want more practice on the pieces, try how to draw a pumpkin or how to draw a leaf on their own.

Shading the basket

Pretend a light shines down from the top. The inside of the horn is the darkest part. On the outside, press hard at the bottom of each woven band and lighten up as you move toward the top of it. Skip the front rim so it stays light. Our guide to shading walks through the same idea in more detail.

Thanksgiving ideas

A colored cornucopia makes a great table card or the cover of a thank-you note. Kids can draw one while the pie bakes, then each guest signs it. Set it beside a Thanksgiving centerpiece, or pair it with our turkey drawing for a full holiday set.

Cornucopia drawing ideas to try next

  • A simple horn for little kids. Draw one curly horn with three or four bands, then two apples and a leaf at the opening. No overlapping to plan.
  • Coloring page. Stop after the marker outline and photocopy it. Each kid at the table colors their own.
  • Fall leaf border. Frame the horn with orange, red and yellow leaves in the corners and write a thank-you message along the bottom.
  • A fuller table. Draw the cornucopia in the middle of a page and add a pie on one side and a candle on the other.

Common cornucopia drawing problems

  • The horn looks like a snail. Start the two outer lines far apart and squeeze them closer only near the tip.
  • The woven bands look flat. Make each band smaller as it heads toward the tip, and curve every line.
  • The opening looks empty. Add small grapes or potatoes behind the big pumpkin, then a couple of leaves in the back.
  • Pencil lines show through. Erase every guideline before you color.

Free printable

Print the steps and supply list for this project

One page you can take to the table. Free with a free account, no password.

Get the free printable

What you'll need

Free, for this project

Get this checklist by email

  • All 5 tools and materials, with tick boxes
  • A link to print all 10 steps on paper, to keep by you while you craft

No password. The whole tutorial stays free on this page.

Quick answer

An easy cornucopia drawing in 10 steps: corn, pumpkin and leaves first, then the woven horn of plenty, color and shading. An easy project: about 40 minutes. You need 5 things, including drawing paper or sketch pad, colored pencils and black fine point permanent marker. The 10 steps start with draw Two Round Vegetables at the Front of the Cornucopia, draw Two Ears of Corn With a Kernel Grid and draw the Pumpkin Behind the Corn With a Stem and Ridges.

Step-by-step guide

10 steps, about 13 minutes. Tap a picture to jump to that step. Your progress saves automatically.

Tick each step off as you go.

  1. Step 1: Draw Two Round Vegetables at the Front of the Cornucopia

    Watch this step · 1:45

    Start near the bottom right of your paper with your black marker. Draw a circle. Put a zigzag line across the top of it for the leafy stem. Now draw a C shape right beside it, tucked behind the first one so the two overlap. Give it the same zigzag top. These are the front of your pile, so every other shape will hide behind them.

    Tip:

    Leave plenty of space above and to the left. The pumpkin and the horn still need to fit there.

    Back to all steps

  2. Step 2: Draw Two Ears of Corn With a Kernel Grid

    Watch this step · 2:40

    Draw a long oval for the corn, starting behind the second vegetable so you only draw part of it. Add a rainbow-shaped line on top and another underneath for the husk leaves. Draw a line down the middle of the cob, then a line above and below it. Cross them with short lines going the other way to make the kernel grid. Repeat for a second ear tucked behind the first.

    Tip:

    Curve the grid lines a little to follow the shape of the cob. It makes the corn look round.

    Back to all steps

  3. Step 3: Draw the Pumpkin Behind the Corn With a Stem and Ridges

    Watch this step · 3:35

    Draw a big circle that starts at the vegetables, comes up and over, and connects back into the corn. You are only drawing the part that shows. On top, draw two curved lines for the stem, bend them off to the side, and close the end. Then add the pumpkin's contour lines: one curve down the middle and a curve on each side.

    Tip:

    Make the pumpkin the biggest shape in the pile. It is the center of the whole picture.

    Back to all steps

  4. Step 4: Add Pointed Leaves With Veins Around the Pumpkin and Corn

    Watch this step · 4:10

    Draw a leaf poking out on the right. Make a curve, then a curve coming back to a point, and draw a vein down the middle with little veins off the sides. Add a second leaf under the corn and a third out to the left. Here is a handy trick: draw the middle vein first, then draw the outline around it. Many kids find that easier.

    Tip:

    Point the leaves in different directions. A mix of angles makes the pile look more natural.

    Back to all steps

  5. Step 5: Draw the Cornucopia Rim as a Big Woven C Shape

    Watch this step · 5:25

    Start up next to the pumpkin stem. Draw a big C shape that curves around the left side of the pile and comes back in at the bottom. Draw a second C right inside the first to make a thick rim. Now fill that rim with short diagonal lines all the way around. That is the woven edge of the basket. A cornucopia started as a ram's horn, and later people wove baskets in the same shape.

    Tip:

    Keep the diagonal lines evenly spaced. They read as weaving even when they are not perfect.

    Back to all steps

  6. Step 6: Sketch the Curly Cornucopia Horn Tip With Pencil Guidelines

    Watch this step · 6:20

    Put the marker down and pick up your pencil. Above the rim, draw a small curl for the tip of the horn. Leave room above it. Then draw the bottom line of the horn: start at the bottom of the rim, curve around and up, and come in toward the curl. The two lines start far apart and get closer as they reach the tip, like a dinosaur tail.

    Tip:

    Draw lightly. These are guidelines, and you will erase them after the marker goes on.

    Back to all steps

  7. Step 7: Draw the Woven Basket Bands Down the Cornucopia Horn

    Watch this step · 7:40

    Switch back to the marker. Start at the bottom edge of your pencil guideline and draw a curved band that reaches across to the other side. Draw the next band behind it with a little bump, and connect it back in. Keep going toward the tip. Each band should get smaller as the horn narrows. When you reach the curl, erase all of the pencil lines.

    Tip:

    Let the marker dry for a minute before you erase, or the black can smear across the page.

    Back to all steps

  8. Step 8: Fill the Cornucopia Opening With Potatoes, Grapes and Leaves

    Watch this step · 8:55

    Look inside the opening, right behind the pumpkin. Draw two C shapes for potatoes. Add a bunch of grapes: one small circle, then half circles around it so they overlap. Draw a rainbow line behind the grapes with a zigzag top for one more vegetable. Finish with a couple of leaves in the back. Then draw curved lines on the inside wall of the horn, going the opposite way from the outside bands.

    Tip:

    Use your own ideas here. Apples, pears or a small gourd all work in the opening.

    Back to all steps

  9. Step 9: Color the Cornucopia Basket, Pumpkin and Vegetables

    Watch this step · 9:57

    Grab your colored pencils. Color the basket tan, the pumpkin orange and the leaves green. The corn gets yellow, the grapes purple, the potatoes brown, and the front vegetables red and purple. Feel free to match the video or pick your own colors. Fill each shape all the way to the black outline so no white specks show.

    Tip:

    Color lightly at first. You can always add another layer, but it is hard to take one away.

    Back to all steps

  10. Step 10: Shade the Inside and Bottom of the Cornucopia So It Looks 3D

    Watch this step · 11:30

    Pick up a medium brown and color the inside of the horn dark, since it sits in shadow. Go over it again with a dark brown. On the outside, start at the bottom of each woven band and press hard, then fade out as you move up. Skip the front rim. Shade the leaves dark where they tuck behind the pumpkin, and add brown under the pumpkin and corn.

    Tip:

    Dark next to light is what makes it pop. Leave the tops of the bands pale.

    Back to all steps

How to Draw a Candy Cane

Keep going

How to Draw a Candy Cane

You reached the last step

Save this project to come back to it

Your ticked steps, the free printable and your other saved makes, together in My Projects. Free, no password.

You tapped Save

Save this project for later

We'll email you a link, no password.

How to Draw a Cornucopia

  • Your saved projects in one list
  • Your ticked steps on any device

Check your inbox for an email from us. Not there? Look in your spam folder.

Free printable

Printable sheet for this project

The bonus is hidden until you sign up.

Free with a free account, no password. Every step above stays open to everyone.

Products Used

The Checklist

How to Draw a Cornucopia

Tools
3
Materials
2
Steps
10
Video
13 min

Tools we recommend

As an Amazon Associate we earn from qualifying purchases. Links on this page may be affiliate links - clicking them and buying doesn't change your price, but helps support Crafting Step by Step.

Tags

The Crafter's Weekly

New drawing tutorials, every Sunday

One short email with the week's best step-by-step guides. Free, no spam, unsubscribe anytime.

Test your knowledge

Did the lesson stick? Start with this one.

5 questions covering what you just read. No signup, no score saved, and you can stop after this one.

Question 1 of 5

What is another name for a cornucopia?

Quick reference

Key takeaways from How to Draw a Cornucopia

5 questions, answers, and one-line explanations. Tap to expand.

  1. 1.What is another name for a cornucopia?

    Answer: The horn of plenty

    It is a horn-shaped basket overflowing with food, a symbol of a good harvest.

  2. 2.Why draw the fruit and vegetables before the basket?

    Answer: They sit in front, so they get drawn whole

    Things in front go down first; shapes behind stop where they meet them.

  3. 3.What is the drawing trick called where one shape stops at another?

    Answer: Overlapping

    Overlapping is the simplest way to show depth in a drawing.

  4. 4.Why sketch the curly horn tip in pencil before using marker?

    Answer: A guideline helps get the tricky curve right

    The curl is the hardest shape, so a light guideline saves a mistake in ink.

  5. 5.Where should the darkest brown go to make the horn look 3D?

    Answer: Inside the horn and the bottom of each band

    Shadow collects inside the opening and under each woven band.

Did this work for you?

What's next

Related collections

Curated theme pages that include this tutorial.

Similar tutorials

Hand-picked next reads based on the one you just finished.

Liked this drawing tutorial?

Pick the crafts you want to hear about. One email every Sunday with new step-by-step tutorials. No spam, easy to unsubscribe.

Get more like this in your inbox

Weekly digest. Pick the categories you want. Unsubscribe anytime.

Send me tutorials about

We only email about new tutorials. Easy unsubscribe anytime.