How to Draw a Bird: Step-by-Step Bluebird Drawing for Beginners

CraftsEasy8:199 stepsBrowse more →
Also in:Painting

By CraftingStepByStepPublished Updated

Based on a video by Art for Kids Hub.

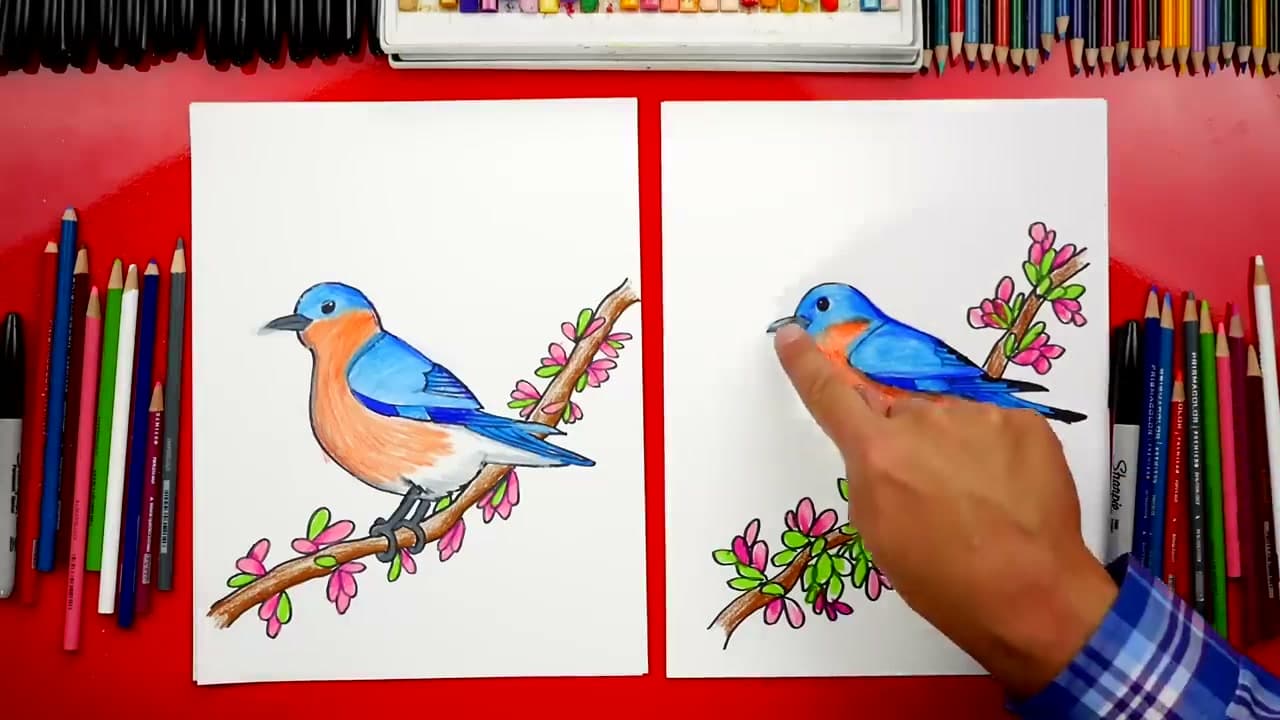
This tutorial walks you through how to draw a bird from the very first dot to the final pop of color. The reference is a classic Eastern bluebird perched on a flowering branch, taught by the team at the Art for Kids Hub YouTube channel. Their pacing is friendly and forgiving, so it works whether you are five, fifty, or somewhere in between.

You only need three things to follow along: a black marker (a Sharpie works), a sheet of plain printer paper, and a small set of colored pencils for the finish. The drawing leans on simple shapes - circles, V's, gentle curves - and a slow build from eye, to beak, to body, to branch. By the end you will have a perched bluebird with pink blossoms on a sienna brown branch.

If you enjoy this one, the same shape-by-shape approach scales up. Try how to draw a horse next for a longer body study, then test your facial proportions with how to draw a face and how to draw eyes. For hands and shading practice, see how to draw hands and how to shade a drawing.

Step-by-Step Guide

1

Step 1: Draw the eye in the top-left of the paper

0:42
Step 1: Step 1: Draw the eye in the top-left of the paper

Start with the eye. Put a small filled circle near the top-left of the page. Leave a tiny white speck inside it so the eye looks shiny and alive. That single dot anchors the whole bird - it sets the size of the head and where everything else will sit. Resist the urge to make it bigger than a pencil eraser. A small eye reads as realistic; a big eye reads as cartoon. Take your time and let the ink dry for a second before moving on.

Tip

Leaving the white highlight in the eye is the difference between a flat dot and a living bird. Don't fill it completely solid.

2

Step 2: Add the beak with a sideways V

1:00
Step 2: Step 2: Add the beak with a sideways V

Right next to the eye, draw a sideways V pointing left. That V is the closed mouth line. Then trace the top of the beak as a curve that pushes forward and dips down to a soft point. Mirror it with a return curve underneath to close the beak. The video adds a small line through the middle to suggest the mouth opening. Your beak might come out a little long on the first try - that's fine. Practice is the whole point.

3

Step 3: Sketch the top of the head

1:35
Step 3: Step 3: Sketch the top of the head

Now give the bird a head. Starting just behind the eye, draw a smooth curve that arcs up and back down, ending behind where the body will sit. Keep the curve gentle - a sharp peak makes the bird look angry. The top of the head should sit a little higher than the eye, with the back sloping down toward where the wing will attach. Don't overthink it. One steady pass beats six nervous ones.

4

Step 4: Draw the belly and body outline

1:55
Step 4: Step 4: Draw the belly and body outline

Drop a short diagonal line from the bottom of the beak to start the front of the chest. From there, sweep a long curve down and around to define the belly and the lower edge of the body. Stop the line where the legs and tail will eventually come in - roughly under the spot where you ended the head curve. The body shape is essentially a soft, lopsided oval that flares wider toward the back. Aim for one confident line.

Tip

If your belly curve dips too low, the bird ends up looking like a duck. Keep it round and tight under the wing area.

5

Step 5: Outline the wing with a diagonal curve

2:45
Step 5: Step 5: Outline the wing with a diagonal curve

The wing sits on the back of the bird and points toward the tail. Start your line at the top of the back, curve down and out to the lower right at about a 45-degree angle, then bring it back up to meet the body just behind the chest. Leave a small gap where the line attaches to the back - that gap reads as a feather break and gives the wing some depth. Two short lines for the legs go just below the belly here too, both pointing the same direction.

6

Step 6: Layer the wing feathers and tail

3:35
Step 6: Step 6: Layer the wing feathers and tail

Inside the wing outline, draw three or four nested lines that follow the same diagonal shape. Each new line sits a little further back, like roof tiles, and connects up to the previous one. Those layered shapes read as flight feathers. Once the wing is full, extend a long line out past the body for the top edge of the tail, then bring it back forward to the wing to close the shape. A diagonal across the inside hints at tail feather separation.

Tip

The feathers do not need to be even. Slight variation actually makes the wing look more natural.

7

Step 7: Draw the feet and branch

4:05
Step 7: Step 7: Draw the feet and branch

Time to perch the bird. Below each leg, draw a backwards C-shape that wraps under and meets a wiggly horizontal line - that line is the branch the bird is standing on. Add a small back toe curving around behind, and two front toes coming up over the top of the branch. Repeat on the second leg behind. The toes should look like they are gripping the wood, not floating above it. A second wiggly line parallel to the first gives the branch some thickness.

8

Step 8: Add leaves and blossoms to the branch

6:40
Step 8: Step 8: Add leaves and blossoms to the branch

Stretch the branch up behind the bird so it disappears off the top edge of the page, then add a second wiggly line right next to it for the back side. Now cluster small leaves all along the branch. Each leaf is two short curves that meet at a point - draw them in pairs, then bunches of three or four. Sprinkle in some blossom shapes the same way. The video fast-forwards through this part because the goal is volume, not precision. Fill the branch until it looks full.

Tip

If your branch starts to look sparse, add another cluster of leaves. Density sells the spring-tree look.

9

Step 9: Color the bluebird, belly, and branch

7:50
Step 9: Step 9: Color the bluebird, belly, and branch

Switch to colored pencils. Lay down ultramarine blue across the back, head, wing, and tail, then come back over it with a brighter true blue to add highlights. Color the belly and chest in a warm poppy red, leaving the very bottom belly area white. Use a cool gray for the beak, feet, and a touch of shading under the wing. Sienna brown does the branch. Pink and process red color the blossoms, spring green the leaves. Finish by smoothing the bird with a white pencil over the top.

Tip

The white pencil pass at the end blends the blue and red layers and gives the bird a softer, almost airbrushed finish.

Products Used

☐ The Checklist

How to Draw a Bird: Step-by-Step Bluebird Drawing for Beginners

Tools
3
Materials
4
Steps
9
Video
8 min

Your Guide

Art for Kids Hub

As an Amazon Associate we earn from qualifying purchases. Links on this page may be affiliate links - clicking them and buying doesn't change your price, but helps support ShowMeStepByStep.

Tags

Test your knowledge

Did the lesson stick? Find out in 2 minutes.

5 quick questions covering what you just read. No signup, no score saved — just a gut check.

Quick reference

Key takeaways from How to Draw a Bird: Step-by-Step Bluebird Drawing for Beginners

5 questions, answers, and one-line explanations. Tap to expand.

  1. 1.What is the very first mark you make?

    Answer: The eye dot

    A small filled circle in the top-left for the eye, leaving a tiny white speck inside. It anchors the size of the whole bird.

  2. 2.What gives the eye a living look instead of flat dot?

    Answer: A white highlight

    A tiny white speck inside the filled dot. Filling completely solid makes the eye read as flat or dead.

  3. 3.What shape is the closed beak's mouth line?

    Answer: A sideways V

    A sideways V pointing left. Then curve the top of the beak forward and down to a soft point, with a return curve underneath.

  4. 4.How are the wing's flight feathers drawn?

    Answer: Nested diagonal lines

    Three or four lines nested inside the wing outline, each set back like roof tiles. The layering reads as flight feathers.

  5. 5.Color for the bluebird's chest and belly?

    Answer: Warm poppy red

    Warm poppy red, leaving the lowest belly white. Ultramarine blue covers back, head, wing, and tail with brighter blue highlights.

What's next

Related collections

Curated theme pages that include this tutorial.

Weekly Digest

Liked this crafts tutorial?

Pick the categories you want to hear about. Weekly digest of new step-by-step tutorials. No spam, easy unsubscribe.

Send me tutorials about

We only email about new tutorials. Easy unsubscribe anytime.