How to Make a Pop-Up Heart Card

The finished result: How to Make a Pop-Up Heart Card
  • Difficulty: Easy
  • 10 steps

You tapped Save

Save this project for later

We'll email you a link, no password.

How to Make a Pop-Up Heart Card

  • Your saved projects in one list
  • Your ticked steps on any device

Check your inbox for an email from us. Not there? Look in your spam folder.

Print

Steps written out by Crafting Step by Step from Art for Kids Hub's video (opens YouTube) (9:15). Published .

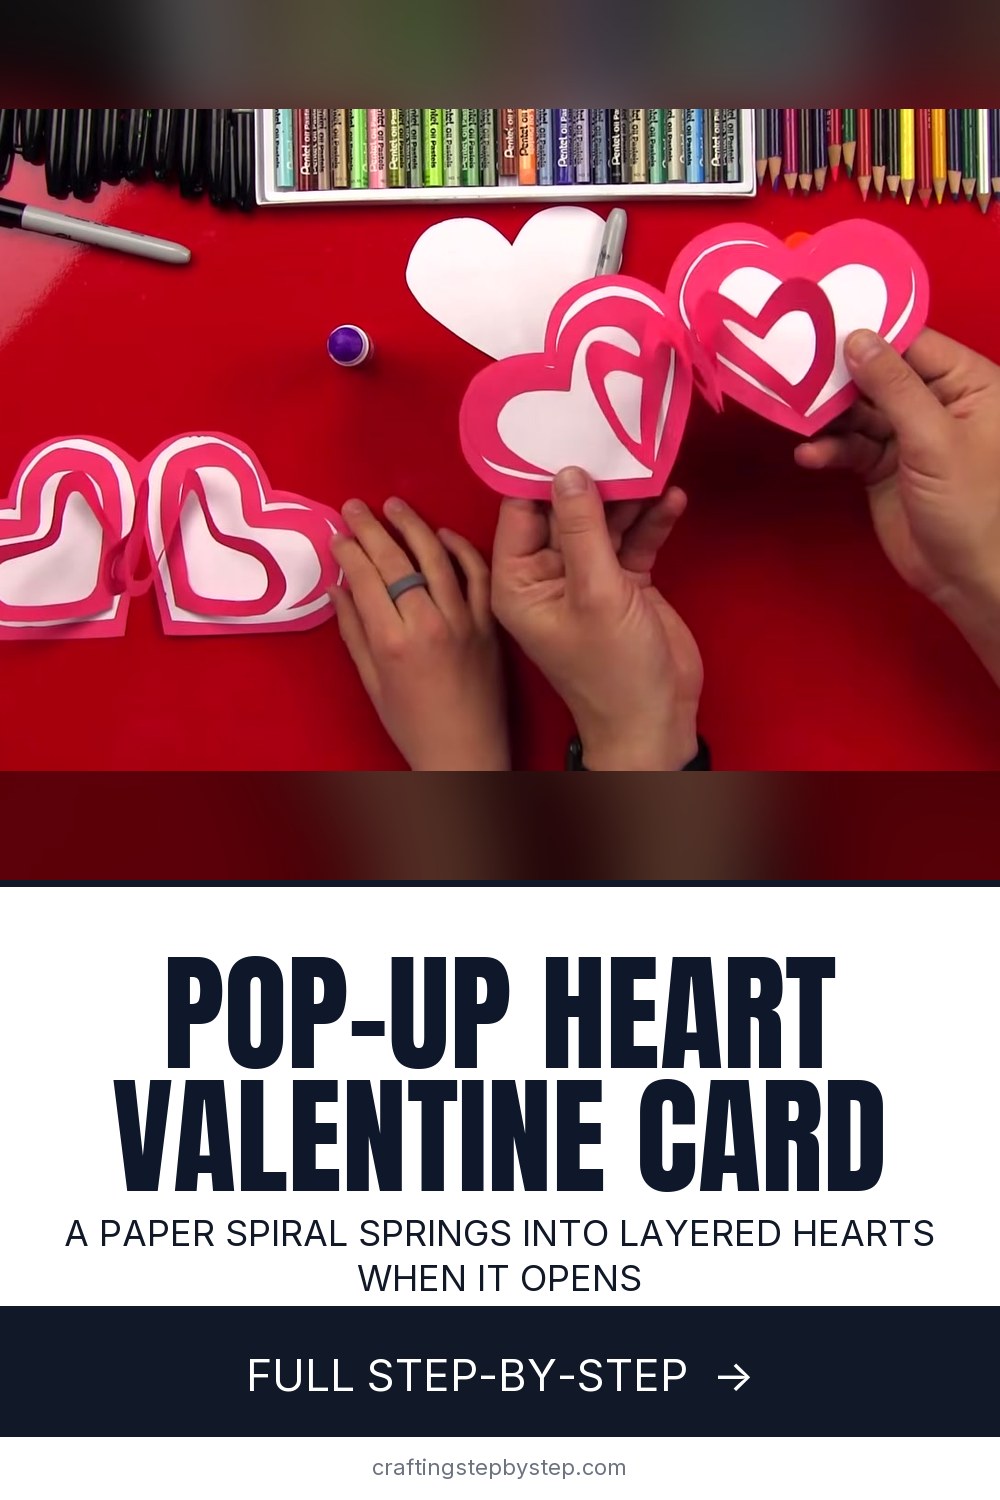
This pop-up heart card is a folded red heart that opens to show a paper spiral. Glue the spiral in the right two spots and it stretches into a stack of layered hearts every time the card opens. The idea comes from Rob of the Art for Kids Hub channel, who makes it alongside his son. All you need is construction paper, scissors, a marker and a glue stick, which makes it a good Valentine's Day card to make with a grandchild at the kitchen table.

How the pop-up heart card works

There are three parts. The card is a heart cut from folded red paper with the fold left whole, so it opens like a book. Two white hearts line the inside. The pop-up is two red hearts cut together and then cut in a spiral from the outside in. The two centre hearts are glued to each other, and the outer ring is glued to both inside halves of the card. Open the card and the spiral pulls apart into rings of hearts that stand up off the page.

Materials and swaps from home

  • Paper. Rob uses red construction paper and plain printer paper for the white hearts. Red cardstock makes a sturdier card, but keep the spiral in thinner paper so it stretches.
  • Template. Draw one heart on scrap card and cut it out. You trace it three times, so every heart matches.
  • Glue. A glue stick is best. Liquid glue soaks the spiral and makes it stick shut.

Size and how long it takes

A 9 x 12 inch sheet folded in half gives a card about 4 to 5 inches across. Make the template heart about 3 1/2 inches wide so there is room to trace a larger heart around it. Plan on 30 to 40 minutes with a child, or about 20 on your own. The spiral cutting is the slow part.

Who it suits

Children around six and up can trace and glue. Younger ones do better if you cut the spiral and let them do the gluing and the writing. Make a stack for a class Valentine party, or one in deep red and white for your husband or wife. If you like folded paper hearts, an origami heart fits neatly inside the envelope too.

Valentine's Day card variations

  • Colours. Pink card with a red spiral, or a spiral cut from patterned scrapbook paper.
  • Messages. Write I on one side of the spiral and U on the other, so the heart in the middle says I love you.
  • Other shapes. The spiral works with a circle, a square or a star, so you can reuse the idea for birthdays.

For the classic cut-and-push method, see how to make a pop-up card. For more layered ideas, try how to make a 3D card.

Troubleshooting

  • The heart fell apart at the fold. The cut ran through the folded edge. Leave a bit of the fold uncut on the next one.
  • The spiral will not open. Glue reached the inner rings. Open the card slowly the first time and ease them apart. Only glue the top two bumps of the outer ring.
  • The spiral snapped. The rings were too thin. Keep each ring about as wide as a finger.

Keeping it for next year

Store the card flat in its envelope inside a book. Keep the heart template with your Valentine supplies and the next batch goes faster. Want a softer keepsake? Try crocheting a heart.

Free printable

Print the steps and supply list for this project

One page you can take to the table. Free with a free account, no password.

Get the free printable

What you'll need

Free, for this project

Get this checklist by email

  • All 6 tools and materials, with tick boxes
  • A link to print all 10 steps on paper, to keep by you while you craft

No password. The whole tutorial stays free on this page.

Quick answer

Make a pop-up heart card with paper, scissors and a glue stick. An easy project. You need 6 things, including red construction paper, glue stick and scissors. The 10 steps start with fold the Red Construction Paper in Half for the Heart Card, trace a Larger Heart Around the Template Against the Fold, cut Out the Heart Card Without Cutting the Fold, trace and Cut Two White Hearts for the Card Lining and glue the White Hearts Inside the Red Heart Card.

Step-by-step guide

10 steps, about 9 minutes. Tap a picture to jump to that step. Your progress saves automatically.

Tick each step off as you go.

  1. Step 1: Fold the Red Construction Paper in Half for the Heart Card

    Watch this step · 1:02

    Take a sheet of red construction paper and fold it in half so the short edges meet. Run your hand along the fold to press a sharp crease. This folded edge becomes the hinge of your heart card, so it needs to be crisp. Have your heart template ready nearby. If you have not made one yet, cut a heart about 3 1/2 inches wide from scrap paper now.

    Tip:

    A crisp fold makes the card stand up and close neatly later. Press it twice.

    Back to all steps

  2. Step 2: Trace a Larger Heart Around the Template Against the Fold

    Watch this step · 2:00

    Set the template on the folded paper with one side of the heart touching the folded edge. Keep it near the bottom, but leave room around it. Trace around the template with a marker, staying a little way out from its edge, so you draw a bigger heart than the template. The part of your line that meets the fold stays open. Do not draw over the fold.

    Tip:

    Leave about half an inch of space around the template. A bigger card gives the spiral more room.

    Back to all steps

  3. Step 3: Cut Out the Heart Card Without Cutting the Fold

    Watch this step · 2:39

    Cut along the line through both layers of paper. Cut on the inside of the marker line so no black shows on the finished card. Stop where the line meets the fold and leave that edge whole. When you open it up you have a heart-shaped card that opens like a book. You could write in it now and stop here, but the pop-up is the fun part.

    Tip:

    Keep the red scrap paper. You need it again for the spiral heart.

    Back to all steps

  4. Step 4: Trace and Cut Two White Hearts for the Card Lining

    Watch this step · 3:48

    Fold a half sheet of white paper in half. Place the template in the middle of it this time, away from the fold, and trace close around it. Cut out the heart through both layers. Because the heart did not touch the fold, you end up with two separate white hearts that match. These line the inside of your card.

    Tip:

    Plain printer paper works fine here. Rob uses it in place of white construction paper.

    Back to all steps

  5. Step 5: Glue the White Hearts Inside the Red Heart Card

    Watch this step · 4:22

    Open the red card flat. Rub glue stick over the back of each white heart and press one onto each inside half of the card. Center them so a red border shows all the way around. Smooth them down from the middle out to push out any bubbles. The white lining makes the red spiral stand out once it is in place.

    Tip:

    Glue right to the edges of the white hearts so they do not catch when the card opens.

    Back to all steps

  6. Step 6: Trace and Cut Two Red Hearts From the Folded Scrap Paper

    Watch this step · 4:47

    Go back to your red scrap paper. Fold it if it is not folded already, and trace the template once more in the middle, away from the fold. Cut it out through both layers. You now have two red hearts the same size. Keep them stacked together. They are cut as a pair in the next step, and that is what makes the pop-up work.

    Tip:

    Hold the two hearts pinched together the whole time so they do not slide apart.

    Back to all steps

  7. Step 7: Cut a Spiral Into the Stacked Red Hearts for the Pop-Up

    Watch this step · 5:54

    Pinch the two red hearts together and start cutting in from one side. Follow the shape of the heart around and around, moving inward each time, like peeling an apple in one long strip. Keep each ring about a finger wide. When you reach the middle, stop and leave a small heart in the center. Take it slowly so you do not cut a ring off. The spiral has to stay in one piece.

    Tip:

    Turn the paper, not the scissors. It keeps the curve smooth and the rings even.

    Back to all steps

  8. Step 8: Glue the Two Centre Hearts of the Spiral Together

    Watch this step · 6:54

    Lay the spiral down so the two layers line up again. Gently peel back one layer at the middle so you can reach the small center heart. Put a little glue stick on it and press the two center hearts together. Only the middle gets glued. The rest of the spiral stays loose, so it can stretch out when the card opens.

    Tip:

    Use a small dab of glue. Too much creeps onto the inner rings and they will stick.

    Back to all steps

  9. Step 9: Glue the Outer Spiral Ring Inside the Heart Card

    Watch this step · 7:28

    Set the spiral heart inside the card, on top of one white heart. Put glue only on the two top bumps of the outer ring and part way down the outside edge. Keep the glue off the next ring in. Close the card over it, check the spiral is lined up with the card, and press down hard so the glue grabs.

    Tip:

    Line the spiral point up with the card point before you close it. A crooked spiral pops up crooked.

    Back to all steps

  10. Step 10: Glue the Other Side of the Spiral and Open the Pop-Up Heart Card

    Watch this step · 8:10

    Flip the card over and open the other side. Glue the top two bumps of the outer ring on this side, the same as before. Close the card and press down hard all over. Now open it slowly. The spiral stretches into rings of hearts that stand up off the card. The first opening may stick a little, so ease it apart. After that it opens easily.

    Tip:

    Write your message on the outside of the card, or put I on one side and U on the other.

    Back to all steps

How to Make a Pop Up Christmas Tree Card

Keep going

How to Make a Pop Up Christmas Tree Card

Keep going with card making

More on this topic, picked for this pop-up heart card.

You reached the last step

Save this project to come back to it

Your ticked steps, the free printable and your other saved makes, together in My Projects. Free, no password.

You tapped Save

Save this project for later

We'll email you a link, no password.

How to Make a Pop-Up Heart Card

  • Your saved projects in one list
  • Your ticked steps on any device

Check your inbox for an email from us. Not there? Look in your spam folder.

Free printable

Printable sheet and shopping list for this project

The bonus is hidden until you sign up.

Free with a free account, no password. Every step above stays open to everyone.

Products Used

The Checklist

How to Make a Pop-Up Heart Card

Tools
3
Materials
3
Steps
10
Video
9 min

Tools we recommend

As an Amazon Associate we earn from qualifying purchases. Links on this page may be affiliate links - clicking them and buying doesn't change your price, but helps support Crafting Step by Step.

Tags

The Crafter's Weekly

New card making tutorials, every Sunday

One short email with the week's best step-by-step guides. Free, no spam, unsubscribe anytime.

Did this work for you?

What's next

Related collections

Curated theme pages that include this tutorial.

Similar tutorials

Hand-picked next reads based on the one you just finished.

Liked this card making tutorial?

Pick the crafts you want to hear about. One email every Sunday with new step-by-step tutorials. No spam, easy to unsubscribe.

Get more like this in your inbox

Weekly digest. Pick the categories you want. Unsubscribe anytime.

Send me tutorials about

We only email about new tutorials. Easy unsubscribe anytime.