How to Use a Mini Darning Loom

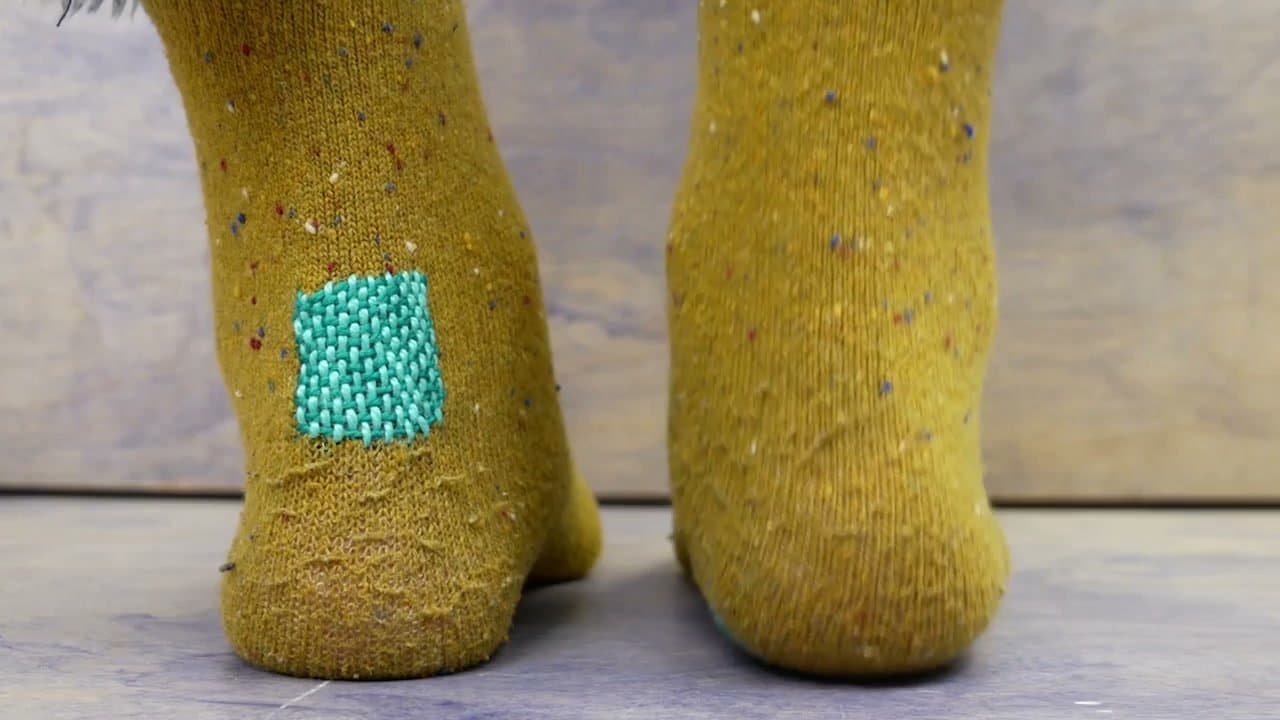
The finished result: How to Use a Mini Darning Loom
  • Difficulty: Easy
  • About 45 minutes
  • 10 steps

You tapped Save

Save this project for later

We'll email you a link, no password.

How to Use a Mini Darning Loom

  • Your saved projects in one list
  • Your ticked steps on any device

Check your inbox for an email from us. Not there? Look in your spam folder.

Print

Steps written out by Crafting Step by Step from Christine's Crafts' video (opens YouTube) (17:48). Published .

Also in:Crafts

A mini darning loom turns a hole in your jeans into a tiny woven patch you will want to show off. Christine of Christine's Crafts walks through the whole thing on a pair of jeans, from strapping the loom on to stitching the last loops down. If the leaflet that came with your loom left you confused, this is the plain version.

How to use a mini darning loom: the short version

  • Band the wooden disc behind the hole, then band the loom into the disc's groove.
  • Run warp threads in pairs from tiny stitches on the fabric up to the hooks.
  • Weave a weft thread across, flick the hooks, and weave back.
  • Repeat right up to the hooks, changing colors for stripes if you like.
  • Take the loom off and whip stitch the loops down.

What the hooks do

The row of hooks is the clever part. Every hook holds a pair of warp threads. Flick the hooks one way and every other thread lifts, so your needle slides across in one go. Flick them back and the threads swap places for the return pass. That is all a loom does on a big scale too. Forget to flick and the row pulls straight out.

Choosing thread

Six strand embroidery floss is the easy choice. It comes in hundreds of colors, it is cheap, and it fills a patch quickly on denim. For a fine knit or a sock, split the floss or use a thinner darning wool so the patch is not stiff. Use one color for the warp and play with stripes in the weft, or stripe both for a checked patch.

How big a patch can you make?

A patch can only be as wide as the row of hooks, roughly an inch and a half on most mini looms. For a bigger hole, weave two patches side by side, or turn the loom and weave a second patch across the first.

Helpful tricks

  • Stand a few hooks up before you loop the warp. It is far less fiddly.
  • Open the warp with a second, larger needle so the threaded needle slips through.
  • Press each new row down with that needle, the way a weaver beats the weft.
  • A needle threader saves your eyes and your patience.

Common problems

  • The band keeps pinging off. Seat it in the groove first, then hook it over the disc. Try again. Everyone loses one.
  • The patch has a loose top edge. You stopped short of the hooks. Squeeze in the last rows even when it gets tight.
  • Gaps between rows. Push each row down before the next one.
  • Loops pull out after removal. Whip stitch through every loop. Skip one and it unravels.

Patch shapes and ideas

A rectangle is the natural shape, but a heart or triangle works too. Change how many hooks you use on each row. Visible mends look great on jean knees, sweater elbows, tote bags and kids' clothes. You can even weave a patch on a plain item as decoration.

More mending

Prefer an invisible fix? Try how to darn a sock with a needle or how to fix a hole in a sweater. If you enjoy the weaving, weaving on a lap loom is the bigger version, and backstitch is handy for outlining a mend.

Free printable

Print the steps and supply list for this project

One page you can take to the table. Free with a free account, no password.

Get the free printable

What you'll need

Free, for this project

Get this checklist by email

  • All 8 tools and materials, with tick boxes
  • A link to print all 10 steps on paper, to keep by you while you craft

No password. The whole tutorial stays free on this page.

Quick answer

Use a mini darning loom (Speedweve style) to weave a striped patch over a hole. An easy project: about 45 minutes. Materials cost about $1 to $3. You need 8 things, including garment with a hole, embroidery needle and large blunt tapestry needle. The 10 steps start with band the Darning Disc Behind the Hole in the Jeans, attach the Mini Darning Loom to the Disc and anchor the First Warp Thread on the Darning Disc.

Step-by-step guide

10 steps, about 18 minutes. Tap a picture to jump to that step. Your progress saves automatically.

Tick each step off as you go.

  1. Step 1: Band the Darning Disc Behind the Hole in the Jeans

    Watch this step · 0:38

    Lay your garment flat and slide the wooden disc underneath, with the hole roughly in the middle so the patch will cover it. Wrap one of the elastic bands around the fabric and disc. There is a groove around the disc edge, and the band should sit snugly in it. Check that the fabric is smooth over the disc, not puckered, before you go on.

    Tip:

    If the hole is on a sleeve or leg, put the disc inside so you only catch one layer.

    Back to all steps

  2. Step 2: Attach the Mini Darning Loom to the Disc

    Watch this step · 0:52

    Push the loom's curved base into the same groove above the hole. It is a tight fit, so press firmly. Then stretch the second elastic band around the back of the loom and hook it over the disc to hold everything together. This band likes to ping off. Seat it again and keep going. Mark the outline of your patch on the fabric with chalk or a pencil if you want crisp edges.

    Tip:

    Tailor's chalk can rub off on denim. A pencil line lasts longer.

    Back to all steps

  3. Step 3: Anchor the First Warp Thread on the Darning Disc

    Watch this step · 3:12

    Thread a needle with a long length of embroidery floss for the warp, the threads that run up to the hooks. Bring the needle up through the fabric near the edge of the disc and then out at the bottom corner of your patch. Leave a long tail at the start. Make one tiny stitch to anchor the thread. You will use that tail later to tie off.

    Tip:

    A cheap needle threader makes this part painless.

    Back to all steps

  4. Step 4: Loop the Warp Threads Up Around the Loom Hooks

    Watch this step · 5:00

    Take the thread up and around a hook, then back down to the fabric and make another tiny stitch beside the first. That gives you your first pair of warp threads. Repeat on the next hook and the next, working across until the warp is as wide as your patch. Stand a few hooks up before looping, which is much easier than catching them flat. Finish by taking the thread out near the disc edge.

    Tip:

    Change warp colors partway for a checked patch.

    Back to all steps

  5. Step 5: Weave the First Weft Row Through the Warp

    Watch this step · 7:16

    Turn all the hooks to face one way. Thread a new color for the weft, come in from the disc edge and make a little stitch at the bottom of the warp. Slide a larger needle through the opened warp to hold a gap, then pass your threaded needle through. Pull the thread snug and press it down with the larger needle so the row sits tight against the fabric.

    Tip:

    Pushing the blunt end through first opens the threads without snagging them.

    Back to all steps

  6. Step 6: Flick the Loom Hooks Across for the Return Pass

    Watch this step · 8:14

    Make a small stitch at the far side, then run a finger along the hooks to flick them all the other way. That swaps which warp threads are up and which are down. Pass the needle back through, pull it snug and press the row down. You should now see a woven pattern forming. Every pass is the same: stitch, flick, weave, press.

    Tip:

    If a row pulls straight out, you forgot to flick the hooks.

    Back to all steps

  7. Step 7: Change Thread Colors to Weave Stripes in the Patch

    Watch this step · 10:20

    Keep weaving rows until the first stripe is as deep as you want. Take that thread out to the edge of the disc and leave a tail. Thread up the next color, come in from the disc edge, make a little stitch and carry on. You can stay in one color the whole way too. A single color patch looks neat and tidy.

    Tip:

    Short threads are easier to pull through when you only need a few rows.

    Back to all steps

  8. Step 8: Weave the Last Rows Close Under the Loom Hooks

    Watch this step · 13:15

    As the patch grows, the hooks get in the way and the warp gets tight. Slow down here. Wiggle the needle through and use the larger needle to hold the gap open. Keep going right up to the hooks. Stopping early leaves a loose top edge, and the last rows are what make a tidy, finished patch.

    Tip:

    Small loops at the top are good. They are what you stitch down later.

    Back to all steps

  9. Step 9: Take the Mini Darning Loom Off the Patch

    Watch this step · 15:12

    Bring the last weft thread out to the side. Remove the top elastic band and feed any caught threads through so they lie loose. Wiggle the loom out of the groove, unhooking each warp loop from its hook as you go. Then take off the second band and slide the disc out from under the fabric. Your patch is woven but not yet secure.

    Tip:

    Thread a needle with the warp color before you start so you can secure the loops right away.

    Back to all steps

  10. Step 10: Whip Stitch the Warp Loops and Finish the Patch

    Watch this step · 15:45

    With the warp color, come up through the first loop at the top of the patch, go down into the fabric, and up through the next loop. Work along the whole row so every loop is caught. Turn the garment over and secure each loose tail on the back, weaving it under the stitches or tying a small knot stitch. Trim the ends.

    Tip:

    Count the loops as you go. A missed loop is the one that unravels.

    Back to all steps

How to Sew a French Seam

Keep going

How to Sew a French Seam

Keep going with sewing

More on this topic, picked for this mini darning loom.

You reached the last step

Save this project to come back to it

Your ticked steps, the free printable and your other saved makes, together in My Projects. Free, no password.

You tapped Save

Save this project for later

We'll email you a link, no password.

How to Use a Mini Darning Loom

  • Your saved projects in one list
  • Your ticked steps on any device

Check your inbox for an email from us. Not there? Look in your spam folder.

Free printable

Printable sheet and shopping list for this project

The bonus is hidden until you sign up.

Free with a free account, no password. Every step above stays open to everyone.

Products Used

The Checklist

How to Use a Mini Darning Loom

Tools
6
Materials
2
Steps
10
Video
18 min

Tools we recommend

As an Amazon Associate we earn from qualifying purchases. Links on this page may be affiliate links - clicking them and buying doesn't change your price, but helps support Crafting Step by Step.

Tags

The Crafter's Weekly

New sewing tutorials, every Sunday

One short email with the week's best step-by-step guides. Free, no spam, unsubscribe anytime.

Did this work for you?

What's next

Related collections

Curated theme pages that include this tutorial.

Similar tutorials

Hand-picked next reads based on the one you just finished.

Liked this sewing tutorial?

Pick the crafts you want to hear about. One email every Sunday with new step-by-step tutorials. No spam, easy to unsubscribe.

Get more like this in your inbox

Weekly digest. Pick the categories you want. Unsubscribe anytime.

Send me tutorials about

We only email about new tutorials. Easy unsubscribe anytime.