How to Read a Knitting Pattern (Beginner's Guide)

KnittingEasy16:367 stepsBrowse more →
Also in:Crafts

By CraftingStepByStepPublished Updated

Based on a video by Jacq Knits.

A knitting pattern is just a set of instructions for making a knitted project, but at first glance it can look like a wall of cryptic abbreviations and parenthesized numbers. Once you know what each section does, the same shorthand becomes easy to follow on any pattern - sock, sweater, scarf, or shawl.

Jacqueline from Jacq Knits walks through every section a typical pattern includes, then writes out a sample pattern by hand so you can see how the pieces fit together. After this you will know how to pick the right yarn weight, work a gauge swatch, decode abbreviations like SSK and K2tog, follow asterisk repeats, and read sizing brackets without second-guessing yourself.

Once you have the pattern down, build your first project with our beginner walk-throughs on how to cast on, how to knit and purl, how to increase, and how to slip stitch.

Step-by-Step Guide

1

Step 1: Skim the Pattern Anatomy

1:00
Step 1: Step 1: Skim the Pattern Anatomy

Every pattern opens with the same handful of sections: a short description of the finished piece, construction notes (knit flat on straight needles or in the round on circulars), yarn and needle requirements, gauge, sizing, an abbreviations key, and then the row-by-row instructions.

Read the opening paragraph first. The designer is telling you what the project is, how it is built (top-down, bottom-up, flat or in the round), and roughly how hard it is. This is where you decide if it is the right project for you before you buy yarn.

Products used in this step

2

Step 2: Match the Yarn Weight

3:00
Step 2: Step 2: Match the Yarn Weight

The pattern lists a yarn weight (worsted, fingering, bulky, etc.) and usually a yardage estimate. The weight is what you have to match - color and brand are up to you.

Every yarn skein label has a small number inside a yarn-ball icon. A 4 is worsted weight, a 1 is fingering, a 5 is bulky, and so on. Google "yarn weight chart" if you want the full list. Pick a yarn at the same weight or your finished piece will not measure correctly. Buy a little more yardage than the pattern asks for so you do not run short on the last row.

Tip

Different fibers behave differently. Cotton has almost no stretch and drapes heavy. Wool is springy. Acrylic sits in the middle. If you can, use the same fiber type the designer used.

Products used in this step

3

Step 3: Check the Needle Size

4:00
Step 3: Step 3: Check the Needle Size

Needle requirements come right after the yarn. The pattern lists a needle type (straight for flat pieces, circular or double-pointed for working in the round) and a size in both US and metric, like US 7 (4.5mm).

If you buy your needles in the US, the US size is what is printed on the package. Metric sizing shows up on European brands and is more precise, so it is the one to trust if you are using needles from different manufacturers.

Products used in this step

4

Step 4: Decode the Sizing Key

5:05
Step 4: Step 4: Decode the Sizing Key

Patterns for fitted pieces - sweaters, socks, hats - give instructions for multiple sizes at once using parentheses. The format usually reads "size small (medium, large, X-large)" at the top of the pattern.

From then on, every stitch count follows the same format. "Cast on 40 (42, 44, 46) stitches" means cast on 40 for small, 42 for medium, 44 for large, 46 for X-large. Before you knit a single stitch, grab a highlighter or pen and circle every number that matches your size all the way through the pattern. It is the single best habit for following a sized pattern without losing your place.

5

Step 5: Knit a Gauge Swatch

7:40
Step 5: Step 5: Knit a Gauge Swatch

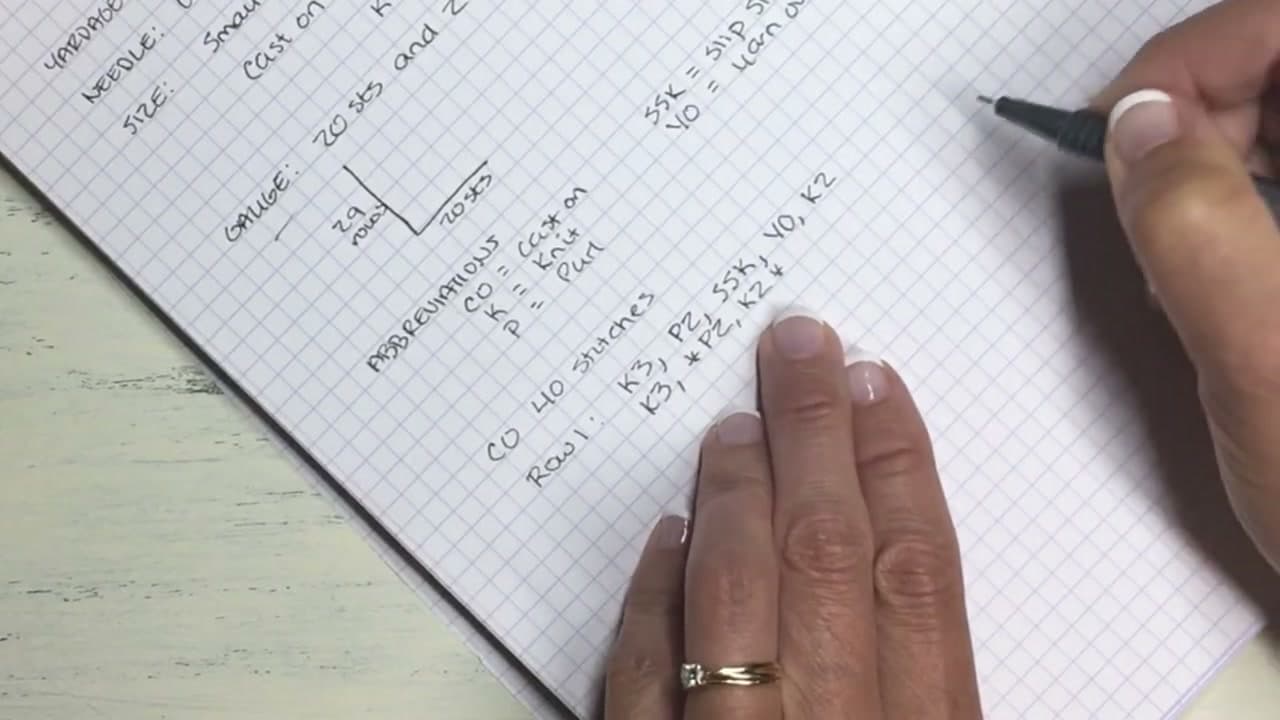
The gauge box looks something like "20 stitches and 29 rows = 4 inches in stockinette stitch." That is the designer telling you how many stitches per inch they got with the recommended yarn and needles.

Cast on about 24 stitches with your yarn and needles, knit a stockinette square (knit one row, purl one row) until it measures roughly 5 inches tall, then bind off. Lay a ruler across it and count stitches in a 4-inch span. If you have more than 20, your knitting is tight - go up a needle size. Fewer than 20 means it is loose - go down a size. For scarves, blankets, and other non-fitted projects you can skip the swatch entirely.

Tip

Wash and block your swatch the same way you plan to wash the finished piece. Some fibers (especially superwash wool and cotton) grow when wet, and your gauge after blocking is the gauge that matters.

Products used in this step

6

Step 6: Read the Abbreviations Key

10:00
Step 6: Step 6: Read the Abbreviations Key

Every abbreviation the pattern uses is defined in one block, usually right before the instructions. The most common ones repeat across nearly every pattern you will ever read:

  • CO - cast on
  • BO - bind off (cast off in UK patterns)
  • K - knit
  • P - purl
  • K2tog - knit two stitches together (decrease)
  • SSK - slip slip knit (decrease)
  • YO - yarn over (increase / eyelet)
  • Sl1 - slip one stitch
  • M1L / M1R - make one stitch (left or right leaning)
  • kfb - knit front and back (increase)

If any abbreviation in the key is new to you, look it up on YouTube before you cast on. Five minutes of video now saves you from ripping out a row later.

Products used in this step

7

Step 7: Work the Row-by-Row Instructions

13:00
Step 7: Step 7: Work the Row-by-Row Instructions

Pattern rows read left to right, one comma at a time. A comma means "and then." So Row 1: K3, P2, SSK, YO, K2 reads as: knit 3, then purl 2, then slip slip knit, then yarn over, then knit 2.

Asterisks mark repeats. K3, *P2, K2* repeat 10 times means knit 3 once, then do the P2 K2 sequence between the asterisks ten times in a row. You will also see brackets used the same way - [K2, P2] x 3 means work K2 P2 three times. At the end of every row the stitch count should still match what the pattern expects, so count after the first few rows to catch any mistakes early.

When the pattern says repeat rows 1-4, five more times, that means you have already done the four rows once and now repeat them another five times for six total. The final block of any pattern is the bind-off (BO) instruction, which finishes the piece.

Tip

Place a stitch marker every time the pattern tells you to. Markers split each row into smaller chunks so you do not have to count across 80 stitches every time. They slip from one needle to the other as you work.

Products used in this step

Products Used

☐ The Checklist

How to Read a Knitting Pattern (Beginner's Guide)

Tools
4
Materials
1
Steps
7
Video
17 min

Your Guide

Jacq Knits

As an Amazon Associate we earn from qualifying purchases. Links on this page may be affiliate links - clicking them and buying doesn't change your price, but helps support ShowMeStepByStep.

Tags

What's next

Related collections

Curated theme pages that include this tutorial.

Weekly Digest

Liked this knitting tutorial?

Pick the categories you want to hear about. Weekly digest of new step-by-step tutorials. No spam, easy unsubscribe.

Send me tutorials about

We only email about new tutorials. Easy unsubscribe anytime.