How to Draw Using the Grid Method

The finished result: How to Draw Using the Grid Method
  • Difficulty: Easy
  • About 45 minutes
  • 9 steps

You tapped Save

Save this project for later

We'll email you a link, no password.

How to Draw Using the Grid Method

  • Your saved projects in one list
  • Your ticked steps on any device

Check your inbox for an email from us. Not there? Look in your spam folder.

Print

Steps written out by Crafting Step by Step from Rick Mayotte's video (opens YouTube) (5:34). Published .

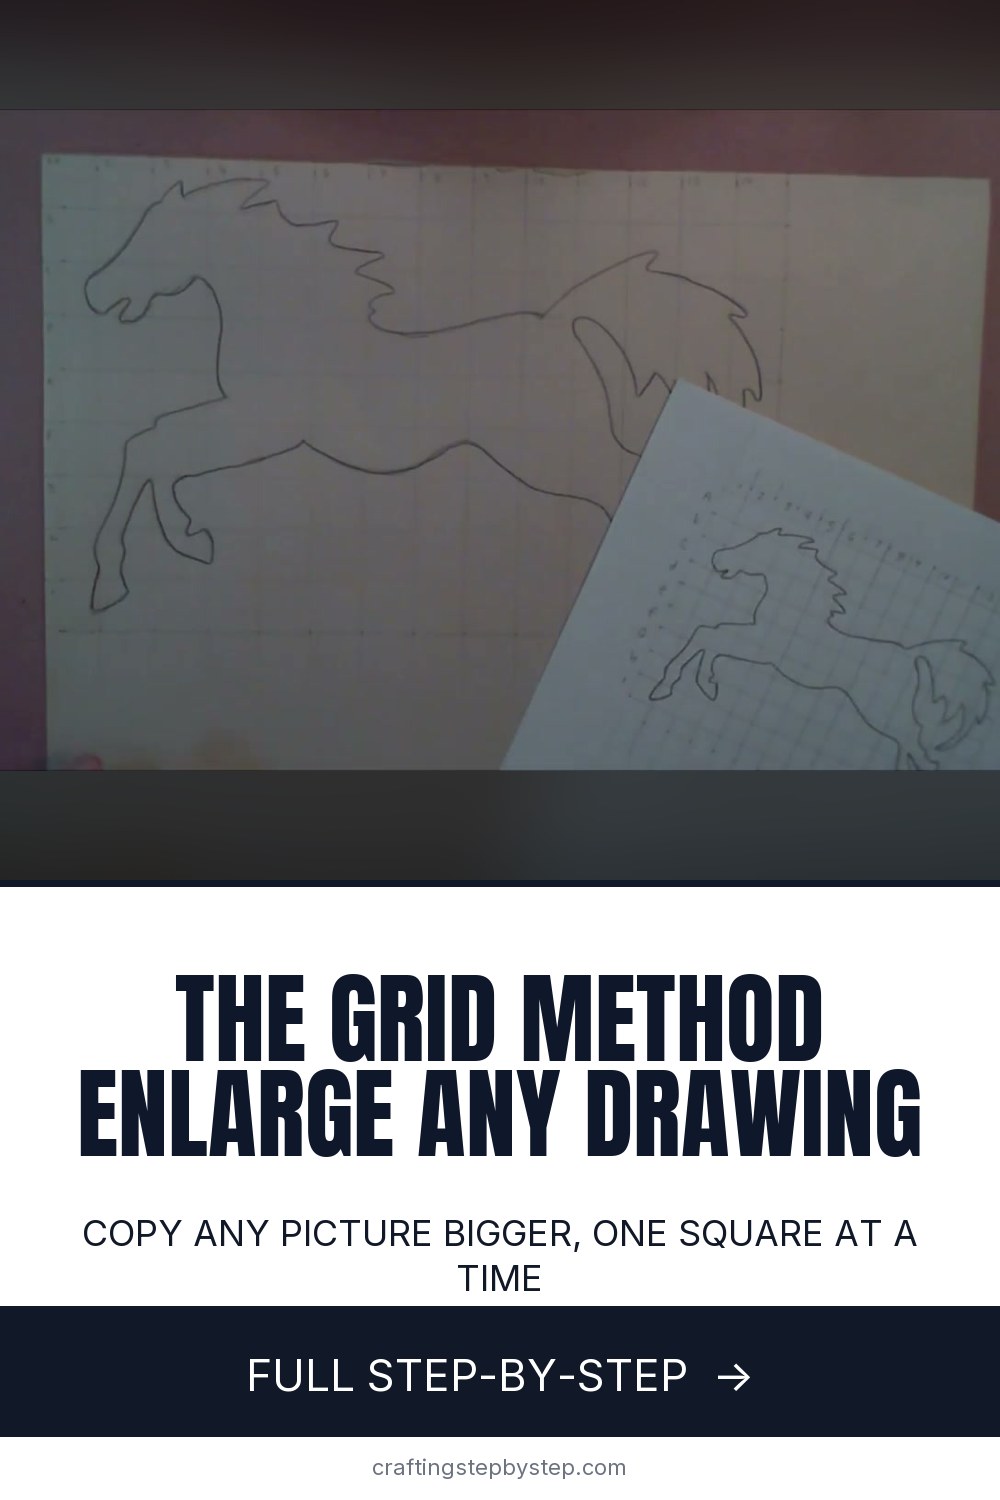
The grid method is how artists copy a picture at a new size and keep the shapes right. You draw a grid over the picture, draw a grid with the same number of squares on your paper, then copy one square at a time. Each square is a small, easy drawing. Put them together and the whole thing lines up. Rick Mayotte shows it by blowing a small horse sketch up to about 14 inches, too big for a home printer, so he can trace it onto poster board.

What you need

  • The picture you want to copy, a sketch or a printed photo
  • A long metal ruler
  • Sharp pencils, one light and one darker
  • Drawing paper or a newsprint pad in the size you want
  • An eraser, ideally a kneaded one that lifts lines gently

How to work out the grid size

The squares on both grids must be the same in number, not in size. The ratio between them is how much bigger the copy gets. Half-inch squares on the original and one-inch squares on the new paper doubles the drawing. Two-inch squares makes it four times bigger. To shrink a large picture, flip it: big squares on the original, small ones on the copy. If you need an exact size, divide the size you want by the width of the original and use that number to pick your square size.

Why it works so well

Most drawing mistakes are proportion mistakes: a head too big, legs too short. The grid breaks one hard drawing into many small ones, so your eye only judges a few lines at a time. Ask yourself where the line enters the square, where it leaves, and how it bends in between. That is all.

Grid method vs tracing

Tracing only copies at the same size, and a projector needs a dark room and a wall. The grid method needs a pencil and a ruler, works at any size and trains your eye while you do it. Many artists find that after a few grid drawings they judge proportions better freehand too.

Keeping grid lines off the finished art

Draw the copy grid very lightly so you can erase it later. Rick leaves his grid in place because he only uses the drawing as a pattern. For a finished piece, draw the grid on a separate sheet, lay it on a lightbox and tape your good paper on top. The lines show through and never touch the art. On a printed photo you can draw the grid straight on the print, or on a clear sheet over it.

Grid method mistakes to avoid

  • Different square counts. Count both grids before you start. One missing row stretches the whole drawing.
  • Losing your place. Label the rows and columns, or cover the rest of the picture with a paper window.
  • Pressing too hard. Grid lines that will not erase spoil the finished piece. Use a light hand and a harder pencil.

Where to use it

Use it for portraits, pet drawings, murals and patterns for wood or fabric. It pairs well with how to draw a horse and how to draw a face, where proportions matter most. Moving a design onto canvas? See how to transfer a sketch to canvas. Once the outline is in place, colored pencils are a good way to finish it.

Free printable

Print the steps and supply list for this project

One page you can take to the table. Free with a free account, no password.

Get the free printable

What you'll need

Free, for this project

Get this checklist by email

  • All 6 tools and materials, with tick boxes
  • A link to print all 9 steps on paper, to keep by you while you craft

No password. The whole tutorial stays free on this page.

Quick answer

Use the grid method to copy and enlarge any drawing: grid the picture, draw a matching bigger grid and copy one square at a time. An easy project: about 45 minutes. You need 6 things, including drawing paper or newsprint pad, long metal ruler and pencils. The 9 steps start with start With a Clean Sketch for the Grid Method, measure the Width of the Sketch With a Ruler and mark Grid Lines Across the Original Sketch.

Step-by-step guide

9 steps, about 6 minutes. Tap a picture to jump to that step. Your progress saves automatically.

Tick each step off as you go.

  1. Step 1: Start With a Clean Sketch for the Grid Method

    Watch this step · 0:32

    Pick the picture you want to copy. Rick uses a simple running horse outline he drew on printer paper and went over in darker pencil so the lines are easy to see. Clear, dark lines make the copying much easier. If you are working from a photo, print it in black and white so the shapes and edges stand out.

    Tip:

    Simple outlines are best for a first try. Save detailed portraits for later.

    Back to all steps

  2. Step 2: Measure the Width of the Sketch With a Ruler

    Watch this step · 0:46

    Lay a ruler across the widest part of the drawing. The horse is a little under 7 inches across. Decide how big you want the copy. Rick wants 13 to 14 inches, about double. Halving the 7 inches into half-inch squares gives 14 squares across. On the new paper, one-inch squares make it 14 inches wide.

    Tip:

    Close enough is fine. Use a calculator only if you need an exact size.

    Back to all steps

  3. Step 3: Mark Grid Lines Across the Original Sketch

    Watch this step · 1:18

    Use the ruler to tick off half-inch marks along the top and side of the drawing. Then join the marks with straight pencil lines, across and down, so the whole picture sits under a grid of even squares. Keep the ruler flat and pressed down so the lines stay straight and the squares stay the same size.

    Tip:

    Start the grid from one corner so all the squares line up from the same edge.

    Back to all steps

  4. Step 4: Finish the Half-Inch Grid Over the Whole Drawing

    Watch this step · 1:24

    Carry the grid past the edges of the drawing until every part of it sits inside a square. Count the squares. Rick has 14 across and 9 down. Write those numbers down. They are the only numbers that matter, because the new grid has to match them exactly, however big its squares are.

    Tip:

    Count twice. One missing row stretches the whole copy.

    Back to all steps

  5. Step 5: Draw a Larger Grid on the Big Drawing Paper

    Watch this step · 1:46

    Take the big paper. Rick uses a 12 by 18 inch newsprint sheet from the dollar store. Draw the same number of squares, 14 across and 9 down, but make each one an inch. Bigger squares mean a bigger drawing. Inch-and-a-half or two-inch squares would make it larger still. Keep these lines light.

    Tip:

    A long metal ruler keeps lines straight across a big sheet.

    Back to all steps

  6. Step 6: Number and Letter the Grid Rows and Columns

    Watch this step · 2:44

    Write numbers along the top of both grids and letters down the side, in the same order. Now every square has a name, like C7. Find C7 on the original, find C7 on the big sheet, and copy what is in it. This matters most on detailed pictures, where it is easy to drift a square to one side without noticing.

    Tip:

    Cut a square window in scrap paper to cover everything except the square you are copying.

    Back to all steps

  7. Step 7: Copy the Drawing Square by Square Onto the Large Grid

    Watch this step · 4:08

    Start at one corner of the picture and work across. For each square, look at where the line enters, where it leaves and how it curves in between. Draw that inside the matching big square. Rick starts with the horse's head and works along the neck. Do not think about the horse. Think about the lines in the square.

    Tip:

    Draw lightly at first. You can darken the lines once the whole shape is in place.

    Back to all steps

  8. Step 8: Keep Copying Each Grid Square Across the Drawing

    Watch this step · 4:16

    Keep moving square by square across the back, the hindquarters and down the legs. Keep the original beside you so you can glance back and forth. If a line looks wrong, check that you are in the matching square before you erase. Most mistakes come from copying the right line into the wrong square.

    Tip:

    Turn the paper to draw curves more easily. The grid still lines up.

    Back to all steps

  9. Step 9: Compare the Enlarged Drawing With the Original

    Watch this step · 4:28

    Lay the original on top of the enlargement and compare. The proportions should match: the same head size, the same leg length, only bigger. Go over the outline to refine it if you want. Rick keeps the grid lines because he is tracing the horse onto poster board as a pattern. For finished art, erase them.

    Tip:

    To keep grid lines off your art, put the grid on a lightbox under your good paper.

    Back to all steps

How to Draw a Star

Keep going

How to Draw a Star

Keep going with drawing

More on this topic, picked for this project.

You reached the last step

Save this project to come back to it

Your ticked steps, the free printable and your other saved makes, together in My Projects. Free, no password.

You tapped Save

Save this project for later

We'll email you a link, no password.

How to Draw Using the Grid Method

  • Your saved projects in one list
  • Your ticked steps on any device

Check your inbox for an email from us. Not there? Look in your spam folder.

Free printable

Printable sheet and shopping list for this project

The bonus is hidden until you sign up.

Free with a free account, no password. Every step above stays open to everyone.

Products Used

The Checklist

How to Draw Using the Grid Method

Tools
4
Materials
2
Steps
9
Video
6 min

Tools we recommend

As an Amazon Associate we earn from qualifying purchases. Links on this page may be affiliate links - clicking them and buying doesn't change your price, but helps support Crafting Step by Step.

Tags

The Crafter's Weekly

New drawing tutorials, every Sunday

One short email with the week's best step-by-step guides. Free, no spam, unsubscribe anytime.

Did this work for you?

What's next

Related collections

Curated theme pages that include this tutorial.

Similar tutorials

Hand-picked next reads based on the one you just finished.

Liked this drawing tutorial?

Pick the crafts you want to hear about. One email every Sunday with new step-by-step tutorials. No spam, easy to unsubscribe.

Get more like this in your inbox

Weekly digest. Pick the categories you want. Unsubscribe anytime.

Send me tutorials about

We only email about new tutorials. Easy unsubscribe anytime.