How to Draw a Snowy Owl

Save it for later. We'll email you a link, no password.

Find it again on your phone or computer, with your finished steps ticked.

You tapped Save

Save this project for later

We'll email you a link, no password.

How to Draw a Snowy Owl

  • Your saved projects in one list
  • Your ticked steps on any device

Check your inbox for an email from us. Not there? Look in your spam folder.

  • 10 steps
  • 6:43 video
  • Difficulty: Easy
  • About 20 minutes
  • Materials about $5 to $10
  • Drawing

Based on a video by Art for Kids Hub

Opens their YouTube channel

Steps written out by Crafting Step by Step · Published · Updated

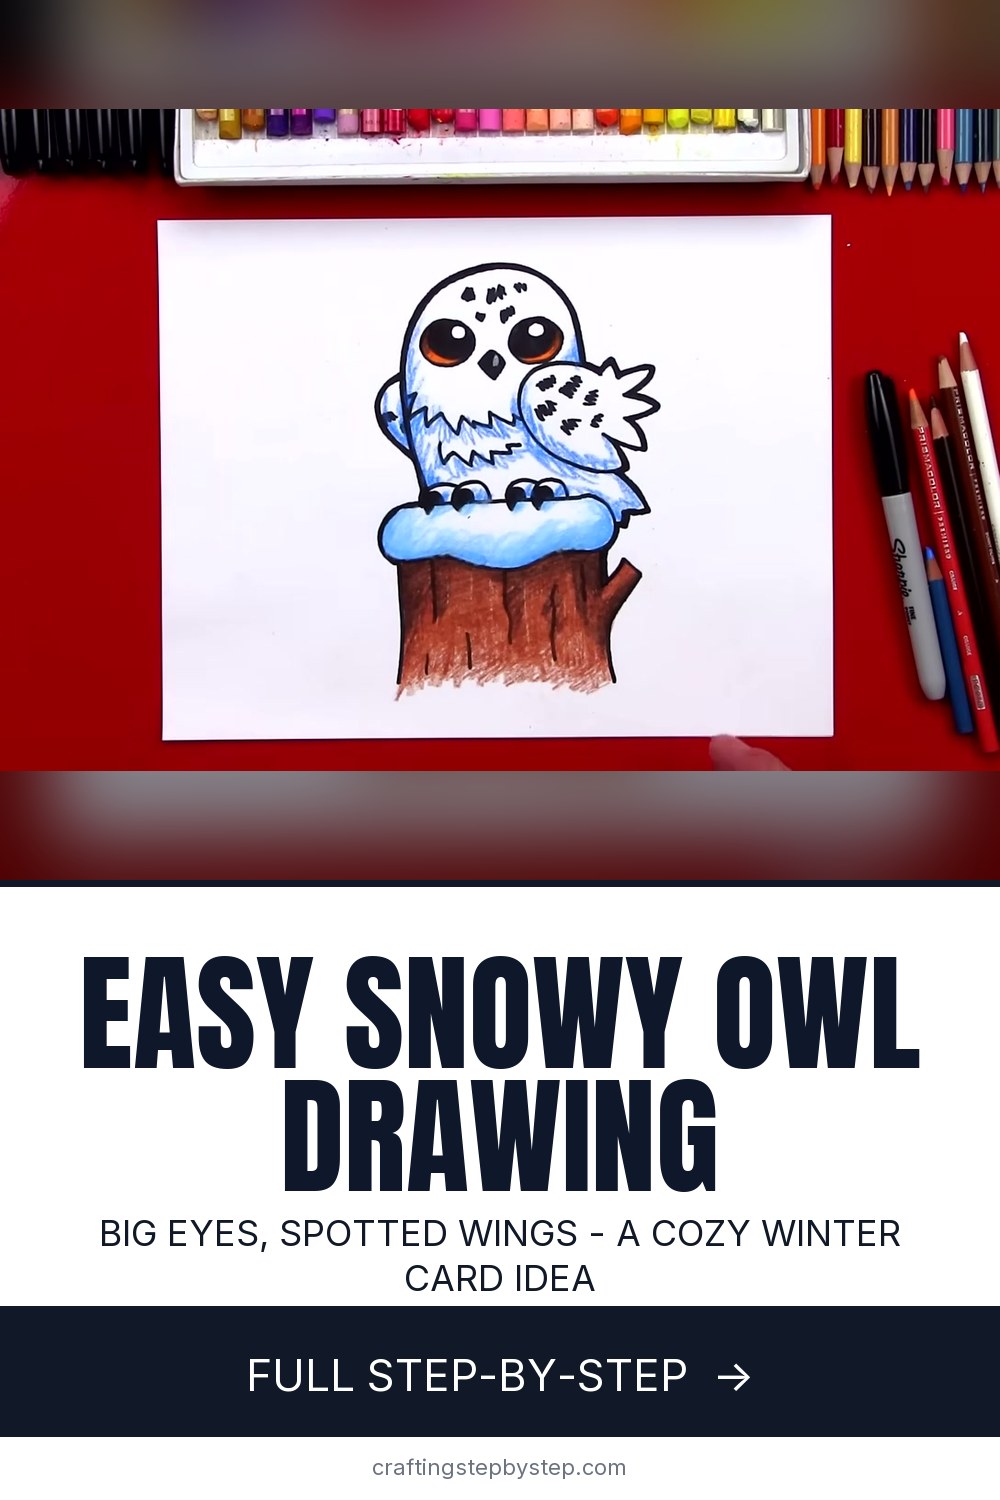
The finished result: How to Draw a Snowy Owl

This snowy owl comes from Rob at Art for Kids Hub. He keeps the lesson easy for young artists, but it holds up for grown-ups too. You draw a chubby white owl with big round eyes, sitting on a tree stump with a cap of snow. It takes about seven minutes with a black marker, then a few colored pencils.

Already drew our regular owl? Think of this one as the winter version.

Snowy owl drawing: what makes it a snowy owl

Real snowy owls are mostly white. Males get paler with age. Females and young birds carry dark brown bars and spots across the wings, back and head. They have bright yellow eyes and a small dark beak tucked into thick feathers.

The cartoon keeps it simple. A plain white body, a scatter of dark spots on the wing and head, and a few zigzag lines for fluffy chest feathers. Rob colors the eyes a warm orange brown. Swap in yellow if you want it closer to the real bird. Either way, the spots are what tell people this is a snowy owl and not a barn owl.

Making your owl look wintry

A white bird on white paper can vanish. The fix is pale blue. Shade the edges of the owl's body, the underside of the wing and the bottom of the snow cap with a light blue pencil. Leave the middle of each shape white. Now the owl looks round and cold, and the snow looks like snow.

A dark brown stump gives the white something to stand against. For more winter, add a light blue sky behind the owl, a few falling snowflakes, or a bare branch.

Cards, tags and window art

This owl fits a folded card well. Draw it on the front with a little snow on the ground and write "Whooo loves you?" inside. Smaller owls make sweet gift tags. Cut them out, punch a hole above the head and tie them on with string. A row of colored owls taped to a window makes a cheerful winter scene that lasts all season.

A more realistic snowy owl in pencil

Older artists can draw the same pose with a graphite pencil. Make the head wider and flatter, shrink the eyes, and add a facial disc around them. Build the dark bars with short curved strokes in rows that follow the feathers. Keep the white areas clean and shade only the shadow side. Our guide on how to shade covers the soft blending.

Common snowy owl drawing problems

  • The owl looks flat. Add more blue along the outside edges and under the wing. Shadow is what makes white look round.
  • The eyes do not match. Draw both circles lightly in pencil first, then trace them in marker once they look even.
  • The owl is floating. Make sure the talons overlap the snow cap and the black tips hang over its front edge.
  • The spots look messy. Use fewer, smaller marks. Five to eight on the wing is plenty.

Snowy owl drawing ideas to try next

  • Two owls side by side on one stump, a big one and a little one.
  • An owl in flight with both wings open and spots on every feather.
  • More cold-weather friends: a penguin or a polar bear.
  • Turn it into yarn with how to crochet an owl.

Free printable

Print the steps and supply list for this project

One page you can take to the table. Free with a free account, no password.

Get the free printable

What you'll need

Free, for this project

Get this checklist by email

  • All 4 tools and materials, with tick boxes
  • A link to print all 10 steps on paper, to keep by you while you craft

No password. The whole tutorial stays free on this page.

Quick answer

Draw a cute snowy owl on a snowy tree stump in 10 easy steps. An easy project: about 20 minutes. Materials cost about $5 to $10. You need 4 things, including drawing paper or drawing pad, black fine point permanent marker and pencil and eraser. The 10 steps start with draw the Snowy Owl's Snow-Capped Tree Stump Top, draw the Snowy Owl Stump Sides, Cut Branch and Bark Lines and draw the Snowy Owl's Curved Talons on the Snow.

Step-by-step guide

10 steps, about 7 minutes. Tap a picture to jump to that step. Your progress saves automatically.

Tick each step off as you go.

  1. Step 1: Draw the Snowy Owl's Snow-Capped Tree Stump Top

    Watch this step · 0:40

    Start in the middle of your paper, a little below center. Draw a straight line for the top of the stump. Then draw a wavy line underneath it that curves down and back up, connecting the left end to the right end. That wavy shape is a thick cap of snow sitting on the stump. Leave plenty of room above it for the owl.

    Tip:

    Use two sheets of paper if you draw with marker so the ink does not soak through.

    Back to all steps

  2. Step 2: Draw the Snowy Owl Stump Sides, Cut Branch and Bark Lines

    Watch this step · 1:20

    Draw a line down from the left end of the snow cap for one side of the stump. Make the right side shorter. From there, draw a little stub sticking out, like a branch that got cut off, and bring the line back to the stump and down. Then add a few short vertical lines inside the stump for bark texture.

    Tip:

    Vary the bark lines. Some long, some short looks more like real wood.

    Back to all steps

  3. Step 3: Draw the Snowy Owl's Curved Talons on the Snow

    Watch this step · 2:18

    On top of the snow cap, a little left of center, draw an upside-down U. Draw a second one overlapping behind it. That is one foot with two toes. Repeat it on the right for the other foot. Draw a smaller U inside each toe, then a little V below it. Color those V tips black so the talons look like they curl over the edge of the stump.

    Tip:

    Pause the video any time you need more time on a step.

    Back to all steps

  4. Step 4: Draw the Snowy Owl's Body as a Big Upside-Down J

    Watch this step · 2:33

    Put your marker next to the left foot. Draw a big upside-down J. Go up, round over the top for the head, and hook back down on the right side. Stop partway down. Do not close it, because the wing goes in that gap. This one shape is the owl's head and body together, so make it tall and round.

    Tip:

    Make the top wide and round. A narrow top looks more like a ghost than an owl.

    Back to all steps

  5. Step 5: Draw the Snowy Owl's Front Wing With Zigzag Feathers

    Watch this step · 3:00

    Draw a sideways U for the wing. Start at the open end of the body and swing it out to the right, then back in so it meets the body again. Tilt it a little on the diagonal. Add a zigzag line along the tip of the wing for feathers. Yours do not need to match Rob's. A few points or a lot of points both work.

    Tip:

    Keep the zigzag on the outer edge so the wing looks like it is folded at the owl's side.

    Back to all steps

  6. Step 6: Draw the Snowy Owl's Back Wing and Short Tail

    Watch this step · 3:22

    Only the shoulder of the back wing shows, because it tucks behind the body. Draw a small curved bump on the left side of the owl. Then go to the right side, right above the stump, and draw a short tail poking out from under the wing. Finish it with a small zigzag for the tail feathers.

    Tip:

    Small is right here. A big back wing makes the owl look lopsided.

    Back to all steps

  7. Step 7: Draw the Snowy Owl's Big Round Eyes

    Watch this step · 4:12

    Draw two big circles near the top of the head, right next to each other and the same size. Inside each one, draw a crescent shape like a moon for the pupil, facing opposite directions. Add a small circle in each pupil for the light reflection. Color the pupils black and leave the reflection circles white. Big shiny eyes give the owl its sweet look.

    Tip:

    Draw one eye, then match the second to it before you color anything in.

    Back to all steps

  8. Step 8: Draw the Snowy Owl's Beak and Fluffy Chest Feathers

    Watch this step · 4:50

    Draw a small V right between the eyes, add a short line across the top, and color the beak in. Then add the fluffy chest. Start on the left side of the body and draw a zigzag line across to the wing. Draw a second zigzag below it, then one more under the neck. These rows turn a plain shape into a soft feathered owl.

    Tip:

    Uneven zigzags look more like real fluffy feathers than neat ones.

    Back to all steps

  9. Step 9: Add Dark Spots to the Snowy Owl's Wing and Head

    Watch this step · 5:26

    Snowy owls can be pure white, but many have dark markings. Add short spots on the wing by wiggling your marker back and forth in tiny strokes. Put a few on the back shoulder too, then scatter a small group on top of the head. Keep the spots small and spaced out. Too many and the owl stops looking snowy.

    Tip:

    Group the spots in loose rows so they look like feather bars.

    Back to all steps

  10. Step 10: Color the Snowy Owl Blue and the Tree Stump Brown

    Watch this step · 5:58

    Grab colored pencils. Shade the edges of the owl's body and the snow cap with light blue and leave the middles white. Color the eyes orange or yellow. Then fill the stump with brown. Rob goes back over the stump with a darker brown for shadows and adds a little darker blue under the wing and snow. Skip the shading if you want to keep it easy.

    Tip:

    Press lightly with blue first. You can always add more, but you cannot take it away.

    Back to all steps

How to Draw a Bear

Keep going

How to Draw a Bear

You reached the last step

Save this project to come back to it

Your ticked steps, the free printable and your other saved makes, together in My Projects. Free, no password.

You tapped Save

Save this project for later

We'll email you a link, no password.

How to Draw a Snowy Owl

  • Your saved projects in one list
  • Your ticked steps on any device

Check your inbox for an email from us. Not there? Look in your spam folder.

Free printable

Printable sheet for this project

The bonus is hidden until you sign up.

Free with a free account, no password. Every step above stays open to everyone.

Products Used

The Checklist

How to Draw a Snowy Owl

Tools
2
Materials
2
Steps
10
Video
7 min

Tools we recommend

As an Amazon Associate we earn from qualifying purchases. Links on this page may be affiliate links - clicking them and buying doesn't change your price, but helps support Crafting Step by Step.

Tags

The Crafter's Weekly

New drawing tutorials, every Sunday

One short email with the week's best step-by-step guides. Free, no spam, unsubscribe anytime.

Did this work for you?

What's next

Related collections

Curated theme pages that include this tutorial.

Similar tutorials

Hand-picked next reads based on the one you just finished.

Liked this drawing tutorial?

Pick the crafts you want to hear about. One email every Sunday with new step-by-step tutorials. No spam, easy to unsubscribe.

Get more like this in your inbox

Weekly digest. Pick the categories you want. Unsubscribe anytime.

Send me tutorials about

We only email about new tutorials. Easy unsubscribe anytime.