How to Make Fake Snow

Based on a video by Maqaroon

Opens their YouTube channel

Steps written out by CraftingStepByStep · Published · Updated

Watch the original video (opens YouTube)
The finished result: How to Make Fake Snow
Also in:Other Crafts

Fake snow takes about twenty minutes and buys you a whole afternoon of indoor play. This walkthrough follows Maqaroon, who lined up the most popular homemade snow recipes going around online and made all of them on the same board so you can see how they differ side by side.

Three recipes are worth your time, and all of them use things already in the kitchen or the bathroom cupboard: frozen shaving foam on its own, baking soda with cornstarch, and baking soda with shaving foam. The baking soda and foam version won - bright white, cold in the palm, and it packs into a snowball that holds.

What you need

  • Baking soda, more than you expect. Buy the large box.
  • Shaving foam, fragrance-free if the shop stocks it
  • Cornstarch, for the shelf-stable recipe
  • Water, easiest to control from a spray bottle
  • Tubs with lids and high sides, plus a snowball mold

How to make snow at home: the best homemade snow recipe

The homemade snow most people are after is the baking soda and shaving foam mix. Pour baking soda a few inches deep, spray foam back and forth across the top, then push your fingers down through it and fold until no dry powder is left in the corners. It comes out bright white and cold in your hand, because the foam is evaporating against your skin. A shoebox-sized tub takes most of a one-pound box of baking soda and half a can of foam.

Instant snow is a different thing

Instant snow, the kind sold in sachets that erupts when you pour water on it, is sodium polyacrylate - the absorbent polymer used in disposable diapers. You cannot mix it from kitchen ingredients. A teaspoon drinks about a cup of water and swells into cold wet flakes in seconds. It is wetter and slushier than the recipes here.

Powder snow, foam snow, or crumbly ice

Each recipe lands on a different texture, so pick the one that matches what you are picturing.

  • Frozen shaving foam gives crumbly ice crystals. The only genuinely cold one, and the only one that melts.
  • Baking soda and cornstarch gives dry powdered snow. Sandy to the touch, and the color leans cream.
  • Baking soda and shaving foam gives fine powder snow, bright white, and it packs clean. This is the fake snow foam recipe worth making if you only make one.

Fake snow for dioramas, villages and photo backdrops

For a diorama or a model village, use the cornstarch mix dry, with no water at all - it stays put, it will not wet cardboard or lift paint, and it dusts onto roofs and branches through a tea strainer. A window display or a photo backdrop wants the baking soda and foam mix, the whitest under a light. For a sensory tray, frozen foam is the one children remember, because it is cold to hold. If you want a winter scene sealed and permanent, a snow globe is the better route - none of these recipes survive being put in water.

Troubleshooting and how long it lasts

It went slimy. Too much water in the cornstarch batch turns it into oobleck. Add more of both powders until it goes crumbly again, and mist the water in next time.

It went powdery after a few days. The foam has evaporated out. Spray more in and remix by hand. If it will not hold a snowball, it is too dry.

How long it keeps. The two powder recipes last weeks in a sealed tub. Frozen foam is gone inside an hour once it leaves the freezer.

Mess and safety. Nothing here stains, but baking soda and cornstarch leave white dust on dark carpet and dark clothes, so work on a tray. None of it is food, so supervise toddlers and keep it away from a dog that licks everything.

Want more of the same for a rainy afternoon? There is slime, playdough, and kinetic sand, all of which keep better than snow does.
What you'll need

Step-by-step guide

9 steps, about 6 minutes. Tap a picture to jump to that step. Your progress saves automatically.

Tick each step off as you go.

  1. Step 1: Spray Shaving Foam Into a Container

    Watch this step · 0:50

    The first recipe is one ingredient. Shake a can of shaving foam, hold it over a plastic tub and spray until the tub is heaped over the rim. Do not smooth it down. The peaks collapse on their own once the lid goes on.

    Go for a fragrance-free foam if the shop has one. Scented versions work the same way but the whole batch ends up smelling like a barbershop, which ruins the illusion fast. A small tub or a zip-top bag is plenty for one child.

    Tip:

    Foam for sensitive skin tends to be whiter and denser than the standard blue-can stuff, and it holds its shape better once frozen.

    Back to all steps

  2. Step 2: Snap On the Lid and Freeze the Foam

    Watch this step · 1:02

    Press the lid down until it clicks shut all the way around, then stand the tub flat in the freezer. The lid stops the foam drying out and stops the freezer smelling of shaving cream.

    Maqaroon left hers in for three days and thought it could have used longer. A day gets you soft frozen foam. Three days gets you something crumbly. The longer it sits, the more it breaks into ice crystals instead of scooping like ice cream.

    Tip:

    Freeze it in a few small tubs rather than one big one. You can bring out a fresh cold batch when the first one starts going soft.

    Back to all steps

  3. Step 3: Break the Frozen Foam Into Snow

    Watch this step · 1:20

    Peel the lid off and dig a hand straight into it. The frozen foam breaks into cold crumbly chunks with a texture somewhere between frozen whipped cream and real snow. It is the only one of the three recipes that is genuinely cold to hold.

    Squeeze a handful and it packs into a rough snowball. Throw it quickly, because it starts melting in about a minute. The upside is it leaves nothing sticky on your hands.

    Tip:

    A snowball mold will not work with this one. Frozen foam is still foam, and it slumps out of the mold before the two halves come apart.

    Back to all steps

  4. Step 4: Mix Equal Parts Baking Soda and Cornstarch

    Watch this step · 2:08

    The second recipe swaps cold for shelf life. Tip equal parts baking soda and cornstarch into a clean dry tub. Crumble the lumps between your fingers until the powder is loose and even, with no pale streaks running through it.

    Nothing in this one melts or evaporates, so a sealed tub keeps for weeks. Two cups of each fills a shallow container to a good playing depth.

    Tip:

    These are the same two ingredients as baking soda clay. Heat the mix on the stove instead of leaving it cold and you get a modelling dough that dries hard.

    Back to all steps

  5. Step 5: Stir In Water a Few Drops at a Time

    Watch this step · 2:14

    Add water a few drops at a time and stir it through with a spoon after every addition. You need far less than feels right. Stop the second a squeezed handful clumps instead of running through your fingers.

    Overshoot and the cornstarch turns into oobleck, a slimy goo that firms up when you press it and runs when you let go. Maqaroon hit that and had to pour in a lot more of both powders to bring it back.

    Tip:

    Use a spray bottle instead of pouring. A few pumps of mist across the surface spreads the water evenly and makes overshooting much harder.

    Back to all steps

  6. Step 6: Squeeze the Powder Snow Into a Shape

    Watch this step · 3:02

    Grab a handful and press it hard between both palms. This batch holds a shape well enough to roll snowballs or fill a mold, and the pressed shape keeps for a minute or two before the edges start shedding.

    Be honest about how it looks. The texture is sandy, closer to damp breadcrumbs than to snow, and the color leans cream rather than white. It is the least convincing of the three to look at and the easiest to keep around.

    Tip:

    Press the mold shut firmly and open it slowly. Rushing the two halves apart is what snaps the shape in half.

    Back to all steps

  7. Step 7: Spray Shaving Foam Over a Tub of Baking Soda

    Watch this step · 3:40

    Here is the recipe worth making. Pour a thick layer of baking soda into a tub, enough to fill it a few inches deep, then spray shaving foam back and forth across the top.

    There is no measuring in this one. Keep adding foam in passes until the powder is damp all the way through and nothing dry is left in the corners. You will get through more baking soda than you expect, so buy the big box.

    Tip:

    Work in a tub with high sides. Baking soda is light and it puffs up over the edge of a shallow tray the moment you start mixing.

    Back to all steps

  8. Step 8: Work It Into Fluffy White Snow by Hand

    Watch this step · 3:46

    Push your fingers down through the mix and fold it over until the last of the dry powder disappears. It turns bright white and crystalline rather than crumbly, and it comes out cold in your hand even though it never went near the freezer.

    Squeeze a handful. It should hold a clean snowball with a smooth surface. Left uncovered the foam slowly evaporates, so spray in a bit more and remix if the batch goes powdery after a few days.

    Tip:

    Nothing here goes to waste. Baking soda and shaving foam is a good scouring paste, so the leftovers clean a sink or a bathtub once the playing is done.

    Back to all steps

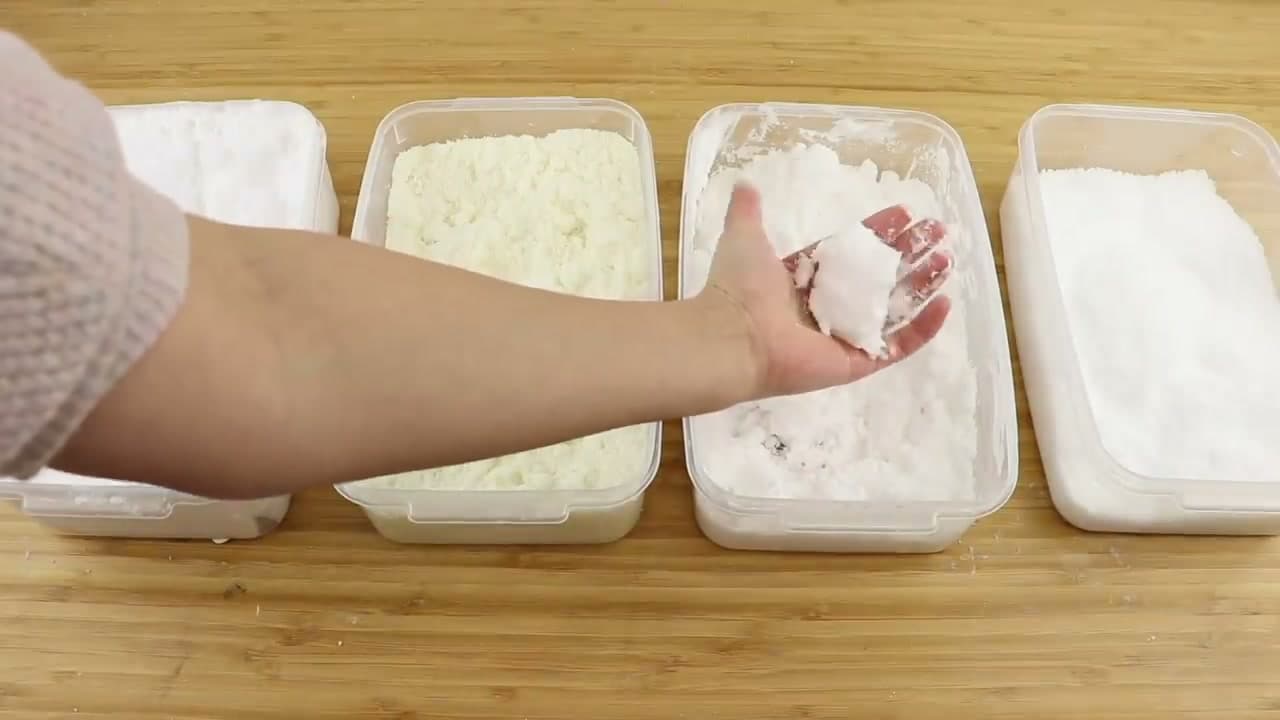
  9. Step 9: Compare the Three Batches of Fake Snow

    Watch this step · 5:26

    Line the tubs up and put a hand in each one. Frozen foam feels the closest to real snow and is the only cold option, but it is gone within the hour. The baking soda and cornstarch mix lasts the longest and looks the least like snow.

    Baking soda and shaving foam won for Maqaroon and it is easy to see why. It is the whitest, it is the easiest to make, it needs no measuring, and it rolls snowballs without falling apart.

    Tip:

    Molded figures are the weak spot for all three. The winning mix sticks to plastic better than it sticks to itself, so it tears when you open the mold.

    Back to all steps

Keep going

How to Dry Orange Slices

Products Used

The Checklist

How to Make Fake Snow

Tools
4
Materials
4
Steps
9
Video
6 min

Tools we recommend

As an Amazon Associate we earn from qualifying purchases. Links on this page may be affiliate links - clicking them and buying doesn't change your price, but helps support CraftingStepByStep.

Tags

The Crafter's Weekly

New crafts tutorials, every Sunday

One short email with the week's best step-by-step guides. Free, no spam, unsubscribe anytime.

Test your knowledge

Did the lesson stick? Start with this one.

5 questions covering what you just read. No signup, no score saved, and you can stop after this one.

Question 1 of 5

Which of the three recipes wins overall?

Quick reference

Key takeaways from How to Make Fake Snow

5 questions, answers, and one-line explanations. Tap to expand.

  1. 1.Which of the three recipes wins overall?

    Answer: Baking soda with shaving foam

    It goes bright white, feels cold, and packs into a snowball that holds.

  2. 2.What is the trade-off with the frozen foam recipe?

    Answer: It is coldest but melts within an hour

    The two powder recipes last for weeks in a sealed tub; this one does not.

  3. 3.Why snap the lid on before the foam goes in the freezer?

    Answer: To stop it drying out and scenting the freezer

    The peaks collapse on their own anyway once the lid goes on.

  4. 4.What goes wrong if you overshoot the water in the powder recipe?

    Answer: The cornstarch turns into oobleck

    Stop the second a squeezed handful clumps instead of running through your fingers.

  5. 5.How do you know the baking soda and foam batch is ready?

    Answer: The last of the dry powder disappears

    It turns bright white and crystalline, and comes out cold without any freezing.

Did this work for you?

What's next

Related collections

Curated theme pages that include this tutorial.

Similar tutorials

Hand-picked next reads based on the one you just finished.

Liked this crafts tutorial?

Pick the crafts you want to hear about. One email every Sunday with new step-by-step tutorials. No spam, easy to unsubscribe.

Get more like this in your inbox

Weekly digest. Pick the categories you want. Unsubscribe anytime.

Send me tutorials about

We only email about new tutorials. Easy unsubscribe anytime.