How to Make UV Resin Flower Earrings (DIY Tutorial)

By CraftingStepByStepPublished Updated

Based on a video by MarinaMakesArt.

These UV resin flower earrings from MarinaMakesArt look like boutique jewelry but come together in one afternoon at the kitchen table. You seal open metal bezel frames onto glossy tape, pour a thin layer of UV resin to make a clear back, set real dried flowers inside, and cure it all under a small UV lamp. No two-part epoxy, no overnight wait.

The whole project works in layers. A cured base layer gives the flowers something to rest on, then a final pour locks them in with a glassy domed surface. UV resin is what makes this beginner-friendly: it stays workable while you arrange the flowers and then hardens in minutes under the lamp, so you can build each earring up at your own pace.

Once you peel the tape and add the hooks, you've got a finished pair of pressed-flower earrings. Swap in different blooms, add iridescent stones or rhinestones for sparkle, and you can make a whole set of one-of-a-kind earrings to wear or give as gifts. It's a calm, satisfying craft with a result that genuinely looks store-bought.

Step-by-Step Guide

1

Step 1: Build a Sticky Tape Work Surface

0:13
Step 1: Step 1: Build a Sticky Tape Work Surface

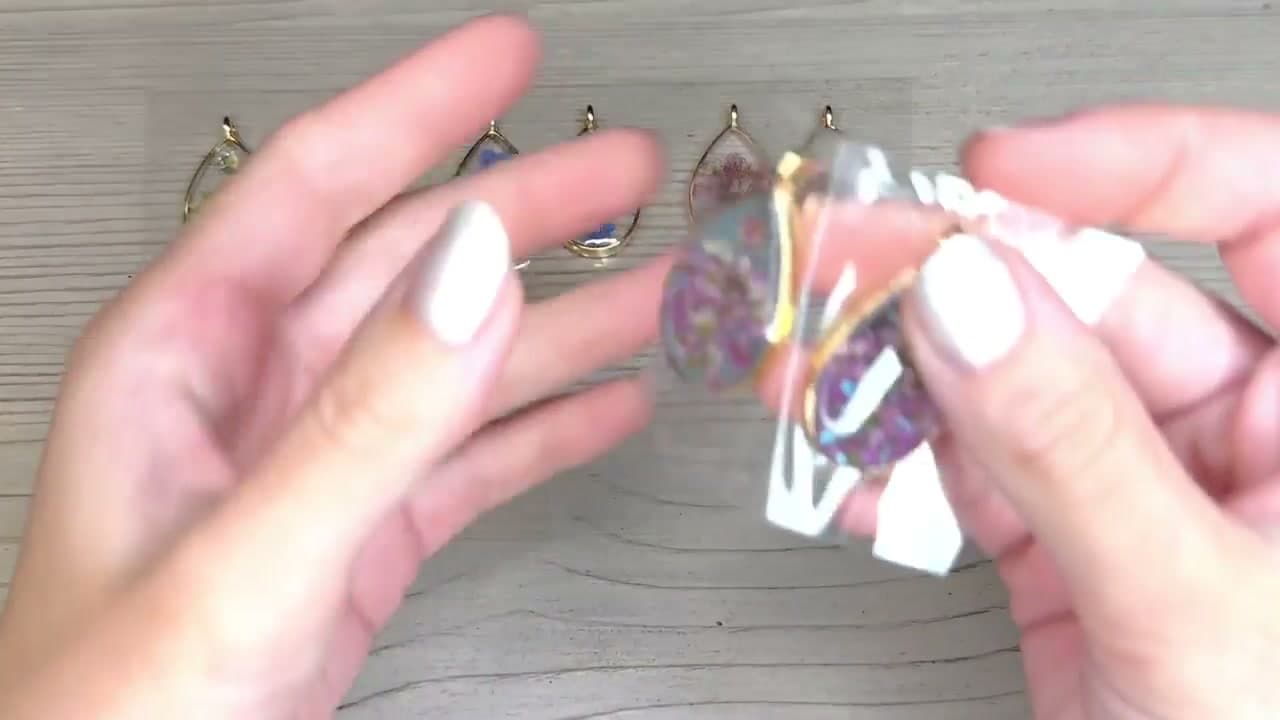
Grab some clear packing tape, the kind that's shiny on the outside. Cut two small strips and one long strip. Lay the long strip sticky-side up, then press the two small strips sticky-side down across its ends to pin it to the table.

This gives you a sticky platform that won't shift around while you work. The glossy surface is important: resin picks up every mark and bit of fuzz, so a clean, shiny tape gives you a smooth glassy back.

Tip

Watch this step Use fresh tape with no fingerprints or lint on the sticky side. Any scratch or speck transfers straight into the cured resin as a permanent flaw.

2

Step 2: Press the Open Frames onto the Tape

1:00
Step 2: Step 2: Press the Open Frames onto the Tape

Take your open earring frames (the metal bezels with no back) and press them firmly onto the sticky side of the tape. Make sure each one is flush, with no gaps along the edge.

The tape becomes the temporary back of the frame, so a tight seal is what stops the liquid resin from seeping out underneath. Press all the way around the rim.

Tip

Watch this step Run a fingernail around the inside edge of each frame to seal it. Even a tiny gap lets resin leak out and ruins the clean teardrop shape.

3

Step 3: Pour the First Layer of UV Resin

1:28
Step 3: Step 3: Pour the First Layer of UV Resin

Grab your UV resin and pour a thin first layer into each frame. This becomes the back layer, sealing the frame and giving the flowers something to sit on later.

You only need enough for a thin coat. Don't overfill, you're building this up in layers, and a thin base cures fast and clear.

Tip

Watch this step UV resin is thinner than two-part epoxy and cures in minutes under a lamp, which is what makes this project doable in one sitting. Work in a well-ventilated spot.

4

Step 4: Spread the Resin to Every Edge

2:04
Step 4: Step 4: Spread the Resin to Every Edge

Take a toothpick and drag the resin out to the full perimeter of each frame. You want it covering the entire inside edge, right up to the metal.

This base layer is what keeps all the later resin in, so don't leave any bare spots along the rim. Work the resin into the points of the teardrop where it likes to pull away.

Tip

Watch this step A wooden toothpick is the perfect cheap tool here. Use a fresh one for each color so you don't drag tinted resin into a clear frame.

5

Step 5: Pop the Bubbles

2:46
Step 5: Step 5: Pop the Bubbles

Look for any bubbles around the frame. Nudge them toward the center with your toothpick, then take a lighter and do a quick swoop of the flame just over the surface. The heat pops the bubbles almost instantly.

Keep the flame moving and quick. You're warming the surface for a second, not holding it there, so the resin stays clear and doesn't scorch.

Tip

Watch this step A long-reach lighter or a small butane torch gives you more control and keeps your fingers away from the flame. One fast pass is all it takes.

6

Step 6: Cure the First Layer Under the UV Lamp

2:55
Step 6: Step 6: Cure the First Layer Under the UV Lamp

Set your UV lamp over the earrings for about a minute to cure that first layer. Curing time depends on how thick you poured, so thicker layers need a few extra minutes.

You'll know it's done by the stickiness. Touch the edge with a toothpick, if there's any tack at all, give it more time under the lamp until it's completely dry to the touch.

Tip

Watch this step Sunlight works in a pinch but is slow and uneven. A dedicated UV/LED resin lamp cures hard and clear every time and is the single best upgrade for resin jewelry.

7

Step 7: Arrange the Dried Flowers

3:40
Step 7: Step 7: Arrange the Dried Flowers

Once the base layer is fully cured and not sticky, start placing your dried flowers into the frames over the top of it. Use tweezers for control, real pressed flowers are delicate.

Play with the layout before you commit. Face the prettiest blooms up, since they'll be locked in exactly as you place them once the next resin layer goes on.

Tip

Watch this step Press each flower gently down into the cured layer so it lies flat. Flowers that stick up get trapped as bubbles or poke through the final surface.

8

Step 8: Add Stones and the Final Resin Layer

4:03
Step 8: Step 8: Add Stones and the Final Resin Layer

For extra sparkle, drop a few iridescent stones or tiny rhinestones into the frames alongside the flowers. Then pour a little more resin over everything to fill the frame up to the top.

Pop any new bubbles with the lighter again, then cure under the UV lamp for a few minutes. Some frames may need one more thin top-up layer to reach a full, domed surface.

Tip

Watch this step Fill just slightly above the metal rim so the resin domes a touch as it cures. That little dome is what gives finished resin jewelry its glassy, professional look.

9

Step 9: Peel the Tape and Clean the Backs

5:14
Step 9: Step 9: Peel the Tape and Clean the Backs

When everything is fully cured, peel the tape off the back of each frame. The back should come away smooth and glossy from the shiny tape.

If there's any sticky residue, rub it off with a little rubbing alcohol on a paper towel. If a back isn't as glossy as you'd like, brush on one thin top coat of resin and cure it again.

Tip

Watch this step Peel slowly and evenly. Yanking the tape can flex a thin piece and crack it, especially on the narrow point of a teardrop.

10

Step 10: Attach the Earring Hooks

6:12
Step 10: Step 10: Attach the Earring Hooks

Open the loop on each earring hook with a gentle twist (open it sideways, not by pulling it apart), slip the finished frame onto the loop, and close it back up.

That's it. Both earrings are done and ready to wear or give away. Hang them on a little display card and they look like something from a boutique.

Tip

Watch this step A pair of jewelry pliers makes opening and closing the hook loops clean and prevents the metal from kinking. Open the loop sideways to keep its round shape.

Products Used

☐ The Checklist

How to Make UV Resin Flower Earrings (DIY Tutorial)

Tools
7
Materials
7
Steps
10
Video
7 min

Your Guide

MarinaMakesArt

As an Amazon Associate we earn from qualifying purchases. Links on this page may be affiliate links - clicking them and buying doesn't change your price, but helps support ShowMeStepByStep.

Tags

Test your knowledge

Did the lesson stick? Find out in 2 minutes.

5 quick questions covering what you just read. No signup, no score saved — just a gut check.

Quick reference

Key takeaways from How to Make UV Resin Flower Earrings (DIY Tutorial)

5 questions, answers, and one-line explanations. Tap to expand.

  1. 1.What does the packing tape do in this project, sticky-side up?

    Answer: Becomes a glossy temporary back

    The shiny side of packing tape pressed firmly against each open bezel becomes the glossy temporary back, so the resin doesn't leak out underneath.

  2. 2.What cures the resin in this project?

    Answer: A UV lamp

    UV resin cures in minutes under a small UV/LED lamp. Sunlight works in a pinch but is slow and uneven.

  3. 3.Why pour the resin in layers instead of one thick pour?

    Answer: Thin layers cure fast and clear

    A thin cured base layer gives the flowers something to sit on. Pour everything at once and the flowers float, sink, or trap bubbles.

  4. 4.How do you get bubbles out of the surface of the resin?

    Answer: A quick swoop of a lighter flame

    Nudge bubbles toward the center with a toothpick, then do a fast pass over the surface with a lighter or small butane torch. The heat pops them instantly.

  5. 5.How do you open an earring hook loop without ruining its shape?

    Answer: Twist it sideways with pliers

    Twisting the loop sideways keeps it round. Pulling it apart flattens the loop into an oval and you can't get it back.

What's next

Related collections

Curated theme pages that include this tutorial.

Weekly Digest

Liked this resin art tutorial?

Pick the categories you want to hear about. Weekly digest of new step-by-step tutorials. No spam, easy unsubscribe.

Send me tutorials about

We only email about new tutorials. Easy unsubscribe anytime.