How to Make Sidewalk Chalk With Plaster of Paris and Paint

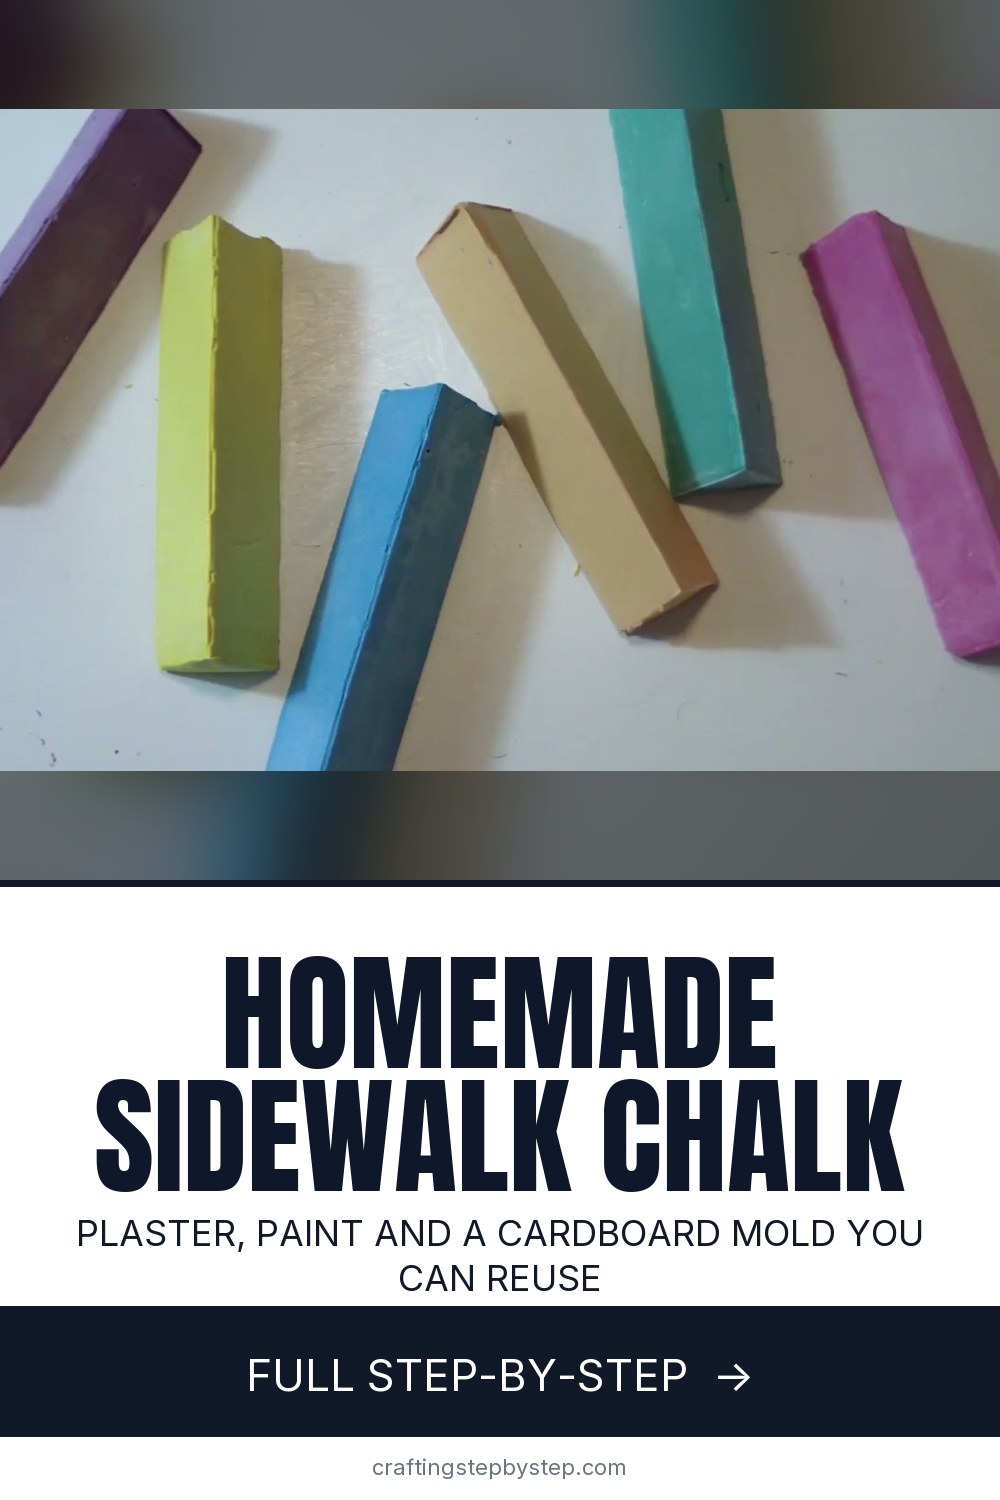
The finished result: How to Make Sidewalk Chalk With Plaster of Paris and Paint
  • Difficulty: Easy
  • About 1 hour, plus 2 hours to dry or set
  • 10 steps

You tapped Save

Save this project for later

We'll email you a link, no password.

How to Make Sidewalk Chalk With Plaster of Paris and Paint

  • Your saved projects in one list
  • Your ticked steps on any device

Check your inbox for an email from us. Not there? Look in your spam folder.

Print

Steps written out by Crafting Step by Step from Fantasvale Art Lab's video (opens YouTube) (12:27). Published .

Store-bought sidewalk chalk is cheap, so why make your own? Because you get to choose the colors, the shape and the size, and kids love watching a soupy cup of plaster turn into a hard stick of chalk. The host of Fantasvale Art Lab adds a twist: instead of the usual round chalk from a paper roll, she folds reusable triangle molds from cardboard and tape. Six of them fit together in a mug like slices of a pie.

How to make sidewalk chalk: what you need

  • Plaster of Paris (finer and whiter than builder's plaster)
  • Water
  • Tempera or poster paint for color
  • Thin cardboard (a cereal box or the back of a notepad)
  • Packing tape, duct tape, a craft knife, ruler and pencil
  • Plastic cups and a knife or palette knife to fill the molds

Getting the mix right

Most plaster of Paris boxes call for about 2 parts plaster to 1 part water. Add water a little at a time until it looks like thick pancake batter. Then stir in the paint. Paint adds liquid, so you may need a spoonful more plaster to thicken it back up. Work quickly. Plaster starts to set in about 10 to 20 minutes, so mix one color at a time.

ProblemLikely cause
Chalk crumblesToo much water or paint
Too hard, barely marksNot enough paint, too little water
Holes in the chalkAir bubbles, tap the mold more
Pale colorAdd more paint, or use darker shades

Why the triangle mold works

Toilet paper rolls are the classic chalk mold, but the video shows the problem: the chalk sticks, and you end up cutting the roll off and scarring the chalk. A taped mold is waterproof and opens like a book, so the chalk slides out smooth. You can reuse it again and again. If you want round chalk, slit a roll lengthwise, tape it waterproof and give it the same hinge.

Safety notes

Plaster dust should not be breathed in, so mix it yourself and pour gently. Plaster warms up as it sets. That is normal. Never pour leftover plaster down the sink, because it hardens in the pipes. Let it set in the cup and throw it in the trash. The finished chalk is not food, so keep an eye on toddlers.

Colors and ideas

Mix your own pastels. In the video, pink plus a little blue becomes lilac, and yellow added to blue for green. Try school colors, holiday colors or one stick for each grandchild in their favorite shade. A mug of six triangle chalks with a ribbon makes a sweet small gift for a summer birthday or a teacher.

How long it takes

Folding and taping six molds takes about half an hour the first time. Mixing and filling six colors takes another 20 minutes. The chalk is firm in a couple of hours, but it is stronger if you leave it overnight before the kids take it out on the driveway.

More kids crafts to try

On a rainy day, swap the sidewalk for the kitchen table with homemade playdough or slime. Older kids will love tie-dyeing a shirt, and salt dough ornaments are another mix, mold and paint project.

Free printable

Print the steps and supply list for this project

One page you can take to the table. Free with a free account, no password.

Get the free printable

What you'll need

Free, for this project

Get this checklist by email

  • All 13 tools and materials, with tick boxes
  • A link to print all 10 steps on paper, to keep by you while you craft

No password. The whole tutorial stays free on this page.

Quick answer

How to make sidewalk chalk with plaster of Paris and tempera paint, cast in reusable triangle molds you fold from cardboard and tape. An easy project: about 1 hour, plus 2 hours to dry or set. Materials cost about $5 to $12. You need 13 things, including plaster of Paris, tempera or poster paint and water. The 10 steps start with cut Cardboard Pieces for the Sidewalk Chalk Molds and mark the Fold Lines on Each Chalk Mold Piece.

Step-by-step guide

10 steps, about 12 minutes. Tap a picture to jump to that step. Your progress saves automatically.

Tick each step off as you go.

  1. Step 1: Cut Cardboard Pieces for the Sidewalk Chalk Molds

    Watch this step · 1:40

    Take a sheet of thin cardboard about the size of printer paper. A cereal box or the back of a notepad is perfect. Divide it into six equal pieces with a pencil and ruler and cut them out with a craft knife on a cutting mat. Each piece is roughly 4 by 3.5 inches (10.5 by 9 cm) and makes one chalk mold.

    Tip:

    Recycled cardboard works fine here. It gets covered in tape anyway.

    Back to all steps

  2. Step 2: Mark the Fold Lines on Each Chalk Mold Piece

    Watch this step · 2:00

    On each piece, mark the long side into three equal strips, about 3 cm each. Draw two lines with a pencil against a ruler. Then run the back of the knife lightly along each line to score it. Scoring makes a clean crease, so the mold folds into a neat triangle instead of a crumpled one.

    Tip:

    Score, do not cut. You only want to dent the top layer of cardboard.

    Back to all steps

  3. Step 3: Crease the Cardboard to Shape the Triangle Chalk Mold

    Watch this step · 2:24

    Bend the cardboard along both scored lines. The three strips fold into a long, hollow triangle, and this becomes the shape of your chalk. Press each crease firmly with your fingers. A triangle chalk is comfy for small hands to hold and gives you thin lines from the edges and wide lines from the flat sides.

    Tip:

    Fold back and forth once or twice so the cardboard stays put once taped.

    Back to all steps

  4. Step 4: Waterproof the Chalk Mold With Packing Tape

    Watch this step · 2:48

    Lay the piece flat again and cover the whole surface with plastic packing tape, then turn it over and cover the other side too. The wet plaster would soak plain cardboard and stick. Shiny plastic tape keeps it waterproof and lets the chalk slide out. Trim the extra tape with the knife and fold the mold back into its triangle.

    Tip:

    Use plasticky packing tape, not paper masking tape. Clear or brown both work.

    Back to all steps

  5. Step 5: Tape the Hinge and Seal the Bottom of the Chalk Mold

    Watch this step · 4:36

    Close the triangle and add a small strip of tape along the open edge. That acts as a hinge, so the mold opens and closes like a book. For the bottom, press a square of duct tape over one end, snip its corners and fold them up the sides. Add a second piece for extra strength so no plaster leaks out.

    Tip:

    Stand the mold up and check for gaps at the corners before you pour.

    Back to all steps

  6. Step 6: Measure Plaster of Paris for the Sidewalk Chalk

    Watch this step · 5:36

    Put a few spoonfuls of plaster of Paris into a plastic cup. Plaster of Paris is finer and whiter than ordinary plaster, so the colors stay bright. Add water a little at a time and stir until it is smooth and creamy, like thick pancake batter. Follow the box for the ratio. Most call for about 2 parts plaster to 1 part water.

    Tip:

    Pour the powder gently and keep your face back from the cup to avoid the dust.

    Back to all steps

  7. Step 7: Color the Plaster With Tempera Paint

    Watch this step · 5:52

    Squeeze in some tempera or poster paint and stir until the color is even. Cheap paint works well here. You can mix your own shades too: a little blue into pink makes lilac, and a little yellow into blue makes green. If the paint makes the mix too runny, stir in a spoonful more plaster.

    Tip:

    Mix one color at a time. Plaster starts to set in 10 to 20 minutes.

    Back to all steps

  8. Step 8: Fill the Chalk Mold and Tap Out the Air Bubbles

    Watch this step · 6:42

    Spoon the colored plaster into the mold with a knife or palette knife until it reaches the top. Then tap the mold firmly on the table several times. Air bubbles rise to the surface. Top up with a little more plaster and tap again. Repeat with the other molds and colors, then stand them upright in a mug to dry.

    Tip:

    Bubbles left inside become holes, and holes are where chalk snaps.

    Back to all steps

  9. Step 9: Open the Mold and Release the Homemade Chalk

    Watch this step · 10:52

    Let the chalk set for a couple of hours until it is hard and dry to the touch. Peel the duct tape off the bottom, then open the mold along its hinge. The chalk slides out with a smooth, shiny surface. Keep the molds. Re-tape the bottoms and you can make another batch any time.

    Tip:

    Let the chalk dry another day before heavy use on rough pavement. It gets stronger.

    Back to all steps

  10. Step 10: Test Your Homemade Sidewalk Chalk

    Watch this step · 12:00

    Try each stick on paper or the sidewalk. The pointed edge draws thin lines, and the flat side shades big areas fast. The colors come out bright. Store the chalks standing up together in a mug, glass or jar, where the triangles fit side by side like a pie. Then head outside and draw.

    Tip:

    Wet the pavement first for extra bold, bright colors that look like paint.

    Back to all steps

How to Make Cloud Dough: Basic, Colored and Chocolate

Keep going

How to Make Cloud Dough: Basic, Colored and Chocolate

9 steps · about 5 minutes

Keep going with crafts

More on this topic, picked for this project.

You reached the last step

Save this project to come back to it

Your ticked steps, the free printable and your other saved makes, together in My Projects. Free, no password.

You tapped Save

Save this project for later

We'll email you a link, no password.

How to Make Sidewalk Chalk With Plaster of Paris and Paint

  • Your saved projects in one list
  • Your ticked steps on any device

Check your inbox for an email from us. Not there? Look in your spam folder.

Free printable

Printable sheet and shopping list for this project

The bonus is hidden until you sign up.

Free with a free account, no password. Every step above stays open to everyone.

Products Used

The Checklist

How to Make Sidewalk Chalk With Plaster of Paris and Paint

Tools
7
Materials
6
Steps
10
Video
12 min

Tools we recommend

As an Amazon Associate we earn from qualifying purchases. Links on this page may be affiliate links - clicking them and buying doesn't change your price, but helps support Crafting Step by Step.

Tags

The Crafter's Weekly

New crafts tutorials, every Sunday

One short email with the week's best step-by-step guides. Free, no spam, unsubscribe anytime.

Did this work for you?

What's next

Related collections

Curated theme pages that include this tutorial.

Similar tutorials

Hand-picked next reads based on the one you just finished.

Liked this crafts tutorial?

Pick the crafts you want to hear about. One email every Sunday with new step-by-step tutorials. No spam, easy to unsubscribe.

Get more like this in your inbox

Weekly digest. Pick the categories you want. Unsubscribe anytime.

Send me tutorials about

We only email about new tutorials. Easy unsubscribe anytime.