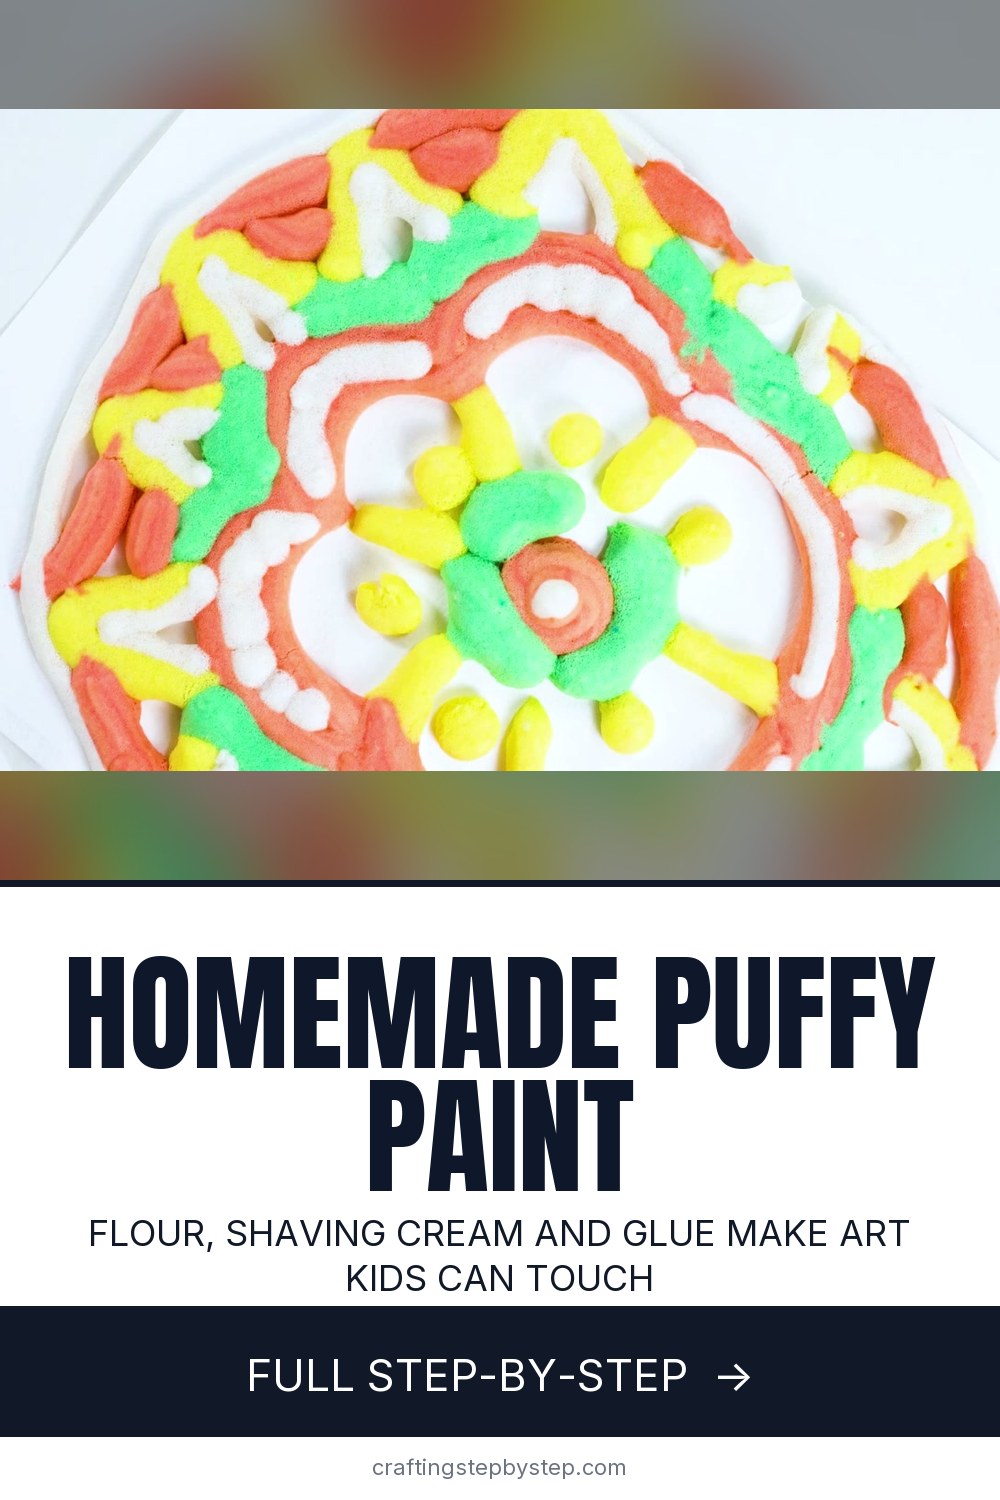
How to Make Puffy Paint With Shaving Cream, Glue and Flour

The finished result: How to Make Puffy Paint With Shaving Cream, Glue and Flour
  • Difficulty: Easy
  • About 40 minutes, plus 12 hours to dry or set
  • 10 steps

You tapped Save

Save this project for later

We'll email you a link, no password.

How to Make Puffy Paint With Shaving Cream, Glue and Flour

  • Your saved projects in one list
  • Your ticked steps on any device

Check your inbox for an email from us. Not there? Look in your spam folder.

Print

Steps written out by Crafting Step by Step from The Artful Parent's video (opens YouTube) (6:00). Published .

Puffy paint is the kind of craft kids remember. You squeeze it out like frosting, it stands up off the page, and it gets even puffier as it dries. The Artful Parent makes it with four things from the kitchen and the bathroom cabinet: flour, shaving cream, white glue and food coloring. It takes about ten minutes to mix and one afternoon of happy squeezing.

How to make puffy paint: the recipe

  • 1 cup all-purpose flour
  • 3 cups foaming shaving cream (the foam kind, not gel)
  • 1 cup white school glue (PVA)
  • Food coloring or liquid watercolors

This makes enough for four or five colors and several pictures. Halve it for one or two children.

Why it puffs

Shaving cream is mostly tiny air bubbles. The glue coats those bubbles and the flour thickens the mix so it holds its shape. As the water dries out, the glue sets around the air and leaves a light, spongy, raised line. That is also why it needs a stiff surface. Thin paper curls as the glue shrinks.

Bags, bottles or brushes

Zipper sandwich bags are the easiest: fill, seal, snip a corner. Piping bags give a neater line and are easier for small hands to squeeze. Old squeeze bottles work too if the paint is a touch thinner. You can also spread it with a craft stick or brush for a textured fill instead of lines.

Fixing the consistency

ProblemFix
Runny, lines spread flatStir in a spoonful of flour
Too stiff to squeezeAdd a little more shaving cream
Not puffyFresh shaving cream, mixed gently
Pale colorsMore drops, or use liquid watercolors

Drying and keeping

Lay finished pictures flat somewhere they will not be bumped and let them dry overnight. Thick blobs can take a full day. Once dry, the paint is firm but still soft and squishy to the touch. Mixed paint does not keep well, so make it the day you plan to use it.

Picture ideas

  • Rainbows and clouds. The classic. White puffy clouds feel like cotton.
  • Snowmen and snowflakes. White paint on blue or black card for winter.
  • Ice cream cones. Squiggly scoops look good enough to eat.
  • Names and letters. A raised, touchable name sign for a bedroom door.
  • Handmade cards. A puffy heart or tree on folded card stock.

Is it the same as store-bought puffy paint?

No. Store puffy paint for T-shirts is an acrylic fabric paint that survives the wash. This homemade version is for paper and card. It will crack and wash out of fabric, so save the kitchen recipe for pictures and keep a bottle of fabric paint for clothes.

A note for grown-ups

Shaving cream and glue are not food, so keep an eye on little ones who like to taste. Cover the table with a tray, mat or old tablecloth. If someone has sensitive skin, try an unscented shaving foam.

More messy crafts to try

If your crew loves this, mix up homemade playdough or slime next. Shaving cream also makes marbled paper, and salt dough ornaments make great keepsakes to paint.

Free printable

Print the steps and supply list for this project

One page you can take to the table. Free with a free account, no password.

Get the free printable

What you'll need

Free, for this project

Get this checklist by email

  • All 12 tools and materials, with tick boxes
  • A link to print all 10 steps on paper, to keep by you while you craft

No password. The whole tutorial stays free on this page.

Quick answer

How to make puffy paint with flour, shaving cream, glue and food coloring. An easy project: about 40 minutes, plus 12 hours to dry or set. Materials cost about $4 to $8. You need 12 things, including all-purpose flour, foaming shaving cream and white school glue. The 10 steps start with measure Flour Into a Bowl for Puffy Paint, add Shaving Cream to the Puffy Paint Flour and stir White Glue Into the Puffy Paint Mixture.

Step-by-step guide

10 steps, about 6 minutes. Tap a picture to jump to that step. Your progress saves automatically.

Tick each step off as you go.

  1. Step 1: Measure Flour Into a Bowl for Puffy Paint

    Watch this step · 1:40

    Put 1 cup of all-purpose flour into a large mixing bowl. Pick a big bowl. Shaving cream takes up a lot of room and you want space to stir without it spilling over. Have your measuring cup, a sturdy spatula and the shaving cream close by. Kids love helping measure, so let them level off the flour.

    Tip:

    A glass or plastic bowl is easier to clean than wood once the glue gets in.

    Back to all steps

  2. Step 2: Add Shaving Cream to the Puffy Paint Flour

    Watch this step · 1:54

    Measure 3 cups of foaming shaving cream and add it to the flour. Press it into the cup to get a real cupful, then scoop it out with the spatula. The foam is what makes this paint puff, so use the classic foam kind from a can. Gel shaving creams do not hold the air the same way.

    Tip:

    Spray the shaving cream into the cup slowly. Fast spraying leaves big air pockets.

    Back to all steps

  3. Step 3: Stir White Glue Into the Puffy Paint Mixture

    Watch this step · 2:08

    Add 1 cup of white school glue. Stir gently until there are no dry streaks of flour left and the mix looks like fluffy frosting. Fold rather than beat. Stirring too hard knocks the air out of the foam and you lose some of the puff. It should hold soft peaks on the spatula.

    Tip:

    Washable school glue cleans off hands and tables more easily than craft glue.

    Back to all steps

  4. Step 4: Divide the Puffy Paint Into Small Bowls

    Watch this step · 2:36

    If you want more than white, spoon the mixture into smaller bowls, one for each color. Four or five colors is plenty for a rainbow. Keep one bowl white. White puffy paint is great for clouds, snow and outlines, and it looks bright on dark paper. Scrape the big bowl clean so nothing goes to waste.

    Tip:

    Use small bowls with straight sides. They make it easier to scoop into bags later.

    Back to all steps

  5. Step 5: Color Each Bowl of Puffy Paint With Food Coloring

    Watch this step · 2:46

    Add a few drops of food coloring to each bowl and stir until the color is even. Liquid watercolors work too and give brighter shades. Go slowly. You can always add another drop, but too much liquid makes the paint runny. Mix red and yellow for orange, or blue and red for purple, if you are short on colors.

    Tip:

    Colors look lighter in the bowl than on paper once dry, so go a shade deeper.

    Back to all steps

  6. Step 6: Spoon the Puffy Paint Into Plastic Bags

    Watch this step · 3:08

    Scoop each color into its own sandwich bag or piping bag. Push the paint down toward one corner and squeeze out as much air as you can. Seal a sandwich bag, or twist the top of a piping bag and close it with a twist tie or rubber band. Write the color on the bag if they look alike.

    Tip:

    Stand the bag in a tall cup while you fill it. It stays open and upright.

    Back to all steps

  7. Step 7: Snip a Corner Off the Puffy Paint Bag

    Watch this step · 3:20

    Cut a small hole at the corner of each bag with scissors. Start tiny. A small hole gives a thin, controlled line, and you can always cut it bigger. A hole that is too big lets the paint gush out in one blob. An adult should do the cutting for young children.

    Tip:

    Snip at an angle for a slightly wider, flatter line, like a cake decorator.

    Back to all steps

  8. Step 8: Squeeze Puffy Paint Onto Sturdy Card Stock

    Watch this step · 4:00

    Cover your work surface with a tray or mat. Lay down a sheet of card stock or thick paper. Squeeze the bag gently from the top, the way you would a tube of toothpaste, and draw lines, swirls and dots. Bright colors pop against black card stock. Thin printer paper will wrinkle as the paint dries.

    Tip:

    Keep the bag tip a little above the paper, not touching it, for a rounder, puffier line.

    Back to all steps

  9. Step 9: Layer Puffy Paint Colors to Build a Rainbow

    Watch this step · 4:36

    Lay one color right beside the next and the lines will join into a thick, raised design. A rainbow is a perfect first picture. Do one arch at a time, red on the outside, then work your way in. Little ones can press the puffy lines with a finger to feel how soft they are.

    Tip:

    Draw a light pencil arch first if your child wants a guide to follow.

    Back to all steps

  10. Step 10: Finish the Puffy Paint Picture and Let It Dry Overnight

    Watch this step · 5:06

    Keep adding details until you are happy with the picture. Fish, flowers, names and patterns all work well. Then set it flat somewhere safe and let it dry overnight. The paint firms up and puffs a little more as it dries but stays soft and squishy to the touch. Write the date on the back.

    Tip:

    Dry it on a baking sheet so you can move it without bending the paper.

    Back to all steps

How to Make a Yarn Spider Web Decoration for Halloween

Keep going

How to Make a Yarn Spider Web Decoration for Halloween

Keep going with crafts

More on this topic, picked for this project.

You reached the last step

Save this project to come back to it

Your ticked steps, the free printable and your other saved makes, together in My Projects. Free, no password.

You tapped Save

Save this project for later

We'll email you a link, no password.

How to Make Puffy Paint With Shaving Cream, Glue and Flour

  • Your saved projects in one list
  • Your ticked steps on any device

Check your inbox for an email from us. Not there? Look in your spam folder.

Free printable

Printable sheet and shopping list for this project

The bonus is hidden until you sign up.

Free with a free account, no password. Every step above stays open to everyone.

Products Used

The Checklist

How to Make Puffy Paint With Shaving Cream, Glue and Flour

Tools
6
Materials
6
Steps
10
Video
6 min

Tools we recommend

As an Amazon Associate we earn from qualifying purchases. Links on this page may be affiliate links - clicking them and buying doesn't change your price, but helps support Crafting Step by Step.

Tags

The Crafter's Weekly

New crafts tutorials, every Sunday

One short email with the week's best step-by-step guides. Free, no spam, unsubscribe anytime.

Did this work for you?

What's next

Related collections

Curated theme pages that include this tutorial.

Similar tutorials

Hand-picked next reads based on the one you just finished.

Liked this crafts tutorial?

Pick the crafts you want to hear about. One email every Sunday with new step-by-step tutorials. No spam, easy to unsubscribe.

Get more like this in your inbox

Weekly digest. Pick the categories you want. Unsubscribe anytime.

Send me tutorials about

We only email about new tutorials. Easy unsubscribe anytime.