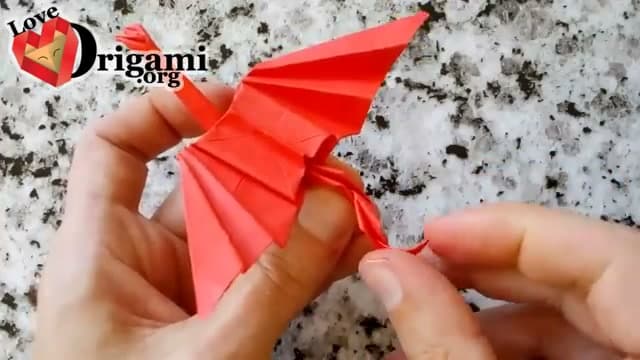
This dragon looks tricky, but it comes from a fold most paper crafters already know. Love Origami builds it on the traditional crane base, then reshapes the points into a neck, a tail, and two spread wings. One square sheet is all you need. No cuts, no glue.
The video moves slowly on purpose, so you can match each crease as you go. Take your time on the reverse folds near the end. That is where the flat shape lifts off the table and starts to look like a real dragon.
How hard is this origami dragon?
It is marked advanced, but that is mostly about patience. If you have folded an origami crane, you already know the first half of this model. The dragon uses the same preliminary base, the same squash and petal folds, and the same finished crane base. Where the crane stops, the dragon keeps going: the two bottom points get slimmed a second time, reverse folded up into a neck and tail, and the side flaps open into wings.
Never folded a crane? Start there. It takes ten minutes and teaches every hard move this dragon needs. An easier warm-up is the origami swan, which gets you used to folding edges tight to a center line.
What you need
- One square of origami paper, colored on one side, at least 15 cm (6 inches)
- A hard, flat surface
- A bone folder or the back of a spoon for sharp creases (optional)
Paper size: bigger is easier
Use 15 cm paper as your minimum. The head is formed from the very tip of a point that has already been folded in half several times, so on a small sheet you are pinching layers the size of a grain of rice. A 20 or 25 cm square gives your fingers room and makes the reverse folds far more forgiving.
Thin paper matters more than size. Standard kami origami paper is ideal. Printer paper works for a practice run once you trim it square, but it is thick enough to bunch where the layers stack up at the neck. Skip cardstock entirely.
Shaping the head, wings and tail
The folds give you a dragon. The shaping makes it look alive. A few things that help:
- Neck: reverse fold it higher and more upright than feels natural. A low neck reads as a bird.
- Head: keep the head fold short. A long head looks like a beak.
- Wings: curve each wing gently over a table edge or a pencil, then pinch a crease along the top edge so it holds the arch.
- Tail: a second small reverse fold near the tip gives it a flick instead of a straight spike.
Harder dragons to try next
Once this one comes out clean, there is a long ladder to climb. The next step up is a dragon with separate legs, which starts from a bird base but adds extra petal folds on the lower flaps. Beyond that are box-pleated dragons with scales, claws and horns folded from a single large sheet. Those take hours and paper 35 cm or bigger. If you want something quicker to fold while you practice, a paper ninja star or an origami butterfly sharpens your creasing in a few minutes.
Common mistakes and how to fix them
- Paper bunching at the head. Too many layers in too small a space. Go up a paper size or switch to thinner paper, and pre-crease the head fold by bending it back and forth before reversing it.
- Lopsided base. If one bottom point is longer than the other, the dragon leans. Check the two points against each other after the crane base, before you slim them. Fix it there, not later.
- Soft creases. A puffy crane base makes every later fold drift. Run a fingernail along each crease as you go.
- Torn paper at the petal fold. Usually the fold was forced before the creases were set. Crease every line, then collapse.
- Wings that flop. Give them a small pinch crease where they meet the body.
Your second dragon always comes out cleaner than your first.