How to Draw a Raven (Realistic Pencil Sketch)

Save it for later. We'll email you a link, no password.

Find it again on your phone or computer, with your finished steps ticked.

You tapped Save

Save this project for later

We'll email you a link, no password.

How to Draw a Raven (Realistic Pencil Sketch)

  • Your saved projects in one list
  • Your ticked steps on any device

Check your inbox for an email from us. Not there? Look in your spam folder.

  • 10 steps
  • 15:26 video
  • Difficulty: Medium
  • About 1 hour
  • Crafts

Based on a video by Cartooning Club XL

Opens their YouTube channel

Steps written out by Crafting Step by Step · Published

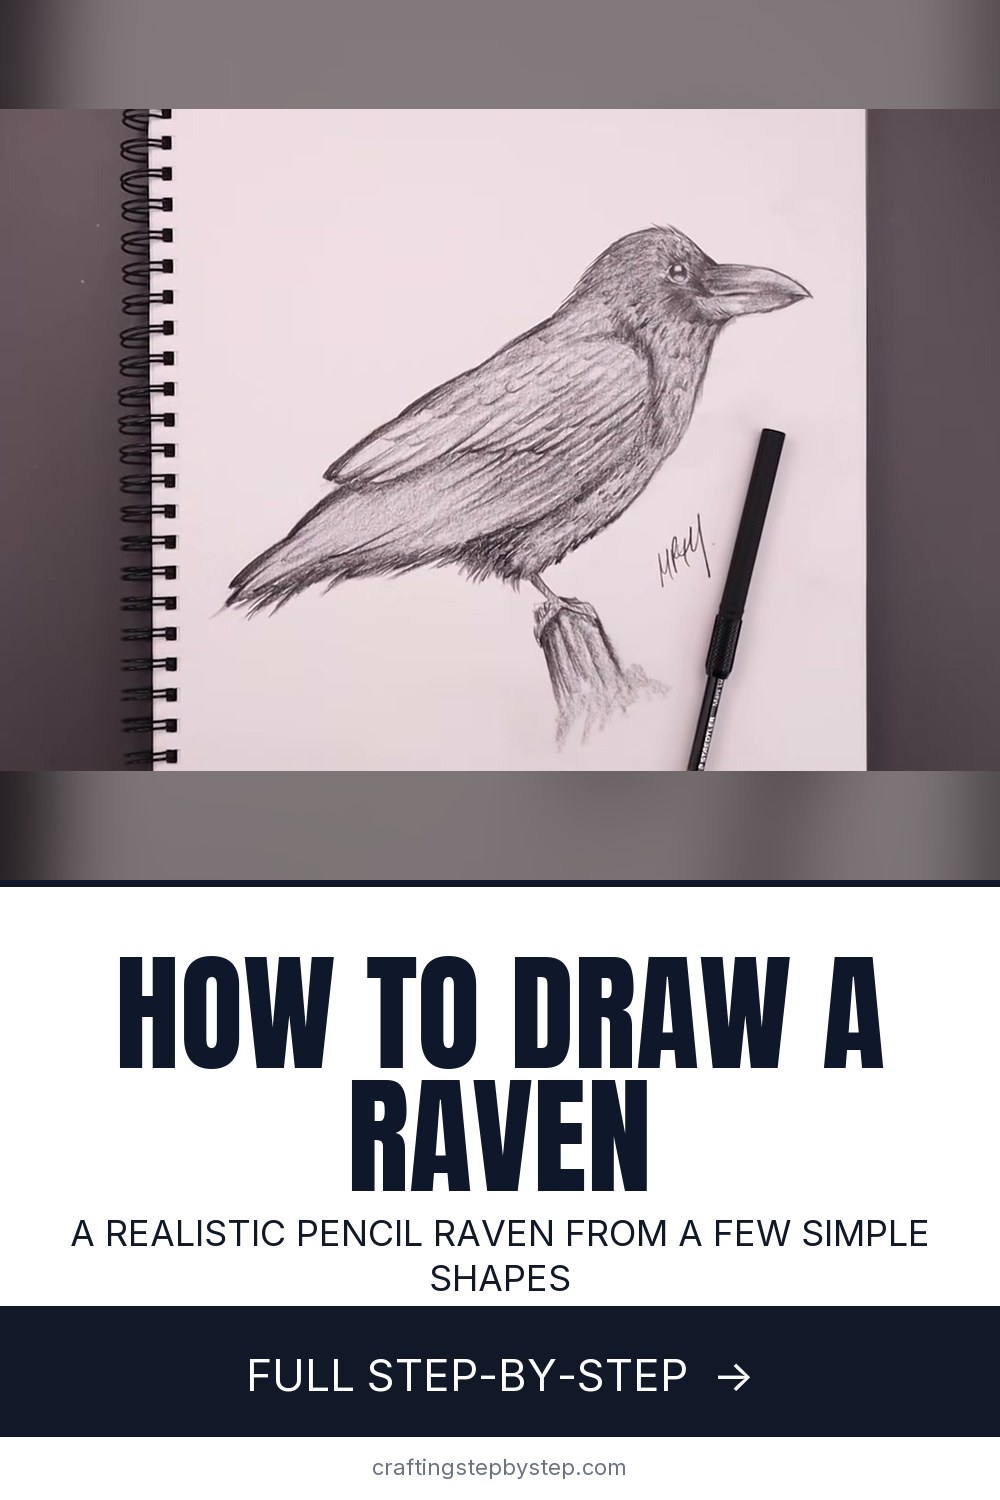
The finished result: How to Draw a Raven (Realistic Pencil Sketch)

Ravens are a favorite drawing subject in the fall. They suit Halloween cards, autumn journals and any page that needs a little drama. This pencil sketch from Cartooning Club XL builds a realistic raven from a few simple shapes, then adds shading and feather texture one layer at a time. You need a pencil, an eraser and some patience. No drawing experience required.

How to draw a raven: the plan

  • Block in the bird with a circle, two straight lines and a curve.
  • Add the wing, the leg and a heavy, hooked beak.
  • Shade the whole body lightly with the side of the pencil.
  • Build up dark feather texture on the head, then the wings and tail.

Raven or crow?

They look alike on paper. A raven is bigger, with a thicker, more curved beak, shaggy feathers at the throat and a wedge-shaped tail. A crow has a slimmer beak, a smoother neck and a fan-shaped tail. Draw the beak heavier and add ruffled throat feathers to make your bird read as a raven.

Pencils to use

An HB or 2B pencil is perfect for the light guide lines because it erases cleanly. Switch to a soft 4B, 6B or 8B for the dark feathers. Ravens are black, so most of the work is building up dark values without losing the shape. A kneaded eraser lifts highlights back out of dark areas, and a paper blending stump softens the base shading.

Drawing black feathers that still look like feathers

A raven is not flat black. Its feathers shine with a blue-purple gloss. Leave thin streaks of light grey along the top edges of the wing feathers and on the crown, and keep a bright dot in the eye. Press harder where feathers overlap and lighter on the edges that catch the light. That contrast is what makes the bird look glossy instead of like a silhouette.

Getting the proportions right

The head circle sets the scale for everything else. The body runs about three head widths from the neck to the tail tip, and the beak is nearly as long as the head is wide. If the bird looks off, check those three measurements before you start shading. It is much easier to fix a guide line than a finished feather.

How long it takes

The shapes take about five minutes. The shading and feathers take the rest, so plan on an hour or more for a finished sketch. Pause the video and work at your own pace.

Common mistakes

  • Dark guide lines. Press lightly at the start. Heavy sketch lines show through the shading.
  • A tiny beak. Ravens have big, heavy beaks. Make it longer than feels right.
  • Smudged highlights. Rest your hand on a scrap of paper so you do not drag graphite across the page.

Ideas for your raven

Draw it on cream card for a Halloween invitation, add a full moon behind it, or perch it on a pumpkin. Frame a finished sketch for October, or teach it to a grandchild as a fall art afternoon.

Keep practicing birds with our guides to drawing a bird, a cardinal and an owl. For darker, smoother feathers, brush up on shading with pencil.

What you'll need

Free, for this project

Get this checklist by email

  • All 4 tools and materials, with tick boxes
  • A link to print all 10 steps on paper, to keep by you while you craft

No password. The whole tutorial stays free on this page.

Quick answer

How to draw a raven step by step in pencil: block in simple shapes, shape the heavy beak, then layer glossy black feathers. A medium project: about 1 hour. You need 4 things, including sketchbook or drawing paper, graphite pencils and kneaded eraser. The 10 steps start with sketch a Circle for the Raven's Head, draw the Raven's Back and Tail Guide Lines, curve the Raven's Body Under the Tail and draw the Raven's Wing Inside the Body.

Step-by-step guide

10 steps, about 15 minutes. Tap a picture to jump to that step. Your progress saves automatically.

Tick each step off as you go.

  1. Step 1: Sketch a Circle for the Raven's Head

    Watch this step · 0:16

    Start at the top right of your page. Using light pressure, sketch a loose circle for the raven's head. Work from the top around to the bottom on both sides. It does not need to be a perfect circle. What matters is the size and the position, because the whole bird is measured from this shape. Leave plenty of room to the left for the body and tail.

    Tip:

    Hold the pencil near the end for loose, light guide lines.

    Back to all steps

  2. Step 2: Draw the Raven's Back and Tail Guide Lines

    Watch this step · 0:48

    From the left side of the head circle, draw a long, straight, angled line down and to the left. This is the raven's back running to the tip of the tail. Then from the same point on the circle, draw a straight line across to the right, a little past the circle. That line helps you place the eye and beak later.

    Tip:

    Keep the back line fairly steep. A flat line makes the bird look like it is lying down.

    Back to all steps

  3. Step 3: Curve the Raven's Body Under the Tail

    Watch this step · 1:12

    Find the halfway point of the back line and mark it. From that mark, draw a curve that dips down for the belly and sweeps up to the right side of the head circle. This tucks the body in under the tail. You should now see a rounded body, a long tail and a head, all from three simple shapes.

    Tip:

    Erase and redraw the curve until the body looks plump, not thin.

    Back to all steps

  4. Step 4: Draw the Raven's Wing Inside the Body

    Watch this step · 1:28

    Start up on the back, close to the head, and curve a line down toward the bottom of the circle. Round it out along the bottom of the body, then bend it back out toward the tail. This is the inside edge of the folded wing. It covers most of the body, which is how a resting raven looks from the side.

    Tip:

    The wing tip should reach most of the way to the end of the tail.

    Back to all steps

  5. Step 5: Add the Raven's Leg, Perch and Beak Guide

    Watch this step · 2:10

    Under the body, curl a small shape down and back up for the top of the leg. Angle the leg forward, then block out a stump for the raven to stand on. Use a straight line on the left and widen it out on the right. Then go back to the head and draw a half circle at the front where the beak will join.

    Tip:

    A stump or branch gives the bird something to stand on and grounds the drawing.

    Back to all steps

  6. Step 6: Shade the Raven's Body With the Side of the Pencil

    Watch this step · 3:12

    Shape the heavy beak, bending the top line down to a hooked tip, and add a small circle for the eye. Round out the back of the neck and the head under the beak. Now tilt your pencil and use the side of the lead to lay a light, even grey over the whole body. This base tone means you never have stark white patches later.

    Tip:

    Shade in one direction, following the slope of the body.

    Back to all steps

  7. Step 7: Draw the Raven's Eye With a Highlight

    Watch this step · 3:36

    Switch to the sharp tip of the pencil. Trace the eye circle, then draw a tiny circle near the top for the highlight. Add a curve along the bottom of the eye. Fill in the center dark, working around the highlight so it stays white paper. That small white dot is what brings the raven to life, so protect it.

    Tip:

    If you fill the highlight by mistake, dab it out with a pointed kneaded eraser.

    Back to all steps

  8. Step 8: Shade the Raven's Heavy Beak

    Watch this step · 4:56

    Work across the beak with the tip of the pencil, then use the side of the lead to add texture inside it. Make the beak dark, but leave a lighter strip along the top edge where light hits it. Darken the line where the two halves of the beak meet. Ravens have big, strong beaks, so let it be bold.

    Tip:

    A slightly curved top edge reads as raven. A straight one reads as crow.

    Back to all steps

  9. Step 9: Build Dark Feather Texture on the Raven's Head

    Watch this step · 7:25

    Add short, flicked strokes across the top of the head so the feathers stand up a little. Then use a soft pencil to build texture and contrast around the eye, starting dark along the top and left side and working toward the eye. Add rough, shaggy strokes down the throat, a classic raven feature. Keep the strokes following the direction the feathers grow.

    Tip:

    Darken in layers. Several light passes beat one heavy one.

    Back to all steps

  10. Step 10: Layer the Raven's Wing and Tail Feathers

    Watch this step · 10:00

    Move down to the wing. Add volume with darker shading, then draw the long feathers in layers, each row overlapping the one behind it. Press hardest in the shadows between feathers and leave lighter edges on top for that glossy look. Carry the strokes into the tail. Finish by tightening the detail, adding contrast and signing your drawing.

    Tip:

    Step back every few minutes to check the darks are balanced across the bird.

    Back to all steps

How to Draw a Christmas Ornament

Keep going

How to Draw a Christmas Ornament

You reached the last step

Save this project to come back to it

Your ticked steps, the free printable and your other saved makes, together in My Projects. Free, no password.

You tapped Save

Save this project for later

We'll email you a link, no password.

How to Draw a Raven (Realistic Pencil Sketch)

  • Your saved projects in one list
  • Your ticked steps on any device

Check your inbox for an email from us. Not there? Look in your spam folder.

Products Used

The Checklist

How to Draw a Raven (Realistic Pencil Sketch)

Tools
3
Materials
1
Steps
10
Video
15 min

Tools we recommend

As an Amazon Associate we earn from qualifying purchases. Links on this page may be affiliate links - clicking them and buying doesn't change your price, but helps support Crafting Step by Step.

Tags

The Crafter's Weekly

New crafts tutorials, every Sunday

One short email with the week's best step-by-step guides. Free, no spam, unsubscribe anytime.

Did this work for you?

What's next

Related collections

Curated theme pages that include this tutorial.

Similar tutorials

Hand-picked next reads based on the one you just finished.

Liked this crafts tutorial?

Pick the crafts you want to hear about. One email every Sunday with new step-by-step tutorials. No spam, easy to unsubscribe.

Get more like this in your inbox

Weekly digest. Pick the categories you want. Unsubscribe anytime.

Send me tutorials about

We only email about new tutorials. Easy unsubscribe anytime.