How to Make Air Dry Clay Ornaments for Christmas
Source: Chalking Up Success! • Full tutorial: www.craftingstepbystep.com/pottery/how-to-make-clay-christmas-ornaments
- Difficulty
- Easy
- Hands-on time
- About 30 minutes
- Wait time
- 48 hours
- Cost
- About $8 to $15
- Makes
- a set of about 4 to 6 ornaments

Tools
- Glass bottle or acrylic clay roller
- Wooden thickness guides
- Ornament-shaped cookie cutter
- Metal straw
- Letter stamp set
- Embossed rolling pin (optional)
- Ceramic tile or silicone craft mat
- Small bowl and damp sponge
- Old towel
Materials
- Air dry clay
- Evergreen sprigs
- Lace ribbon
- Jute twine
- White wooden beads
- Wax paper or baking parchment
Steps
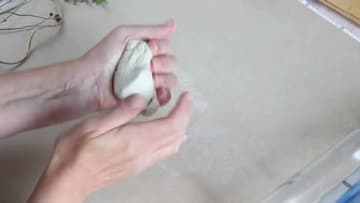
1. Knead the Air Dry Clay Until It Softens
Cut a chunk off the block with a knife and work it between both hands until it warms up and the surface stops cracking at the edges. Straight out of the packet the clay is stiff and a little crumbly.
Tip: Keep an old towel within reach. Air dry clay leaves a film on your hands that dries to a crust, and wiping as you go beats scrubbing at the end.
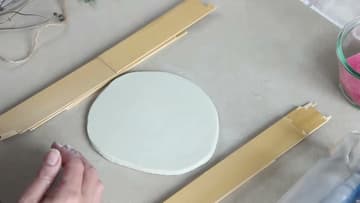
2. Roll the Clay Flat Between Two Thickness Guides
Lay a wooden guide on either side of the clay, set the roller across both guides and roll. The roller rides on the wood, so it cannot squash the clay any thinner than the guides are thick.
Tip: Roll on a ceramic tile, or lay down wax paper first. Clay rolled straight onto a bare countertop sticks, and the cut shapes tear when you try to lift them.
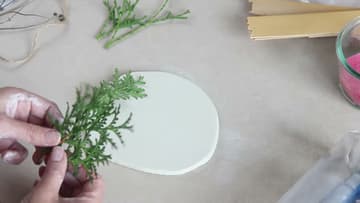
3. Press Evergreen Sprigs Into the Clay
Choose a sprig with a flat spray of needles and lay it on the rolled clay. Press it down with your fingers so it touches all the way along, then roll the bottle over the top once, firmly, in one direction only.
Tip: Roll over the greenery once. Going back and forth shifts the sprig and leaves you with a doubled, blurry print that no amount of smoothing will fix.
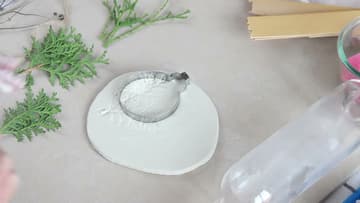
4. Cut the Ornament Shape With a Cookie Cutter
Slide the cutter around over the clay until the part of the pattern you want sits inside it. Working out where to put the cutter is the fiddliest decision in the whole project.
Tip: Nothing is wasted here. A stretched or torn ornament goes back into the ball, gets kneaded and rolled out again, the way pastry scraps do.
5. Stamp a Word Into the Clay With Letter Stamps
Load the letters into the stamper one at a time, reading back to front. JOY goes into the block as Y, O, J.
Tip: Stamp the word before you cut the hanging hole. Pressing down near a hole distorts it, and the tab at the top of the ornament is the thinnest part of the whole thing.
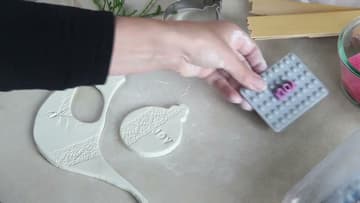
6. Smooth the Cut Edges With a Damp Fingertip
The cutter leaves a slightly ragged lip around the edge. Push a finger into the wet sponge, then run it around the rim of the ornament while the clay is still soft.
Tip: Damp, not wet. Too much water turns the surface to slip and drags the imprint out of the clay along with the dent you were trying to fix.
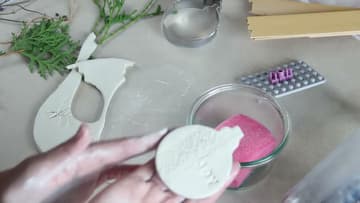
7. Punch the Hanging Hole With a Metal Straw
Stand a metal straw on the tab at the top of the ornament, push it down through the clay and twist it as it goes. The twist shears the plug loose instead of dragging it sideways.
Tip: Leave a couple of millimeters of clay between the hole and the edge. A hole cut too close breaks out while the ornament dries, or the first time you pull twine through it.
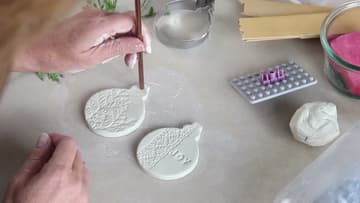
8. Dry the Ornaments Flat, Then Thread Jute Twine and Wooden Beads
Lay the ornaments flat on a rack or a sheet of baking paper, somewhere out of direct heat. They shift from gray to chalky white as the water leaves.
Tip: An ornament curling up at the edges is drying faster on top than underneath. Lay a book on it overnight and it settles back flat.