How to Start a Bullet Journal: A Beginner's Guide

Also in:Crafts

By CraftingStepByStepPublished Updated

Based on a video by Bullet Journal.

The Bullet Journal is an analog system designed to track the past, organize the present, and plan for the future. It was invented by Ryder Carroll, and this short overview comes straight from him on the official Bullet Journal channel. All you need is a notebook and a pen.

The system is fast on purpose. Tasks, events, and notes all get captured with short bulleted sentences (rapid logging), and once a month you migrate open tasks forward, which forces you to ask whether each one is still worth your time. That migration step is what separates a bullet journal from a regular planner. It's the difference between being busy and being productive.

This tutorial walks through the four core modules in the order Ryder sets them up: Index, Future Log, Monthly Log, and Daily Log, plus the rapid logging key and the monthly migration ritual.

Step-by-Step Guide

1

Step 1: Title the Index

0:40
Step 1: Step 1: Title the Index

Open your notebook to the first blank spread. Title both pages as Index. That's it for setup.

The Index is what makes a bullet journal searchable. Anything you add later (a monthly log, a packing list, a project plan) gets a page number and a one-line entry in the Index, so you can find it again in 5 seconds without flipping through every page.

Tip

Reserve the first 2 to 4 pages for the Index even if you only title the first spread today. Indexes fill up faster than you think once you start adding collections.


2

Step 2: Set Up the Future Log

1:05
Step 2: Step 2: Set Up the Future Log

Turn to the next blank spread. Title both pages as Future Log. This is where anything dated more than a month out lives until you're ready to act on it.

For a simple six-month version: count the lines on a page and divide by three. Use a ruler to draw two horizontal lines across the spread, splitting each page into three boxes. Label the six boxes with the next six month names. That gives you 3 months per page, 6 months total.

Tip

Don't overthink the layout. The Future Log is a holding pen for dates and intentions, not a calendar you decorate. Plain boxes with month names work as well as anything fancier.

3

Step 3: Number the Pages and Log to the Index

1:35
Step 3: Step 3: Number the Pages and Log to the Index

Go back and add page numbers to every page you've used so far (most dotted notebooks already have them, but if yours doesn't, write them in the bottom corners).

Now flip back to the Index and add an entry for the Future Log with its page numbers. Example: "Future Log ... 3-4". Every new spread you add from here on gets the same treatment: number the pages, then log it to the Index.

Tip

This habit of indexing as you go is the hidden engine of the system. Skip it for a week and the journal stops being findable.

4

Step 4: Build the Monthly Log Calendar

2:15
Step 4: Step 4: Build the Monthly Log Calendar

Turn to your next blank spread. Write the name of the current month at the top of both pages. The left page is your monthly calendar.

Down the left margin of that page, list every date of the month (1, 2, 3 ... all the way to 30 or 31). Next to each date, add the first letter of the day (M, T, W, T, F, S, S). That gives you a vertical month-at-a-glance you can scan in 2 seconds.

Tip

Use the calendar side for things that already have a date attached: appointments, deadlines, birthdays, travel. Don't fill it with tasks. Tasks go on the right page.

5

Step 5: Write the Monthly Task List

2:45
Step 5: Step 5: Write the Monthly Task List

The right page of the Monthly Log spread is your task list for the month. Write down everything you need to get done in the next 30-ish days.

In front of each task, draw a small dot. That dot is the task bullet, and you'll use it the same way every time you log a task anywhere in the journal. Add page numbers to the spread, then log this month back to the Index.

The Monthly Log gives you a bird's-eye view of everything you need to do this month and exactly how much time you have left to do it.

Tip

Don't try to schedule the tasks yet. The monthly task list is a brain dump. Scheduling happens day by day in the Daily Log.

6

Step 6: Rapid Log Daily Entries

3:20
Step 6: Step 6: Rapid Log Daily Entries

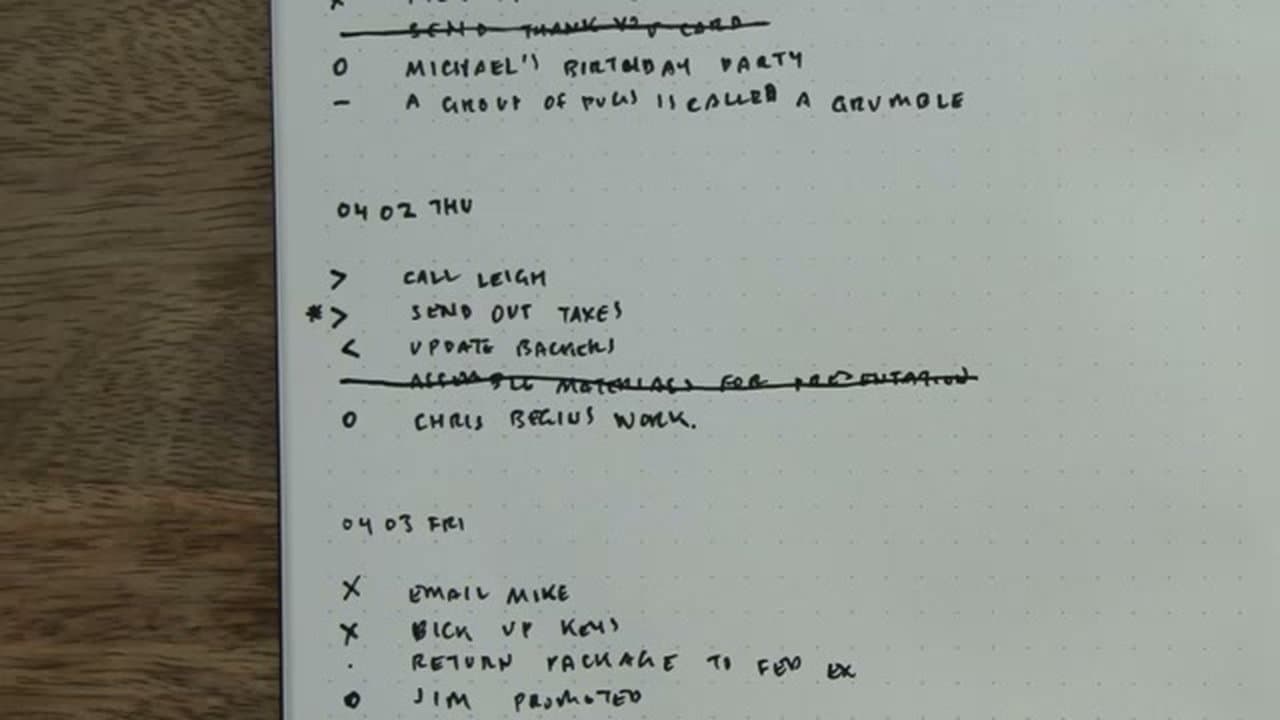
On the next blank page, write today's date at the top. This is your Daily Log. Every entry goes in as a short bulleted sentence using one of three bullets:

  • Task: a solid dot
  • Event: an open circle
  • Note: a short dash

If a task is high priority, draw a small star to the left of its bullet. That star is a signifier, and you can add others later (idea, inspiration, etc.). When you finish a task, X out its dot. Capture as you go - the whole point of rapid logging is that it doesn't slow you down.

Tip

Don't pre-rule the page or count lines. Just date the top and start logging. If a day fills the page, start the next day on the next page. The system flexes around your day, not the other way around.

7

Step 7: Migrate Open Tasks Each Month

3:50
Step 7: Step 7: Migrate Open Tasks Each Month

At the end of each month, set up your next Monthly Log on a fresh spread. Then scan back through the month's daily logs.

For every open task dot, ask one question: is this still worth my time? If yes, and it belongs in the next month, turn the dot into a right arrow and copy the task into the new Monthly Log. If it's months away, turn the dot into a left arrow and copy it into the matching month in the Future Log. If it's no longer worth doing, strike it out completely.

This is migration, and it's the most important habit in the system. Re-writing a task every month is friction on purpose. If a task isn't worth 30 seconds of copying, it isn't worth doing.

Tip

Migration is the difference between a bullet journal and a to-do list that just keeps growing. Don't skip it - it's where the system earns its keep.

Products used in this step

Products Used

☐ The Checklist

How to Start a Bullet Journal: A Beginner's Guide

Tools
3
Materials
2
Steps
7
Video
4 min

Your Guide

Bullet Journal

As an Amazon Associate we earn from qualifying purchases. Links on this page may be affiliate links - clicking them and buying doesn't change your price, but helps support ShowMeStepByStep.

Tags

What's next

Related collections

Curated theme pages that include this tutorial.

Weekly Digest

Liked this scrapbooking tutorial?

Pick the categories you want to hear about. Weekly digest of new step-by-step tutorials. No spam, easy unsubscribe.

Send me tutorials about

We only email about new tutorials. Easy unsubscribe anytime.